Automated migration
Process Overview
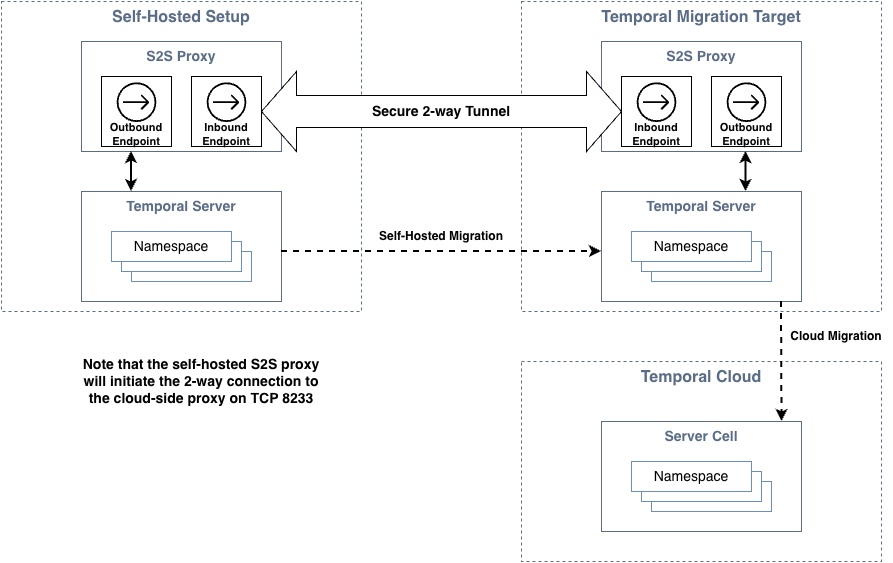
Automated migration is designed to provide a zero-downtime, secure means of migrating to Temporal Cloud. This guide outlines the current process for transitioning Workflows from self-hosted Temporal Server to a namespace hosted within Temporal Cloud.
Namespace migration schedule
When planning a migration it is highly recommended to migrate in the order of least-critical to most-critical Namespace. Ideally, the project will begin with Namespaces designated as "testing", where downtime is an acceptable outcome of the testing process. From there, prioritize migrations based on order of least potential impact.

Project phases
The migration process is separated into several phases, part of which involves coordinating with Temporal to create necessary cloud-side resources.
Migration involves the following phases:
- Prepare - Initial preparation involves collecting and evaluating key data points from the self-hosted clusters. Collected data will be evaluated by Temporal to ensure eligibility for migration.
- Setup - Once eligibility has been verified, configurations for the self-hosted clusters will be modified to support the migration. All cloud-side components will be provisioned and the self-hosted S2S Proxy will be deployed.
- Test - Once all required components are in place, the migration process will be validated using a test Namespace.
- Initiate - At the conclusion of a successful testing process, migration of production Namespaces will begin.
- Finalize - After the Namespace has been transferred to Temporal Cloud and validated, the migration will be finalized.
Please review the additional notes section prior to planning the migration.
Phase 1: Prepare
In preparation for migrating to Temporal Cloud, several data points must be collected and provided to Temporal via support ticket.
Capture cluster configurations
Use one of the following methods to capture the configuration of each cluster.
For server versions above 1.28.1, run the following command against each of your clusters:
temporal operator cluster describe --address <frontend:7233> --output json
For server versions 1.28.1 and prior, use one of the following alternate methods:
tctl --address <frontend:7233> admin cluster describe
or
grpcurl -v -plaintext <your temporal address and port> temporal.server.api.adminservice.v1.AdminService.DescribeCluster
Capture custom search attributes
Temporal must ensure that your custom Search Attributes are compatible with Temporal Cloud. Capture any custom Search Attributes using one of the following commands:
For Elasticsearch/OpenSearch
temporal operator search-attribute list
For SQL
temporal operator search-attribute list --namespace="your_namespace"
Capture Namespace metrics
Metrics are used for cloud-side resource planning. For each Namespace, collect the following:
- Total number of open/closed Workflows
- Total storage used
- Current retention policy. Note that this may differ from the default retention policy in Temporal Cloud.
- Peak action per second (APS). For instructions on collecting these metrics, see Estimate Actions for migration.
When planning an automated migration, share the following estimates with your Temporal account team:
- Peak APS for each Namespace.
- Average APS for each Namespace, if available.
- Fixed-range Action counts, such as total Actions over the last 30 days.
- Representative Workflow Types and their estimated Actions per Workflow Execution.
- Retention Periods and storage estimates.
These estimates help Temporal plan capacity, Namespace limits, and migration timing.
Prepare mTLS certificates
mTLS is used to secure the S2S Proxy communications channel. Provide a single certificate using the process outlined here.
Verify your end-entity certificate with the following command.
openssl verify -CAfile ca.pem client-cert.pem
In the example above, the ca.pem file will be provided to Temporal where the client-cert.pem will be used by your S2S Proxy.
Create Cloud Namespaces
Create your cloud-side Namespaces noting current naming requirements.
Apply any required custom Search Attributes and adjust the rate limits as needed.
Migration cannot proceed into a Namespace that is already in use. Please ensure that these Namespaces remain empty (no Workflows).
If you are new to Temporal Cloud, consider your connectivity path to cloud. You may connect over the public internet or via private connectivity.
Report collected data
Provide all collected data to Temporal via a support ticket.
In your ticket, please provide:
- mTLS certificate - base64 encoded pem file works well for easy submission in the ticket
- cluster configurations - json output for each cluster
- custom search attributes - CLI output for each cluster/Namespace
- Namespace metrics
- cluster/Namespace mappings - use CSV format (see below)
Sample CSV file for reporting cluster/Namespace mappings. Use a separate file for each Temporal Cloud account.
cluster_name, cloud_region, source_namespace, cloud_namespace
cluster1,     us-east-1,    default,          use1.nnnnn
cluster1,     us-east-1,    ns2,              use2.nnnnn
cluster2,     us-central1,  default,          usc1.nnnnn
Phase 2: Setup
Once the migration has been approved, the next step is to prepare both the self-hosted clusters and Temporal Cloud resources for the migration.
Proceed only when your request has been approved by Temporal.
S2S Proxy configuration
The S2S Proxy requires a cloud-side inbound endpoint. Proceed with deployment only after receiving the endpoint from Temporal.
The proxy provides API forwarding over a secure 2-way tunnel to Temporal Cloud. The self-hosted proxy will initiate an outbound connection (TCP 8233) to its cloud-side counterpart and establish the 2-way tunnel. If there are firewalls in-path, ensure that they permit this outbound connection.
Use the following procedure to deploy the proxy:
- Obtain the latest Docker image from the temporalio/s2s-proxy repository.
- Gather the mTLS certs generated in the previous step.
- Deploy 3 replicas of the s2s-proxy (minimum 4 CPU and 512mb memory). For Kubernetes users, use this helm chart example as a reference. See the example configuration file as a reference. Note that the number of replicas must match on both sides of the connection. If your replica count differs from 3, update Temporal with the actual number of replicas so that the same count can be configured on the cloud side.
- Verify that you have included your self-hosted namespaces and their translations in your proxy configuration. Example:
aclPolicy:
  allowedNamespaces:
   - temporal-system
   - namespace1
   - namespace2
   - etc...
namespaceTranslation:
  mappings:
  - local: "namespace1"
    remote: "cloud-namespace1.wxyz"
  - local: "namespace2"
    remote: "cloud-namespace2.wxyz"
  - etc...
- Test access using the command below. It should display the information of the migration server.
temporal operator cluster describe --address {the-outbound-external-address-of-your-proxy}
Once connectivity has been verified, notify Temporal so that connectivity may be validated from the cloud-side proxy.
There are multiple metrics available on the S2S proxy (prometheus endpoint: proxy-pod-ip:9090/metrics). These are helpful for monitoring the overall health of the proxy. In particular, the metric
temporal_s2s_proxy_mux_connection_active
will monitor connectivity to the cloud-side proxy.
Modify cluster configuration
The dynamic configuration of your self-hosted cluster must be modified to facilitate the migration.
Coordinate closely with Temporal for this step of the process.
Adjust the maximum connection keepalive time to match the setting in cloud.
frontend.keepAliveMaxConnectionAge:
  - value: '2h'
If you have previously enabled Global Namespace, the Failover Version Increment must be approved by Temporal. This is critical, since the value may only be set once and cannot change.
If you've never enabled Global Namespace, then you may enable it and set the Initial Failover Version to a unique value in the range of 2-99. Enable by updating the clusterMetadata and the dcRedirectionPolicy.
For server versions 1.22 - 1.23, note this extra required setting.
When complete, restart all Temporal services (frontend, history, matching, worker), starting with the frontend.
dcRedirectionPolicy:
  policy: 'all-apis-forwarding'

clusterMetadata:
enableGlobalNamespace: true # add this
failoverVersionIncrement: CHANGEME # usually 1000000, but coordinate with Temporal. must match cloud-side migration server
masterClusterName: _NO_CHANGE_
currentClusterName: _NO_CHANGE_
clusterInformation:
  _NO_CHANGE_:
    enabled: true
    initialFailoverVersion: CHANGEME # set in the range 2-99. use a unique number per cluster
    rpcName: _NO_CHANGE_
    rpcAddress: _NO_CHANGE_

# for versions 1.22 - 1.23 only
#history.enableReplicationStream:
#  - value: true
After all services have restarted, verify the configuration using:
temporal operator cluster describe
The following sample output is expected:
"failoverVersionIncrement": "1000000",
"initialFailoverVersion": "the number you picked"
"isGlobalNamespaceEnabled": true
Verify current cluster utilization
It is important to ensure that your production cluster has been allocated enough resources to support the migration. In particular, it is important to verify that your persistence/database layer has plenty of CPU and I/O capacity.
Phase 3: Testing
Testing should proceed using either a newly created Namespace or else one that is considered to be non-production. In either case, test Workflows should be utilized. It is ideal to have a mix of completed, active, and new Workflows to use during testing.
Testing uses the following process:
- Create or identify a non-production Namespace that can tolerate data loss in the event of issues.
- Create target cloud-side Namespace and add the Namespace definition to the S2S Proxy configuration.
- Run test Workflows against the Namespace.
- Perform a complete end-to-end migration for the Namespace (see remaining phases for full process).
Testing is considered successful if all data from the self-hosted deployment is migrated to cloud.
Phase 4: Initiate
Review the section on transferring clients before proceeding.
The sections below outline the process for initiating the migration.
Migration start
Temporal will generate the endpoint-id and initiate the migration. During this process, the self-hosted Namespace remains active while the cloud Namespace becomes passive. Workflows are replicated from the self-hosted Namespace to the cloud Namespace. Once the cloud Namespace has fully synced with self-hosted Namespace, migration is ready for handover.
Billing for the cloud Namespace does not begin until the migration is confirmed.
The following command is used to start the migration:
tcld migration start --endpoint-id <endpoint-id> --source-namespace <source-namespace> --target-namespace <target-namespace>
Monitor
During the initial sync, it is important to monitor the overall process to ensure progress is being made. While Temporal will monitor from the cloud-side, progress may also be monitored from the self-hosted side using the replication_stream_stuck metric.
The following command may also be used to monitor the migration progress:
tcld migration get --id <migration-id>
Handover-to-cloud
Once the sync process has completed, Temporal will flip the roles of the self-hosted and cloud Namespace. At this point, the cloud becomes active and the self-hosted Namespace becomes passive. Workflows are then replicated from the cloud to the self-hosted server.
The following command is used to trigger the handover:
tcld migration handover --id <migration-id> --to-replica-id <to-replica-id>
When using this command, replace <to-replica-id> with cloud when handing over to Temporal Cloud. Replace
<to-replica-id> with on-prem when handing back to the self-hosted setup.
Phase 5: Finalize
If you have not done so already, complete the process of transferring clients to the cloud Namespace.
Final validation
Use the following checklist prior to finalizing the migration:
- Confirm that workers can access Namespaces. Either via public internet or private connectivity.
- Understand how to access metrics for your Namespace on Temporal Cloud.
- Monitor general Workflow metrics (schedule to start latency, start v.s. completion rate, sync match rate, etc).
- Learn how capacity management works in Temporal Cloud.
- Plan for a worker tuning session - performance change between Temporal Cloud v.s. self-hosted cluster, which could lead to unexpected symptoms and optimizations.
- Know how to reach out to your Temporal Solutions Architect (SA) and Account Executive (AE) for assistance.
Confirm complete
Once a Namespace has been transferred to the cloud and validated, the migration will be completed. Note that this step is final and may not be undone. Once performed, Workflow replication from the cloud Namespace to the self-hosted server is halted.
The following command is used to confirm the migration:
tcld migration confirm --id <migration-id>
or to abort and roll-back changes without impacting your Workflows, if needed:
tcld migration abort --id <migration-id>
Transfer clients to cloud
There are two options for switching Temporal clients to the cloud.
Option 1 (recommended)
Deploy two sets of Temporal clients: one pointing to your Temporal server and one to the Cloud Namespace endpoint. This is the recommended option since your Workflows will continue to make progress during the handover, even if your cloud Temporal client is unable to access the cloud (due to misconfiguration, for example). The process is as follows:
- Direct your cloud-based Temporal clients to the cloud Namespace endpoint. Initially, these clients will connect and send Poll requests but will not receive any tasks.
- Start migration. Your self-hosted Namespace is active while your cloud Namespace is passive (or standby). Your cloud Temporal clients can begin receiving tasks, but all requests from cloud clients to the Cloud Namespace will automatically forward from the cloud to your self-hosted server.
- Hand over Namespace to the cloud. Your cloud Namespace becomes active and your self-hosted Namespace becomes passive. All requests from your self-hosted Temporal clients will automatically forward from your server to the cloud.
- Complete migration. Your self-hosted Temporal clients will no longer receive any tasks from your server, allowing you to stop these clients.
Option 2
Deploy one set of Temporal clients and switch the Namespace endpoint during migration. With this option, if your workers are misconfigured during the switch, then it is possible that Workflows can stop making progress. It is important to ensure that all workers maintain connectivity to cloud to avoid this scenario. The process is as follows:
- Start migration.
- Switch your Temporal clients to point to the cloud Namespace endpoint. Requests from your Temporal clients will automatically forward from the cloud to your server. Alternatively, you may switch Temporal clients to the cloud Namespace endpoint after handover.
- Hand over Namespace to the cloud. Requests from your Temporal clients will now be served by the cloud and will not be forwarded to your server.
- Confirm migration completion.
Additional notes
Limitations
The following are known limitations.
- OSS server versions 1.22 or newer are required. Refer to the upgrade procedure as needed.
- History shard counts must be a power of two (eg. 512, 1024, etc...).
- If you have multiple self-hosted servers and they are all configured with the same cluster name (by default Temporal
uses 'active' as cluster name), they cannot be connected to a single migration server simultaneously due to cluster
name collision. There are 2 available options:
- Migrate one server at a time using a single migration server.
- Create multiple migration servers (one for each self-hosted server) if you need to migrate all servers simultaneously.
- If you are using multi-cluster replication in your self-hosted setup and have previously failed over Namespaces, then
this may impact your eligibility for automated migration. Specifically, whenever Global Namespace has been previously
enabled the following restrictions apply:
- Initial Failover Version must be less than or equal to 1,000,000
- Failover Version Increment must be a divisor of 1,000,000 (eg. 10)
- OSS supports cross-Namespace commands (e.g., parent-child, SignalExternal, CancelExternal) through the
system.enableCrossNamespaceCommandsconfiguration. This configuration is disabled on Temporal Cloud. Thesystem.enableCrossNamespaceCommandsconfiguration must be disabled, and code using cross-Namespace calls must be updated or removed prior to migration.
Special dynamic configuration for Version 1.22.x-1.23.x
Temporal versions 1.22.x and 1.23.x include support for stream-based replication, but it is disabled by default. Since those releases, stream-based replication has been validated as more reliable than the poll-based replication that remained the default in 1.22 and 1.23.
When preparing for an S2C migration on these versions, configure the following dynamic settings to enable stream-based replication:
history.enableReplicationStream:
  - value: true
Enabling this configuration will require a restart of your history pods.
Frequently asked questions
How many Temporal Cloud accounts do I need?
If you are new to Temporal Cloud, then the most common recommendation is to create a single Account that contains your Namespaces.
When should I opt for auto migration?
The answer depends on your specific situation. However, automated migration is most likely to help if any of the following apply to you:
- When safe transfer of workers is a concern - automated migration allows workers to run against both self-hosted and cloud environments simultaneously, allowing a gradual and lower-risk transition.
- When there are a high number of long-running Workflows.
- When there is a need to migrate closed Workflows.
- When there is a need to migrate Schedules.
In contrast, automated migration may not be the best solution if your self-hosted clusters do not meet the minimum requirements.
Can I split Workflows from a single source Namespace into multiple cloud-side Namespaces?
No. All Workflows will be migrated.
Can I combine manual and auto migration?
No. Auto migration requires a "fresh" target cloud-side Namespace (one that has never had a running Workflow). If Workflows were manually migrated to a cloud-side Namespace, then this Namespace would not be suitable as an auto-migration target.
Why does it matter if custom search attributes are used?
Custom search attributes must be mapped to a Namespace in Temporal Cloud. They matter because configurations in a self-hosted environment may not be directly compatible with Temporal Cloud, potentially requiring additional migration work. The exact process can also differ depending on the type of visibility data store used.
What Workflows are migrated by default?
All Workflows are migrated by default. For closed Workflows, you may specify a date range to be migrated. Your cloud-side Namespace must be configured with your desired retention period prior to starting the migration.
What can I do to speed up an automated migration?
The #1 speed optimization is to limit the time range for closed Workflows. This will reduce the amount of data required to be migrated and in many cases will dramatically reduce overall migration time.
Is the migration of Schedules supported?
Yes. Under the hood, Schedules are essentially Workflows.
I have a long retention period for my Workflows. Is this compatible with Temporal Cloud?
Occasionally, self-hosted retention periods are in excess of what is supported in Temporal Cloud. In these cases it is recommended to utilize archival to store closed Workflows that cannot be migrated. In general, archival is recommended over large retention periods since the extra data can stress the persistence layer of the system.
I am using payload encryption in my self-hosted Temporal cluster. Is this supported in cloud?
Yes. If payloads are already encrypted in your self-hosted server via data converter, then they will remain encrypted during and after migration.
I would like to enable payload encryption as part of the migration. Is this supported?
The automated migration tooling cannot add payload encryption. To encrypt payloads sent to Temporal Cloud, you must encrypt payloads in your cluster before starting the automated migration process.