Temporal Nexus - .NET SDK feature guide
Temporal .NET SDK support for Nexus is in Public Preview.
Use Temporal Nexus to connect Temporal Applications within and across Namespaces using a Nexus Endpoint, a Nexus Service contract, and Nexus Operations.
This page shows how to do the following:
- Run a development Temporal Service with Nexus enabled
- Create caller and handler Namespaces
- Create a Nexus Endpoint to route requests from caller to handler
- Define the Nexus Service contract
- Develop a Nexus Service and Operation handlers
- Develop a caller Workflow that uses a Nexus Service
- Make Nexus calls across Namespaces with a development Server
- Make Nexus calls across Namespaces in Temporal Cloud
This documentation uses source code derived from the .NET Nexus sample.
Run the Temporal Development Server with Nexus enabled
Prerequisites:
- Install the latest Temporal CLI (v1.3.0 or higher recommended)
- Install the latest Temporal .NET SDK (v1.9.0 or higher)
The first step in working with Temporal Nexus involves starting a Temporal server with Nexus enabled.
temporal server start-dev
This command automatically starts the Temporal development server with the Web UI, and creates the default Namespace. It uses an in-memory database, so do not use it for real use cases.
The Temporal Web UI should now be accessible at http://localhost:8233, and the Temporal Server should now be available for client connections on localhost:7233.
Create caller and handler Namespaces
Before setting up Nexus endpoints, create separate Namespaces for the caller and handler.
temporal operator namespace create --namespace nexus-simple-handler-namespace
temporal operator namespace create --namespace nexus-simple-caller-namespace
nexus-simple-handler-namespace will contain the Nexus Operation handler, and we will use a Workflow in nexus-simple-caller-namespace to call that Operation handler.
We use different namespaces to demonstrate cross-Namespace Nexus calls.
Create a Nexus Endpoint to route requests from caller to handler
After establishing caller and handler Namespaces, the next step is to create a Nexus Endpoint to route requests.
temporal operator nexus endpoint create \
  --name nexus-simple-endpoint \
  --target-namespace nexus-simple-handler-namespace \
  --target-task-queue nexus-simple-handler-sample
You can also use the Web UI to create the Namespaces and Nexus endpoint.
Define the Nexus Service contract
Defining a clear contract for the Nexus Service is crucial for smooth communication.
In this example, there is a service package that describes the Service and Operation names along with input/output types for caller Workflows to use the Nexus Endpoint.
Each Temporal SDK includes and uses a default Data Converter. The default data converter encodes payloads in the following order: Null, Byte array, Protobuf JSON, and JSON. In a polyglot environment, that is where more than one language and SDK is being used to develop a Temporal solution, Protobuf and JSON are common choices. This example uses .NET classes serialized into JSON.
using NexusRpc;

[NexusService]
public interface IHelloService
{
    static readonly string EndpointName = "nexus-simple-endpoint";

    [NexusOperation]
    EchoOutput Echo(EchoInput input);

    [NexusOperation]
    HelloOutput SayHello(HelloInput input);

    public record EchoInput(string Message);

    public record EchoOutput(string Message);

    public record HelloInput(string Name, HelloLanguage Language);

    public record HelloOutput(string Message);

    public enum HelloLanguage
    {
        En,
        Fr,
        De,
        Es,
        Tr,
    }
}
Develop a Nexus Service and Operation handlers
Nexus Operation handlers are typically defined in the same Worker as the underlying Temporal primitives they abstract. Operation handlers can decide if a given Nexus Operation will be synchronous or asynchronous. They can invoke underlying Temporal primitives such as a Query, Signal, or Update using the Temporal SDK Client, or run other reliable code. Handlers should be reliable since the circuit breaker trips after 5 consecutive retryable errors, blocking all Operations from the caller to that Endpoint.
The Temporalio.Nexus namespace has utilities to help create Nexus Operations:
NexusOperationExecutionContext.Current.TemporalClient- Get the Temporal Client that the Worker was initialized with for synchronous handlers backed by Temporal primitives such as Signals and QueriesWorkflowRunOperationHandler.FromHandleFactory- Run a Workflow as an asynchronous Nexus Operation
This example starts with a sync Operation handler example using the OperationHandler.Sync method, and then shows how to create an async Operation handler that uses WorkflowRunOperationHandler.FromHandleFactory to start a handler Workflow from a Nexus Operation.
Develop a Synchronous Nexus Operation handler
The OperationHandler.Sync method is for exposing simple RPC handlers.
Use NexusOperationExecutionContext.Current.TemporalClient to get the Temporal Client for signaling, querying, and listing Workflows.
Implementations can also make other calls, but handlers should be reliable to avoid tripping the circuit breaker.
NexusSimple/Handler/HelloService.cs
using NexusRpc.Handlers;

[NexusServiceHandler(typeof(IHelloService))]
public class HelloService
{
    [NexusOperationHandler]
    public IOperationHandler<IHelloService.EchoInput, IHelloService.EchoOutput> Echo() =>
        // This Nexus service operation is a simple sync handler
        OperationHandler.Sync<IHelloService.EchoInput, IHelloService.EchoOutput>(
            (ctx, input) => new(input.Message));

    // ...
}
Use the Temporal Client for Signals, Queries, and Updates
A common pattern is to use the Temporal Client from within a sync handler to Signal, Query, or Update a Workflow. You can also use Signal-With-Start or Update-With-Start to ensure the Workflow is started and send it a Signal or Update. All calls must complete within the Nexus request timeout. Updates should be short-lived to stay within this deadline.
Develop an Asynchronous Nexus Operation handler to start a Workflow
Use the WorkflowRunOperationHandler.FromHandleFactory method, which is the easiest way to expose a Workflow as an operation.
NexusSimple/Handler/HelloService.cs
using NexusRpc.Handlers;
using Temporalio.Nexus;

[NexusServiceHandler(typeof(IHelloService))]
public class HelloService
{
    // ...

    [NexusOperationHandler]
    public IOperationHandler<IHelloService.HelloInput, IHelloService.HelloOutput> SayHello() =>
        // This Nexus service operation is backed by a workflow run
        WorkflowRunOperationHandler.FromHandleFactory(
            (WorkflowRunOperationContext context, IHelloService.HelloInput input) =>
                context.StartWorkflowAsync(
                    (HelloHandlerWorkflow wf) => wf.RunAsync(input),
                    // Workflow IDs should typically be business meaningful IDs and are used to
                    // dedupe workflow starts. For this example, we're using the request ID
                    // allocated by Temporal when the caller workflow schedules the operation,
                    // this ID is guaranteed to be stable across retries of this operation.
                    new() { Id = context.HandlerContext.RequestId }));
}
Workflow IDs should typically be business-meaningful IDs and are used to dedupe Workflow starts. In general, the ID should be passed in the Operation input as part of the Nexus Service contract.
Attach multiple Nexus callers to a handler Workflow with a Conflict-Policy of Use-Existing.
Map a Nexus Operation input to multiple Workflow arguments
A Nexus Operation can only take one input parameter. If you want a Nexus Operation to start a Workflow that takes multiple arguments, simply pass in different arguments using RunAsync.
NexusMultiArg/Handler/HelloService.cs
[NexusServiceHandler(typeof(IHelloService))]
public class HelloService
{
    [NexusOperationHandler]
    public IOperationHandler<IHelloService.HelloInput, IHelloService.HelloOutput> SayHello() =>
        // This Nexus service operation is backed by a workflow run. For this sample, we are
        // altering the parameters to the workflow (in this case expanding to two parameters).
        WorkflowRunOperationHandler.FromHandleFactory(
            (WorkflowRunOperationContext context, IHelloService.HelloInput input) =>
                context.StartWorkflowAsync(
                    (HelloHandlerWorkflow wf) => wf.RunAsync(input.Language, input.Name),
                    // Workflow IDs should typically be business meaningful IDs and are used to
                    // dedupe workflow starts. For this example, we're using the request ID
                    // allocated by Temporal when the caller workflow schedules the operation,
                    // this ID is guaranteed to be stable across retries of this operation.
                    new() { Id = context.HandlerContext.RequestId }));
}
Register a Nexus Service in a Worker
After developing an asynchronous Nexus Operation handler to start a Workflow, the next step is to register a Nexus Service in a Worker.
async Task RunHandlerWorkerAsync()
{
    // Run worker until cancelled
    logger.LogInformation("Running handler worker");
    using var worker = new TemporalWorker(
        await ConnectClientAsync("nexus-simple-handler-namespace"),
        new TemporalWorkerOptions(taskQueue: "nexus-simple-handler-sample").
            AddNexusService(new HelloService()).
            AddWorkflow<HelloHandlerWorkflow>());
    try
    {
        await worker.ExecuteAsync(tokenSource.Token);
    }
    catch (OperationCanceledException)
    {
        logger.LogInformation("Handler worker cancelled");
    }
}
Develop a caller Workflow that uses the Nexus Service
Import the Service API package that has the necessary service and operation names and input/output types to execute a Nexus Operation from the caller Workflow:
NexusSimple/Caller/EchoCallerWorkflow.workflow.cs
using Temporalio.Workflows;

[Workflow]
public class EchoCallerWorkflow
{
    [WorkflowRun]
    public async Task<string> RunAsync(string message)
    {
        var output = await Workflow.CreateNexusWorkflowClient<IHelloService>(IHelloService.EndpointName).
            ExecuteNexusOperationAsync(svc => svc.Echo(new(message)));
        return output.Message;
    }
}
NexusSimple/Caller/HelloCallerWorkflow.workflow.cs
using Temporalio.Workflows;

[Workflow]
public class HelloCallerWorkflow
{
    [WorkflowRun]
    public async Task<string> RunAsync(string name, IHelloService.HelloLanguage language)
    {
        var output = await Workflow.CreateNexusWorkflowClient<IHelloService>(IHelloService.EndpointName).
            ExecuteNexusOperationAsync(svc => svc.SayHello(new(name, language)));
        return output.Message;
    }
}
Set Nexus Operation timeouts
Nexus Operations support three types of timeouts that control how long the caller is willing to wait at different stages of the Operation lifecycle.
Set these timeouts in NexusWorkflowOperationOptions when calling ExecuteNexusOperationAsync.
Schedule-to-Close timeout
The Schedule-to-Close timeout limits the total duration of the Operation from when it is scheduled to when it completes. The Nexus Machinery automatically retries failed requests until this timeout is exceeded.
var output = await Workflow.CreateNexusWorkflowClient<IHelloService>(IHelloService.EndpointName).
    ExecuteNexusOperationAsync(svc => svc.SayHello(new(name, language)), new NexusWorkflowOperationOptions
    {
        ScheduleToCloseTimeout = TimeSpan.FromMinutes(10),
    });
Schedule-to-Start timeout
The Schedule-to-Start timeout limits how long the caller will wait for the Operation to be started by the handler. If not set, no Schedule-to-Start timeout is enforced.
var output = await Workflow.CreateNexusWorkflowClient<IHelloService>(IHelloService.EndpointName).
    ExecuteNexusOperationAsync(svc => svc.SayHello(new(name, language)), new NexusWorkflowOperationOptions
    {
        ScheduleToStartTimeout = TimeSpan.FromMinutes(2),
    });
Start-to-Close timeout
The Start-to-Close timeout limits how long the caller will wait for an asynchronous Operation to complete after it has been started. This timeout only applies to asynchronous Operations. If not set, no Start-to-Close timeout is enforced.
var output = await Workflow.CreateNexusWorkflowClient<IHelloService>(IHelloService.EndpointName).
    ExecuteNexusOperationAsync(svc => svc.SayHello(new(name, language)), new NexusWorkflowOperationOptions
    {
        StartToCloseTimeout = TimeSpan.FromMinutes(5),
    });
Register the caller Workflow in a Worker
After developing the caller Workflow, the next step is to register it with a Worker.
async Task RunCallerWorkerAsync()
{
    // Run worker until cancelled
    logger.LogInformation("Running caller worker");
    using var worker = new TemporalWorker(
        await ConnectClientAsync("nexus-simple-caller-namespace"),
        new TemporalWorkerOptions(taskQueue: "nexus-simple-caller-sample").
            AddWorkflow<EchoCallerWorkflow>().
            AddWorkflow<HelloCallerWorkflow>());
    try
    {
        await worker.ExecuteAsync(tokenSource.Token);
    }
    catch (OperationCanceledException)
    {
        logger.LogInformation("Caller worker cancelled");
    }
}
Develop a starter to start the caller Workflow
To initiate the caller Workflow, a starter program is used.
async Task ExecuteCallerWorkflowAsync()
{
    logger.LogInformation("Executing caller echo workflow");
    var client = await ConnectClientAsync("nexus-simple-caller-namespace");
    var result1 = await client.ExecuteWorkflowAsync(
        (EchoCallerWorkflow wf) => wf.RunAsync("Nexus Echo 👋"),
        new(id: "nexus-simple-echo-id", taskQueue: "nexus-simple-caller-sample"));
    logger.LogInformation("Workflow result: {Result}", result1);

    logger.LogInformation("Executing caller hello workflow");
    var result2 = await client.ExecuteWorkflowAsync(
        (HelloCallerWorkflow wf) => wf.RunAsync("Temporal", IHelloService.HelloLanguage.Es),
        new(id: "nexus-simple-hello-id", taskQueue: "nexus-simple-caller-sample"));
    logger.LogInformation("Workflow result: {Result}", result2);
}
Make Nexus calls across Namespaces with a development Server
Follow the steps below to run the Nexus handler Worker, the Nexus caller Worker, and the starter app.
Run Workers connected to a local development server
Run the Nexus handler Worker:
dotnet run handler-worker
In another terminal window, run the Nexus caller Worker:
dotnet run caller-worker
Start a caller Workflow
With the Workers running, the final step in the local development process is to start a caller Workflow.
Run the starter:
dotnet run caller-workflow
This will show the two workflows started and their results.
Canceling a Nexus Operation
To cancel a Nexus Operation from within a Workflow, cancel the cancellation token passed to the operation call. Only asynchronous operations can be canceled in Nexus, since cancellation is sent using an operation token. The Workflow or other resources backing the operation may choose to ignore the cancellation request. If ignored, the operation may enter a terminal state.
When a Nexus operation is started, the caller can specify different cancellation types that control how the caller reacts to cancellation:
Abandon- Do not request cancellation of the operation.TryCancel- Initiate a cancellation request and immediately report cancellation to the caller. Note that this type doesn't guarantee that cancellation is delivered to the operation handler if the caller exits before the delivery is done.WaitCancellationRequested- Request cancellation of the operation and wait for confirmation that the request was received. Doesn't wait for actual cancellation.WaitCancellationCompleted- Wait for operation completion. Operation may or may not complete as cancelled.
The default is WaitCancellationCompleted. Users can set a different option for CancellationType in NexusWorkflowOperationOptions when starting an operation.
Once the caller Workflow completes, the caller's Nexus Machinery will not make any further attempts to cancel operations that are still running. It's okay to leave operations running in some use cases. To ensure cancellations are delivered, wait for all pending operations to finish before exiting the Workflow.
See the Nexus cancellation sample for reference.
Make Nexus calls across Namespaces in Temporal Cloud
This section assumes you are already familiar with how to connect a Worker to Temporal Cloud.
The tcld CLI is used to create Namespaces and the Nexus Endpoint, and mTLS client certificates will be used to securely connect the caller and handler Workers to their respective Temporal Cloud Namespaces.
Install the latest tcld CLI and generate certificates
To install the latest version of the tcld CLI, run the following command (on MacOS):
brew install temporalio/brew/tcld
If you don't already have certificates, you can generate them for mTLS Worker authentication using the command below:
tcld gen ca --org $YOUR_ORG_NAME --validity-period 1y --ca-cert ca.pem --ca-key ca.key
These certificates will be valid for one year.
Create caller and handler Namespaces
Before deploying to Temporal Cloud, ensure that the appropriate Namespaces are created for both the caller and handler. If you already have these Namespaces, you don't need to do this.
tcld login

tcld namespace create \
  --namespace <your-caller-namespace> \
  --region us-west-2 \
  --ca-certificate-file 'path/to/your/ca.pem' \
  --retention-days 1

tcld namespace create \
  --namespace <your-target-namespace> \
  --region us-west-2 \
  --ca-certificate-file 'path/to/your/ca.pem' \
  --retention-days 1
Alternatively, you can create Namespaces through the UI: https://cloud.temporal.io/Namespaces.
Create a Nexus Endpoint to route requests from caller to handler
To create a Nexus Endpoint you must have a Developer account role or higher, and have NamespaceAdmin permission on the --target-namespace.
tcld nexus endpoint create \
  --name nexus-simple-endpoint \
  --target-task-queue nexus-simple-handler-sample \
  --target-namespace <your-handler-namespace.account> \
  --allow-namespace <your-caller-namespace.account> \
  --description-file endpoint_description.md
The --allow-namespace is used to build an Endpoint allowlist of caller Namespaces that can use the Nexus Endpoint, as described in Runtime Access Control.
Alternatively, you can create a Nexus Endpoint through the UI: https://cloud.temporal.io/nexus.
Observability
Web UI
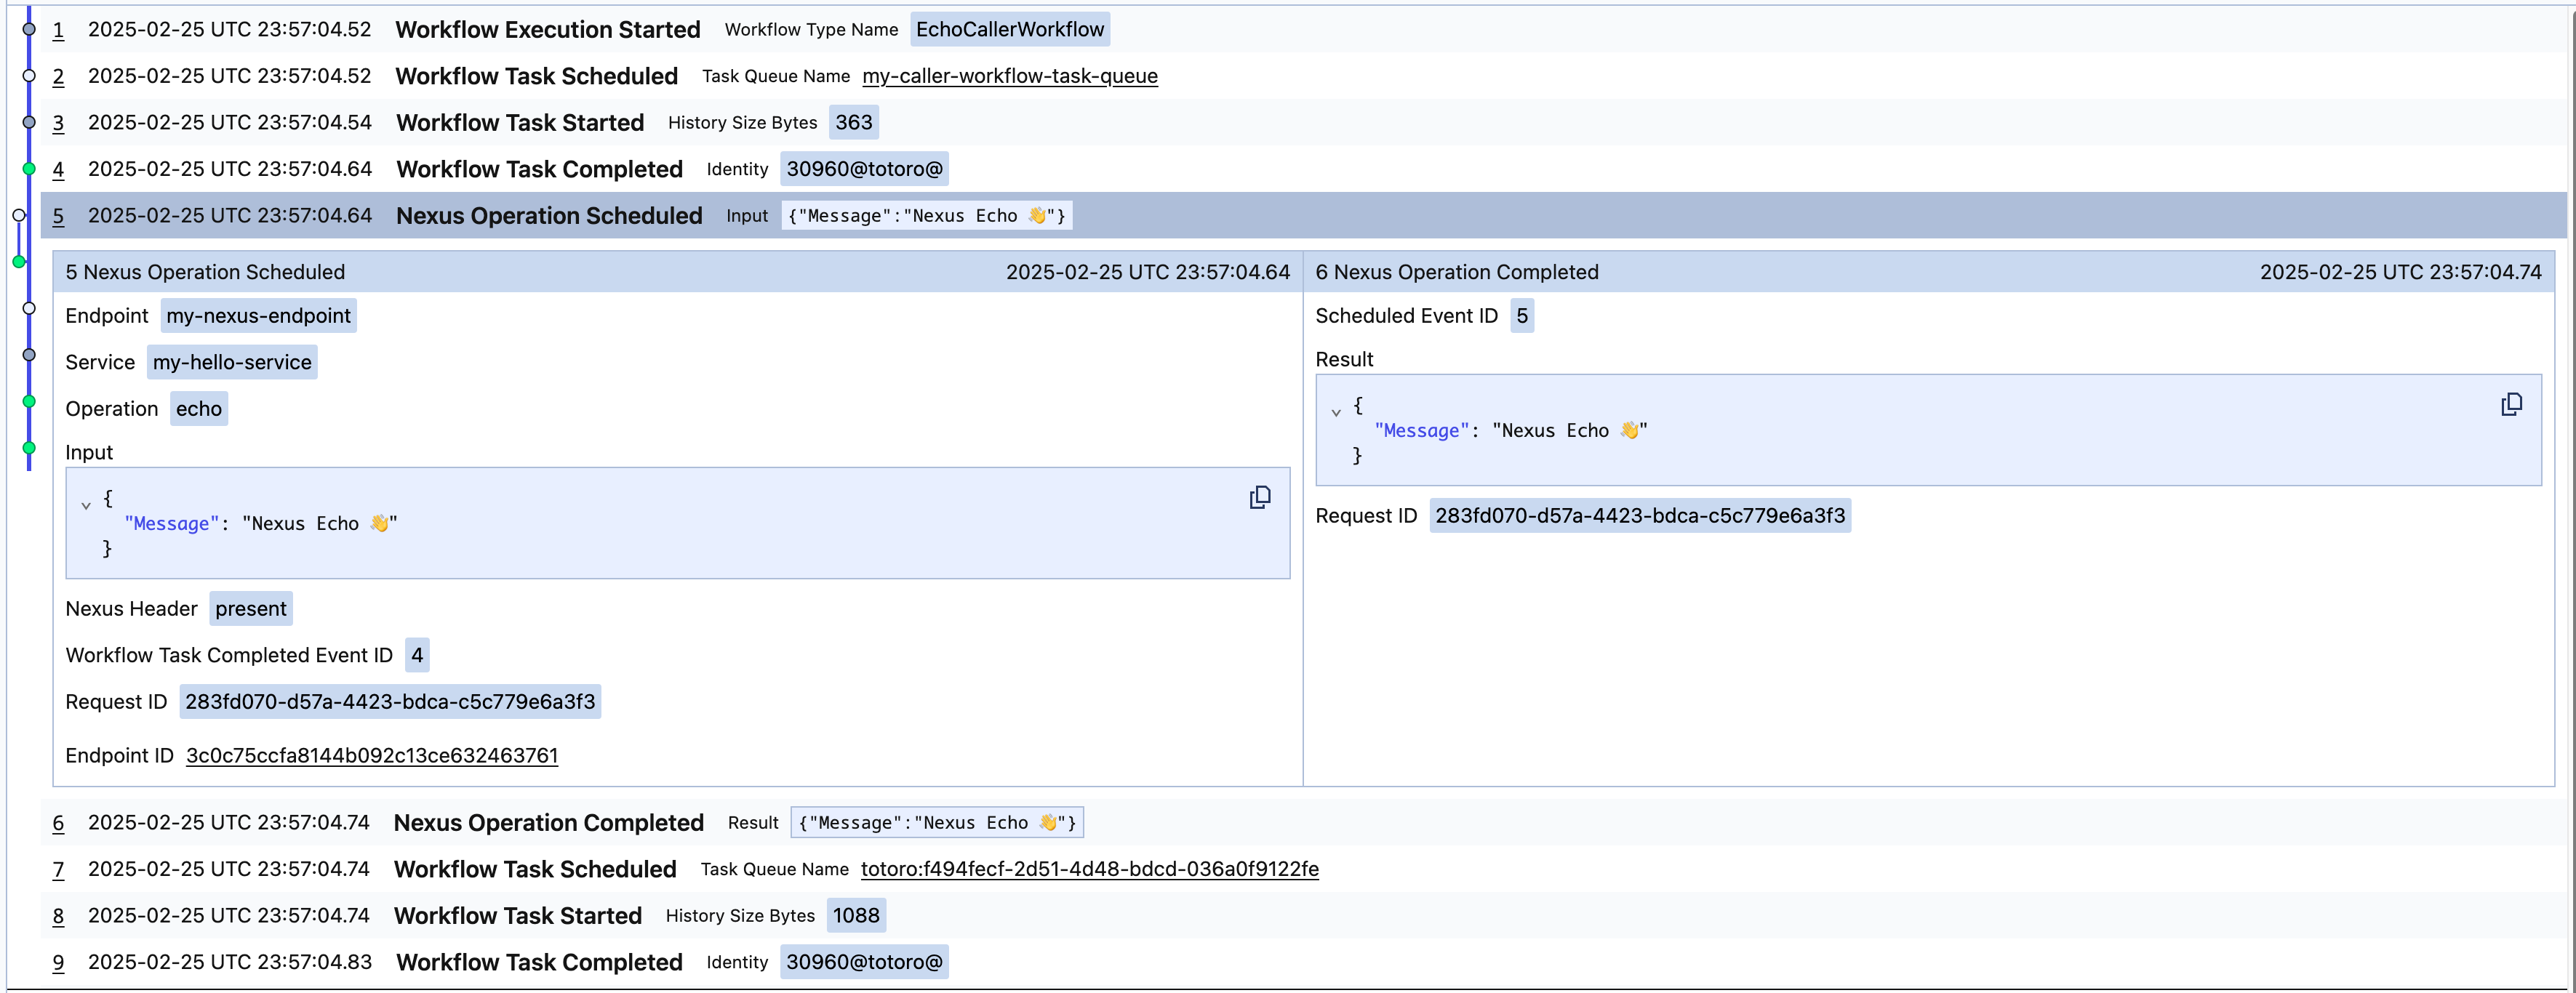
A synchronous Nexus Operation will surface in the caller Workflow as follows, with just NexusOperationScheduled and NexusOperationCompleted events in the caller's Workflow history:
Observability Sync
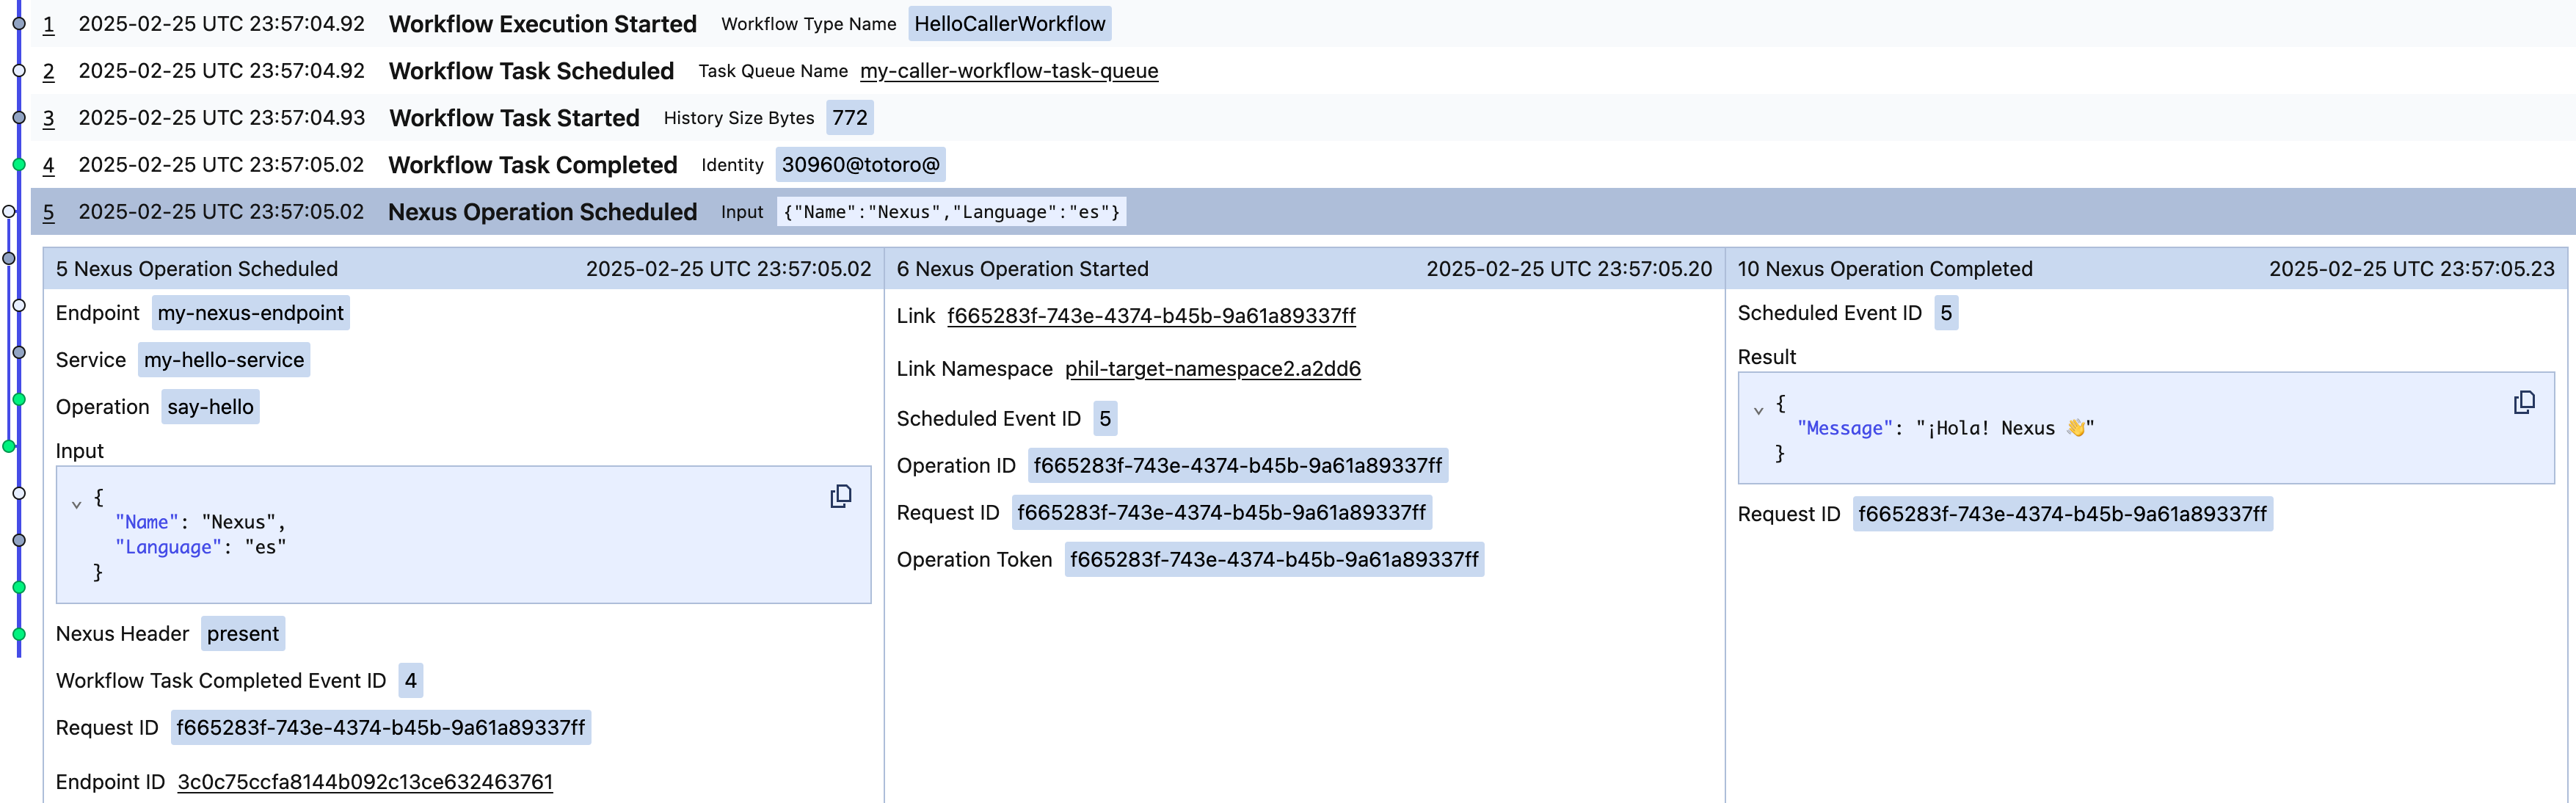
An asynchronous Nexus Operation will surface in the caller Workflow as follows, with NexusOperationScheduled, NexusOperationStarted, and NexusOperationCompleted, in the caller's Workflow history:
Observability Async
Temporal CLI
Use the workflow describe command to show pending Nexus Operations in the caller Workflow and any attached callbacks on the handler Workflow:
temporal workflow describe -w <ID>
Nexus events are included in the caller's Workflow history:
temporal workflow show -w <ID>
For asynchronous Nexus Operations the following are reported in the caller's history:
NexusOperationScheduledNexusOperationStartedNexusOperationCompleted
For synchronous Nexus Operations the following are reported in the caller's history:
NexusOperationScheduledNexusOperationCompleted
NexusOperationStarted isn't reported in the caller's history for synchronous operations.
Learn more
- Read the high-level description of the Temporal Nexus feature and watch the Nexus keynote and demo.
- Learn how Nexus works in the Nexus deep dive talk and Encyclopedia.
- Deploy Nexus Endpoints in production with Temporal Cloud.