Temporal Client - Ruby SDK
A Temporal Client enables you to communicate with the Temporal Service. Communication with a Temporal Service lets you perform actions such as starting Workflow Executions, sending Signals and Queries to Workflow Executions, getting Workflow results, and more.
For Standalone Activities, a Temporal Client can also start and manage Standalone Activities directly, without involving a Workflow.
This page shows you how to do the following using the Ruby SDK with the Temporal Client:
- Connect to a local development Temporal Service
- Connect to Temporal Cloud
- Start a Workflow Execution
- Get Workflow results
A Temporal Client cannot be initialized and used inside a Workflow. However, it is acceptable and common to use a Temporal Client inside an Activity to communicate with a Temporal Service.
Connect to development Temporal Service
Use Client.connect to create a client.
Connection options include the Temporal Server address, Namespace, and (optionally) TLS configuration. You can provide
these options directly in code, load them from environment variables, or a TOML configuration file using the
EnvConfig helpers. We recommend environment variables or a
configuration file for secure, repeatable configuration.
When you’re running a Temporal Service locally (such as with the
Temporal CLI dev server), the required options are minimal. If you
don't specify a host/port, most connections default to 127.0.0.1:7233 and the default Namespace.
- Configuration File
- Environment Variables
- Code
You can use a TOML configuration file to set connection options for the Temporal Client. The configuration file lets you
configure multiple profiles, each with its own set of connection options. You can then specify which profile to use when
creating the Temporal Client. You can use the environment variable TEMPORAL_CONFIG_FILE to specify the location of the
TOML file or provide the path to the file directly in code. If you don't provide the configuration file path, the SDK
looks for it at the path ~/.config/temporalio/temporal.toml or the equivalent on your OS. Refer to
Environment Configuration for more details about configuration
files and profiles.
The connection options set in configuration files have lower precedence than environment variables. This means that if you set the same option in both the configuration file and as an environment variable, the environment variable value overrides the option set in the configuration file.
For example, the following TOML configuration file defines two profiles: default and prod. Each profile has its own
set of connection options.
# Default profile for local development
[profile.default]
address = "localhost:7233"
namespace = "default"

# Optional: Add custom gRPC headers
[profile.default.grpc_meta]
my-custom-header = "development-value"
trace-id = "dev-trace-123"

# Production profile for Temporal Cloud
[profile.prod]
address = "your-namespace.a1b2c.tmprl.cloud:7233"
namespace = "your-namespace"
api_key = "your-api-key-here"

# TLS configuration for production
[profile.prod.tls]
# TLS auto-enables when TLS config or an API key is present
# disabled = false
client_cert_path = "/etc/temporal/certs/client.pem"
client_key_path  = "/etc/temporal/certs/client.key"

# Custom headers for production
[profile.prod.grpc_meta]
environment     = "production"
service-version = "v1.2.3"
You can create a Temporal Client using a profile from the configuration file using the
ClientConfig.load_client_connect_options function as follows. In this example, you load the default profile for
local development:
require 'temporalio/client'
require 'temporalio/env_config'

def main
  puts '--- Loading default profile from config.toml ---'

  # For this sample to be self-contained, we explicitly provide the path to
  # the config.toml file included in this directory.
  # By default though, the config.toml file will be loaded from
  # ~/.config/temporalio/temporal.toml (or the equivalent standard config directory on your OS).
  config_file = File.join(__dir__, 'config.toml')

  # load_client_connect_options is a helper that loads a profile and prepares
  # the configuration for Client.connect. By default, it loads the
  # "default" profile.
  args, kwargs = Temporalio::EnvConfig::ClientConfig.load_client_connect_options(
    config_source: Pathname.new(config_file)
  )

  puts "Loaded 'default' profile from #{config_file}."
  puts "  Address: #{args[0]}"
  puts "  Namespace: #{args[1]}"
  puts "  gRPC Metadata: #{kwargs[:rpc_metadata]}"

  puts "\nAttempting to connect to client..."
  begin
    client = Temporalio::Client.connect(*args, **kwargs)
    puts '✅ Client connected successfully!'
    sys_info = client.workflow_service.get_system_info(Temporalio::Api::WorkflowService::V1::GetSystemInfoRequest.new)
    puts "✅ Successfully verified connection to Temporal server!\n#{sys_info}"
  rescue StandardError => e
    puts "❌ Failed to connect: #{e}"
  end
end

main if $PROGRAM_NAME == __FILE__
Use the EnvConfig package to set connection options for the Temporal Client using environment variables. For a list of
all available environment variables and their default values, refer to
Environment Configuration.
For example, the following code snippet loads all environment variables and creates a Temporal Client with the options
specified in those variables. If you have defined a configuration file at either the default location
(~/.config/temporalio/temporal.toml) or a custom location specified by the TEMPORAL_CONFIG_FILE environment
variable, this will also load the default profile in the configuration file. However, any options set via environment
variables will take precedence.
Set the following environment variables before running your application. Replace the placeholder values with your actual
configuration. Since this is for a local development Temporal Service, the values connect to localhost:7233 and the
default Namespace. You may omit these variables entirely since they're the defaults.
export TEMPORAL_NAMESPACE="default"
export TEMPORAL_ADDRESS="localhost:7233"
After setting the environment variables, you can create a Temporal Client as follows:
require 'temporalio/client'
require 'temporalio/env_config'

def main
  # load_client_connect_options is a helper that loads a profile and prepares
  # the configuration for Client.connect. By default, it loads the
  # "default" profile and also reads from environment variables. The environment
  # variables take precedence over the config file.
  args, kwargs = Temporalio::EnvConfig::ClientConfig.load_client_connect_options()

  puts "  Address: #{args[0]}"
  puts "  Namespace: #{args[1]}"
  puts "  gRPC Metadata: #{kwargs[:rpc_metadata]}"

  puts "\nAttempting to connect to client..."
  begin
    client = Temporalio::Client.connect(*args, **kwargs)
    puts '✅ Client connected successfully!'
    sys_info = client.workflow_service.get_system_info(Temporalio::Api::WorkflowService::V1::GetSystemInfoRequest.new)
    puts "✅ Successfully verified connection to Temporal server!\n#{sys_info}"
  rescue StandardError => e
    puts "❌ Failed to connect: #{e}"
  end
end

main if $PROGRAM_NAME == __FILE__
If you don't want to use environment variables or a configuration file, you can specify connection options directly in code. This is convenient for local development and testing. You can also load a base configuration from environment variables or a configuration file, and then override specific options in code.
Use the connect class method on the Temporalio::Client class to create and connect to a Temporal Client to the
Temporal Service.
client = Temporalio::Client.connect('localhost:7233', 'default')
Connect to Temporal Cloud
You can connect to Temporal Cloud using either an API key or through mTLS. Connection to Temporal Cloud or any secured Temporal Service requires additional connection options compared to connecting to an unsecured local development instance:
- Your credentials for authentication.
- If you are using an API key, provide the API key value.
- If you are using mTLS, provide the mTLS CA certificate and mTLS private key.
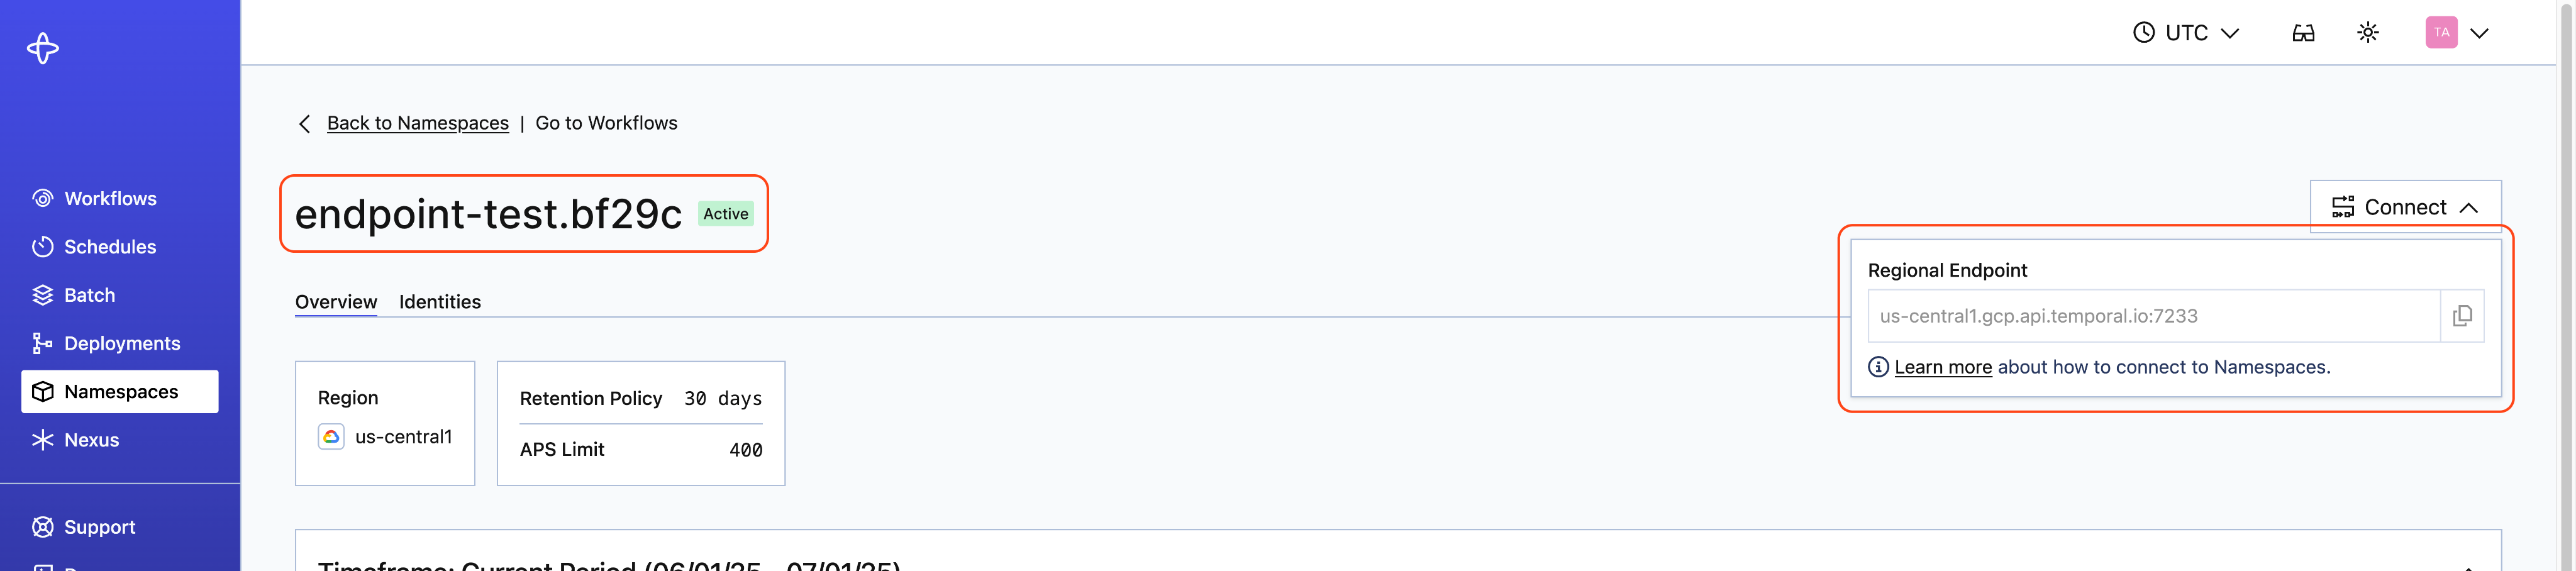
- Your Namespace and Account ID combination, which follows the format
<namespace_id>.<account_id>. - The recommended endpoint is the gRPC Namespace endpoint:
<namespace>.<account>.tmprl.cloud:7233. This endpoint works for all Namespaces and automatically directs traffic to the active region for Namespaces with High Availability. See accessing Namespaces for more information on endpoint options.
You can find the Namespace and Account ID, as well as the endpoint, on the Namespaces tab:
For more information about managing and generating client certificates for Temporal Cloud, see How to manage certificates in Temporal Cloud.
You can provide these connection options using environment variables, a configuration file, or directly in code.
- Configuration File
- Environment Variables
- Code
You can use a TOML configuration file to set connection options for the Temporal Client. The configuration file lets you configure multiple profiles, each with its own set of connection options. You can then specify which profile to use when creating the Temporal Client. For a list of all available configuration options you can set in the TOML file, refer to Environment Configuration.
You can use the environment variable TEMPORAL_CONFIG_FILE to specify the location of the TOML file or provide the path
to the file directly in code. If you don't provide the path to the configuration file, the SDK looks for it at the
default path ~/.config/temporalio/temporal.toml.
The connection options set in configuration files have lower precedence than environment variables. This means that if you set the same option in both the configuration file and as an environment variable, the environment variable value overrides the option set in the configuration file.
For example, the following TOML configuration file defines a staging profile with the necessary connection options to
connect to Temporal Cloud via an API key:
# Cloud profile for Temporal Cloud
[profile.staging]
address = "your-namespace.a1b2c.tmprl.cloud:7233"
namespace = "your-namespace"
api_key = "your-api-key-here"
If you want to use mTLS authentication instead of an API key, replace the api_key field with your mTLS certificate and
private key:
# Cloud profile for Temporal Cloud
[profile.staging]
address = "your-namespace.a1b2c.tmprl.cloud:7233"
namespace = "your-namespace"
tls_client_cert_data = "your-tls-client-cert-data"
tls_client_key_path = "your-tls-client-key-path"
With the connections options defined in the configuration file, use the
Client.connect method to create a Temporal
Client using the staging profile as follows. After loading the profile, you can also programmatically override
specific connection options before creating the client.
require 'temporalio/client'
require 'temporalio/env_config'

def main
  puts "--- Loading 'staging' profile with programmatic overrides ---"

  config_file = File.join(__dir__, 'config.toml')
  profile_name = 'staging'

  puts "The 'staging' profile in config.toml has an incorrect address (localhost:9999)."
  puts "We'll programmatically override it to the correct address."

  # Load the 'staging' profile.
  args, kwargs = Temporalio::EnvConfig::ClientConfig.load_client_connect_options(
    profile: profile_name,
    config_source: Pathname.new(config_file)
  )

  # Override the target host to the correct address.
  # This is the recommended way to override configuration values.
  args[0] = 'localhost:7233'

  puts "\nLoaded '#{profile_name}' profile from #{config_file} with overrides."
  puts "  Address: #{args[0]} (overridden from localhost:9999)"
  puts "  Namespace: #{args[1]}"

  puts "\nAttempting to connect to client..."
  begin
    client = Temporalio::Client.connect(*args, **kwargs)
    puts '✅ Client connected successfully!'
    sys_info = client.workflow_service.get_system_info(Temporalio::Api::WorkflowService::V1::GetSystemInfoRequest.new)
    puts "✅ Successfully verified connection to Temporal server!\n#{sys_info}"
  rescue StandardError => e
    puts "❌ Failed to connect: #{e}"
  end
end

main if $PROGRAM_NAME == __FILE__
The following environment variables are required to connect to Temporal Cloud:
TEMPORAL_NAMESPACE: Your Namespace and Account ID combination in the format<namespace_id>.<account_id>.TEMPORAL_ADDRESS: The gRPC endpoint for your Temporal Cloud Namespace.TEMPORAL_API_KEY: Your API key value. Required if you are using API key authentication.TEMPORAL_TLS_CLIENT_CERT_DATAorTEMPORAL_TLS_CLIENT_CERT_PATH: Your mTLS client certificate data or file path. Required if you are using mTLS authentication.TEMPORAL_TLS_CLIENT_KEY_DATAorTEMPORAL_TLS_CLIENT_KEY_PATH: Your mTLS client private key data or file path. Required if you are using mTLS authentication.
Ensure these environment variables exist in your environment before running your application.
Require the temporalio/env_config module to set connection options for the Temporal Client using environment variables.
The Temporalio::EnvConfig::ClientConfig.load_client_connect_options method will automatically load all environment variables. For a list of all available
environment variables and their default values, refer to
Environment Configuration.
For example, the following code snippet loads all environment variables and creates a Temporal Client with the options
specified in those variables. If you have defined a configuration file at either the default location
(~/.config/temporalio/temporal.toml) or a custom location specified by the TEMPORAL_CONFIG_FILE environment
variable, this will also load the default profile in the configuration file. However, any options set via environment
variables will take precedence.
After setting the environment variables, use the following code to create the Temporal Client:
require 'temporalio/client'
require 'temporalio/env_config'

def main
  # load_client_connect_options is a helper that loads a profile and prepares
  # the configuration for Client.connect. By default, it loads the
  # "default" profile. It also reads from environment variables. The environment
  # variables take precedence over the config file.
  args, kwargs = Temporalio::EnvConfig::ClientConfig.load_client_connect_options()

  puts "  Address: #{args[0]}"
  puts "  Namespace: #{args[1]}"
  puts "  gRPC Metadata: #{kwargs[:rpc_metadata]}"

  puts "\nAttempting to connect to client..."
  begin
    client = Temporalio::Client.connect(*args, **kwargs)
    puts '✅ Client connected successfully!'
    sys_info = client.workflow_service.get_system_info(Temporalio::Api::WorkflowService::V1::GetSystemInfoRequest.new)
    puts "✅ Successfully verified connection to Temporal server!\n#{sys_info}"
  rescue StandardError => e
    puts "❌ Failed to connect: #{e}"
  end
end

main if $PROGRAM_NAME == __FILE__
You can also specify connection options directly in code to connect to Temporal Cloud. To create an initial connection,
provide the endpoint, Namespace and Account ID combination, and API key values to the Client.connect method.
client = Temporalio::Client.connect(
  '<endpoint>', # Endpoint
  '<namespace_id>.<account_id>', # Namespace
  api_key: '<api_key>',
  tls: true
)
To connect using mTLS instead of an API key, provide the mTLS certificate and private key as follows:
client = Temporalio::Client.connect(
  '<endpoint>', # Endpoint
  '<namespace_id>.<account_id>', # Namespace
  tls: Temporalio::Client::Connection::TLSOptions.new(
    client_cert: File.read('my-client-cert.pem'),
    client_private_key: File.read('my-client-key.pem')
  )
)
For more information about configuring TLS to secure inter- and intra-network communication for a Temporal Service, see Temporal Customization Samples.
Start a Workflow
To start a Workflow Execution, supply:
- A Task Queue
- A Workflow Type
- Input arguments
- Workflow options such as Workflow Id
To start a Workflow Execution in Ruby, use either the start_workflow or execute_workflow methods in the Client. You
must set a Workflow Id and Task Queue in the
parameters given to the method.
result = my_client.execute_workflow(
  MyWorkflow, 'some-input',
  id: 'my-workflow-id', task_queue: 'my-task-queue'
)
puts "Result: #{result}"
Get Workflow results
Once a Workflow Execution is started, the Workflow Id and Run Id can be used to uniquely identify it.
You can block until the result is available, or retrieve it later using the handle.
You can also use Queries to access Workflow state and results while the Workflow is running.
Use start_workflow or workflow_handle on the Client to return a Workflow handle. Then use the result method to
await on the result of the Workflow.
handle = my_client.workflow_handle('my-workflow-id')
result = handle.result
puts "Result: #{result}"