Namespaces
This page covers namespace operations in Temporal Cloud. For core namespace concepts, see Temporal Namespace. For open source Temporal, see Managing Namespaces.
A Namespace is a unit of isolation within Temporal Cloud, providing security boundaries, Workflow management, unique identifiers, and gRPC endpoints in Temporal Cloud.
What is a Cloud Namespace Name?
A Cloud Namespace Name is a customer-supplied name for a Namespace in Temporal Cloud. Each Namespace
Name, such as accounting-production, is unique within the scope of a customer's account. It cannot be changed after
the Namespace is provisioned.
Each Namespace Name must conform to the following rules:
- A Namespace Name must contain at least 2 characters and no more than 39 characters.
- A Namespace Name must begin with a letter, end with a letter or number, and contain only letters, numbers, and the hyphen (-) character.
- Each hyphen (-) character must be immediately preceded and followed by a letter or number; consecutive hyphens are not permitted.
- All letters in a Namespace Name must be lowercase.
What is a Temporal Cloud Account ID?
A Temporal Cloud Account ID is a unique customer identifier assigned by Temporal Technologies. Each Id is a short string
of numbers and letters like f45a2, at least five characters long. This account identifier is retained throughout the
time each customer uses Temporal Cloud.
At times you may need to know your customer Account ID. Accessing the account's Namespaces provides an easy way to capture this information. Each Temporal Namespace uses an Account ID suffix. This is the alphanumeric character string found after the period in any Temporal Cloud Namespace name.
You can retrieve an Account ID from the Temporal Cloud Web UI or by using the tcld
utility at a command line interface (CLI). Follow these steps.
- Web UI
- tcld
Follow these steps to retrieve your Account ID:
- Log into Temporal Cloud.
- Select your account avatar at the top right of the page. A profile dropdown menu appears.
- Copy the Cloud Account ID from the menu.
🔍Click image to expand
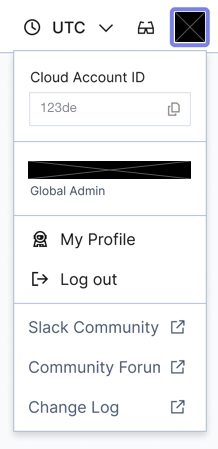
In this example, the Account ID is 123de.
-
Use the
tcldutility to log into an account.tcld loginThe
tcldoutput presents a URL with an activation code at the end. Take note of this code. The utility blocks until the login/activation process completes.Login via this url: https://login.tmprl.cloud/activate?user_code=KTGC-ZPWQA Web page automatically opens for authentication in your default browser.
-
Visit the browser. Ensure the user code shown by the CLI utility matches the code shown in the Web browser. Then, click Confirm in the browser to continue. After confirmation, Web feedback lets you know that the CLI "device" is now connected.
-
Return to the command line. Issue the following command.
tcld namespace listThe CLI tool returns a short JSON packet with your namespace information. This is the same list found in the Temporal Cloud Web UI Namespaces list. Like the browser version, each Namespace uses an Account ID suffix.
{
  "namespaces": [
    "your-namespace.123de",
    "another-namespace.123de"
  ],
  "nextPageToken": ""
}
Each Namespace automatically appends an Account ID suffix to its customer-supplied identifier. This five-character-or-longer string appears after the name, separated by a period. In this Namespace listing sample, the Account ID is 123de.
What is a Cloud Namespace Id?
A Cloud Namespace Id is a globally unique identifier for a Namespace in Temporal Cloud. A Namespace Id is formed by concatenating the following:
- A Namespace Name
- A period (.)
- The Account ID to which the Namespace belongs
For example, for the Account ID 123de and Namespace Name accounting-production, the Namespace Id is
accounting-production.123de.
What is a Cloud gRPC Endpoint?
Temporal Clients communicate between application code and a Temporal Server by sending and receiving messages via the gRPC protocol. gRPC is a Remote Procedure Call framework featuring low latency and high performance. gRPC provides Temporal with an efficient, language-agnostic communication framework.
Every Temporal Namespace uses a gRPC endpoint for communication. When migrating to Temporal Cloud, you'll need to switch the gRPC endpoint in your code from your current hosting, whether self-hosted or locally-hosted, to Temporal Cloud.
A gRPC endpoint appears on the detail page for each Cloud Namespace. Follow these steps to find it:
- Log into your account on cloud.temporal.io.
- Navigate to the Namespace list page from the left-side vertical navigation.
- Tap or click on the Namespace Name to select and open the page for the Namespace whose endpoint you want to retrieve.
- On the Namespace detail page, click on the "Connect" button in the top right corner of the page.
- Click the copy icon next to the gRPC address to copy it to your clipboard.
See How to access a Namespace in Temporal Cloud for more information on different gRPC endpoint types and how to access them.
How to create a Namespace in Temporal Cloud
The user who creates a Namespace is automatically granted Namespace Admin permission for that Namespace.
To create a Namespace, a user must have the Developer, Account Owner, or Global Admin account-level Role.
By default, each account is allocated with a limit of ten Namespaces. As you start using Namespaces by scheduling Workflows, Temporal Cloud automatically raises your allowance. This automatic adjustment happens whenever all your Namespaces are in use, up to a maximum of 100 Namespaces. You can request further increases beyond the 100 Namespace limit by opening a support ticket.
Information needed to create a Namespace
To create a Namespace in Temporal Cloud, gather the following information:
- Namespace Name, region, and Cloud Provider
- Retention Period for the Event History of closed Workflow Executions.
- CA certificate for the Namespace, if you are using mTLS authentication.
- Codec Server endpoint to show decoded payloads to users in the Event History for Workflow Executions in the Namespace. For details, see Securing your data.
- Permissions for each user.
- Web UI
- tcld
Create a Namespace using Temporal Cloud UI
- Gather the information listed earlier in Information needed to create a Namespace.
- Go to the Temporal Cloud UI and log in.
- On the left side of the window, click Namespaces.
- On the Namespaces page, click Create Namespace in the upper-right portion of the window.
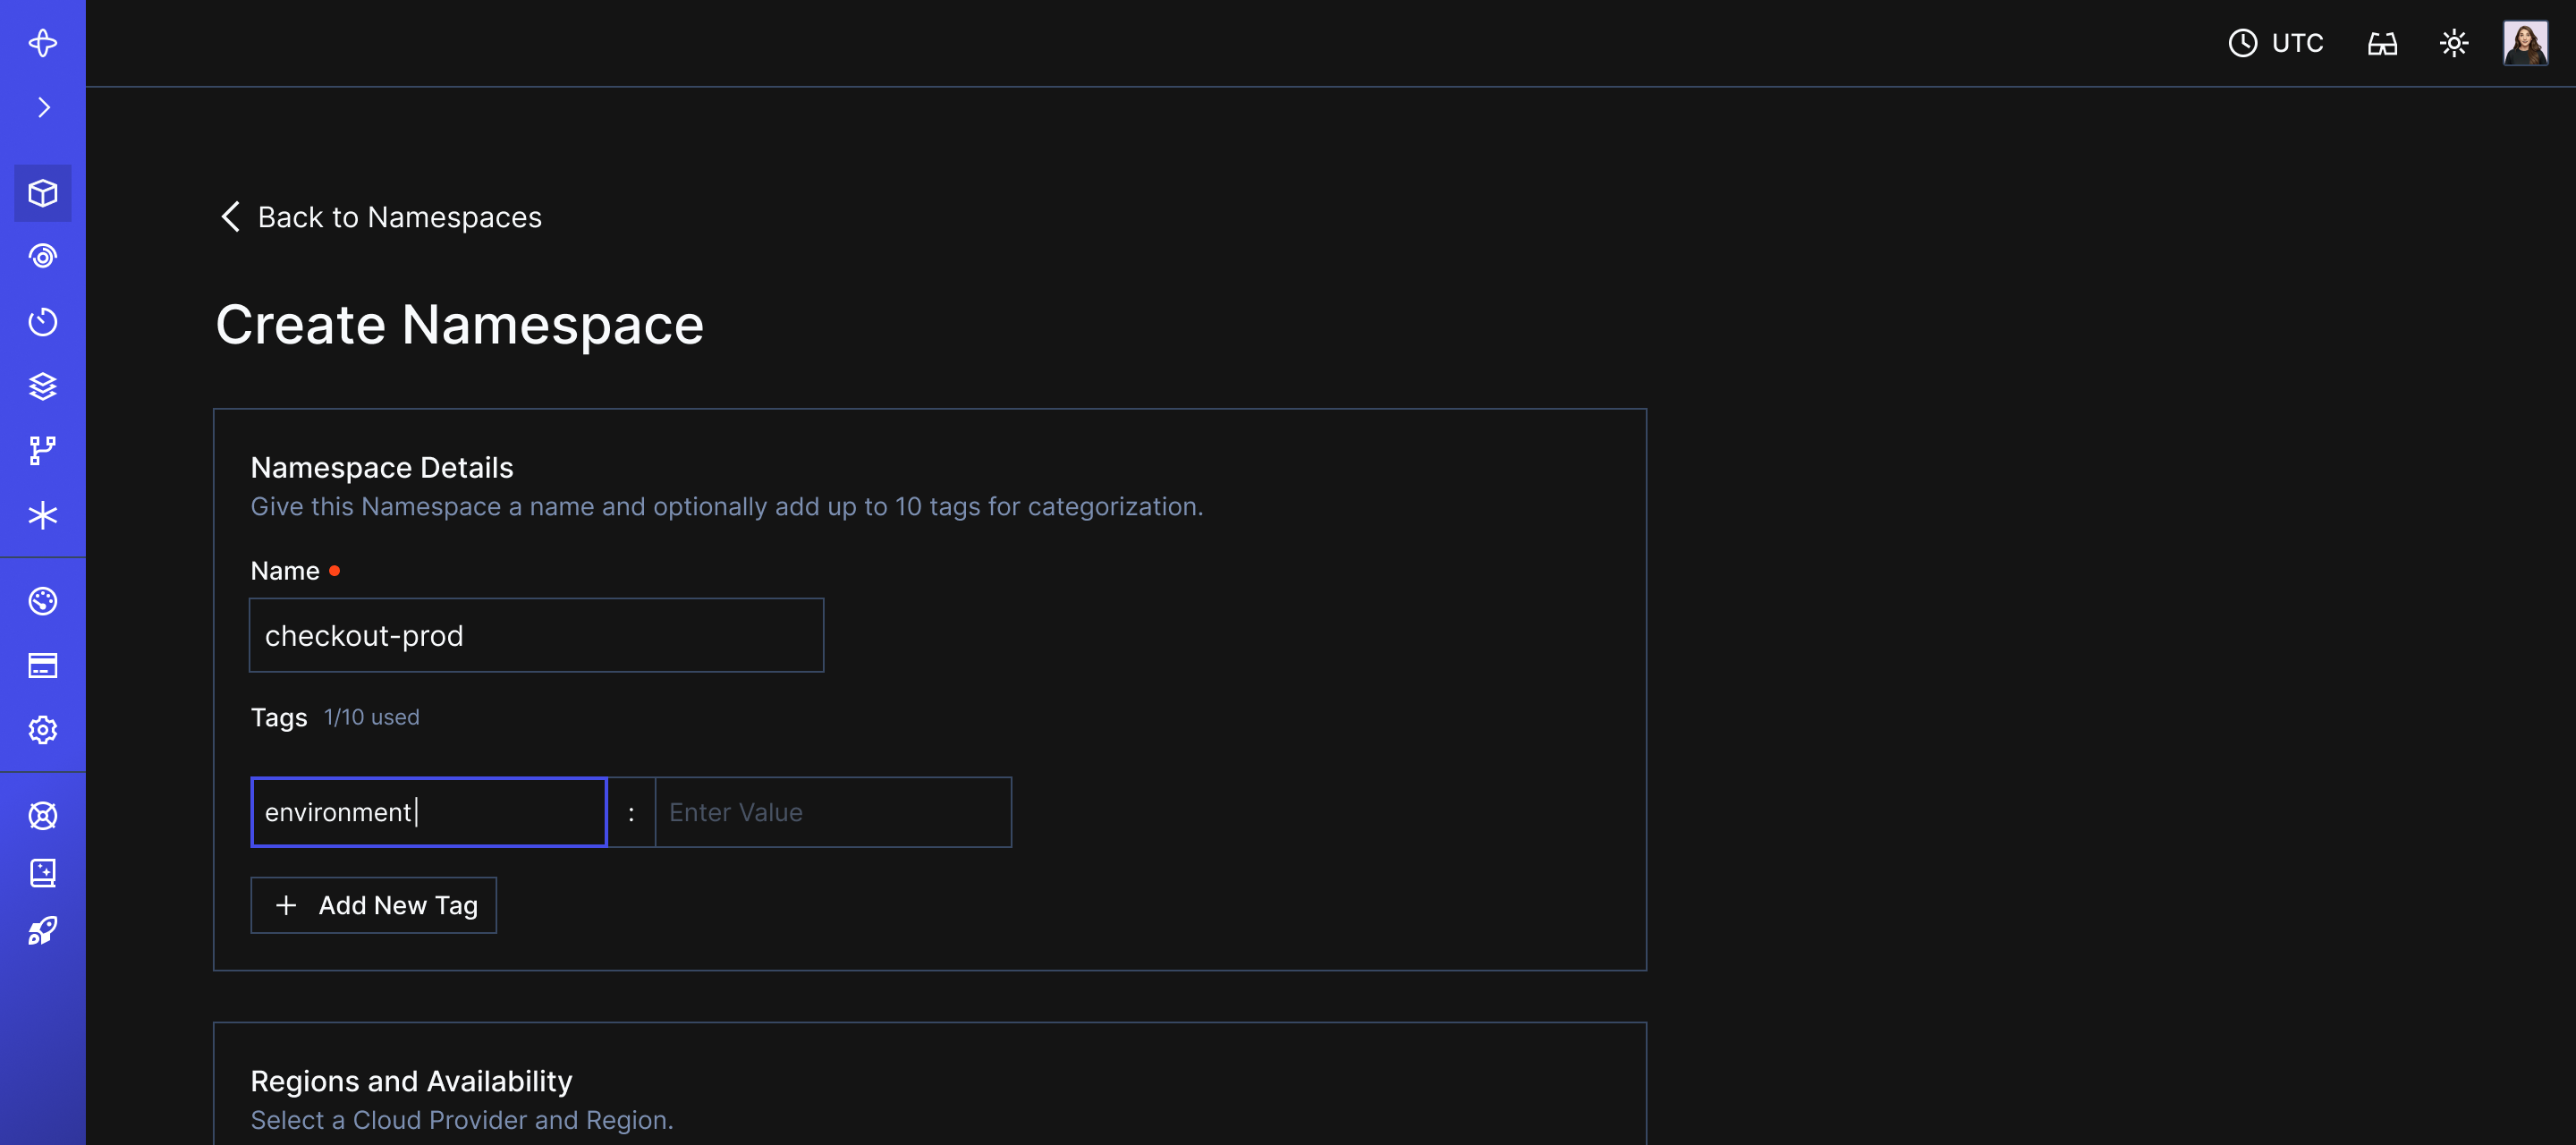
- On the Create Namespace page in Name, enter the Namespace Name.
- In Cloud Provider, select the cloud provider in which to host this Namespace.
- In Region, select the region in which to host this Namespace.
- In Retention Period, specify a value from 1 to 90 days. When choosing this value, consider your needs for Event History versus the cost of maintaining that Event History. Typically, a development Namespace has a short retention period and a production Namespace has a longer retention period. (If you need to change this value later, contact Temporal Support.)
- Select your authentication method: API keys or mTLS.
- If using mTLS authentication, paste the CA certificate for this Namespace.
- Optional: In Codec Server, enter the HTTPS URL (including the port number) of your Codec Server endpoint. You may also enable "Pass the user access token with your endpoint" and "Include cross-origin credentials." For details, see Hosting your Codec Server.
- Click Create Namespace.
See the tcld namespace create command reference for details.
What are some Namespace best practices?
This section provides general guidance for organizing Namespaces across use cases, services, applications, or domains. Temporal Cloud provides Namespace–as-a-service, so the Namespace is the endpoint. Customers should consider not only a Namespace naming convention but also how to group or isolate workloads using the Namespace as a boundary.
Each team can have their own Namespace for improved modularity, security, debugging, and fault isolation. Namespaces contain the blast radius of misbehaving Workers that may exhaust rate limits. Sensitive Workflow state (PCI data) can be secured with per-Namespace permissions and encrypted with a separate encryption key.
Temporal Applications in different Namespaces may be connected with Nexus by exposing a clean service contract for others to use with built-in Nexus access controls. Nexus supports cross-team, cross-domain, multi-region, and multi-cloud use cases.
Constraints and limitations
Before considering an appropriate Namespace configuration, you should be aware of the constraints listed on the Temporal Cloud Limits page.
For advice on managing Namespaces within limits, see the Namespace Best Practices page.
General guidance
Namespace configuration requires some consideration. Following are some general guidelines to consider.
- Namespaces are usually defined per use case. A use case can encompass a broad range of Workflow types and a nearly unlimited scale of concurrent Workflow Executions.
- Namespaces can be split along additional boundaries such as service, application, domain or even sub-domain.
- Namespaces should be used to reduce the "blast radius" for mission-critical applications.
- Environments such as production and development usually have requirements for isolation. We recommend that each environment has its own Namespace.
- Namespaces should be used to reduce the "blast radius" for mission-critical applications.
- Use Nexus to communicate across team, domain, and Namespace boundaries with a clean service contract instead of sharing Temporal primitives directly. Nexus enables each team to have their own Namespace for improved security, troubleshooting, and fault isolation while sharing capabilities through Nexus Endpoints.
Examples
Following are some ideas about how to organize Namespaces.
Example 1: Namespace per use case and environment
We recommend using one Namespace for each use case and environment combination for simple configurations in which multiple services and team or domain boundaries don't exist.
Sample naming convention:
<use-case>_<environment>
Example 2: Namespace per use case, service, and environment
We recommend using one Namespace for each use case, service, and environment combination when multiple services that are part of same use case communicate externally to Temporal via API (HTTP/gRPC).
Sample naming convention:
<use-case><service><environment>
Example 3: Namespace per use case, domain, and environment
We recommend using one namespace per use case, domain, and environment combination when multiple services that are part of the same use case need to communicate with each another via Signals or by starting Child Workflows. In this case, though, you must be mindful about Workflow Id uniqueness by prefixing each Workflow Id with a service-specific string. The name of each Task Queue must also be unique. If multiple teams are involved, the domain could also represent a team boundary.
Sample naming convention:
<use-case><domain><environment>
Sample workflowId convention:
<service-string>_<workflow-id>
How to access a Namespace in Temporal Cloud
Temporal Cloud supports authentication to Namespaces using API keys or mTLS. To migrate a Namespace from one authentication method to another, or to use both API key and mTLS authentication on the same Namespace, please contact Support.
Using both API key and mTLS authentication on the same Namespace is in pre-release and doesn't support High Availability features or authenticating with an API Key to a Namespace Endpoint.
Connecting to your Namespace requires a specific endpoint that works for the given Namespace. There are two types of gRPC endpoints for accessing a Namespace in Temporal Cloud: a Namespace endpoint and a regional endpoint.
- Namespace endpoint (
<namespace>.<account>.tmprl.cloud:7233) — Recommended- This endpoint is unique to each Namespace. It always connects to the Namespace, no matter which region(s) the Namespace is using.
- A Temporal Client that uses a Namespace endpoint doesn't have to be aware of which region the Namespace is in.
- For Namespaces with High Availability, the Namespace endpoint automatically directs traffic to the active region, so Workers and Clients don't need to change endpoints during a failover.
- Regional endpoint (
<region>.<cloud_provider>.api.temporal.io:7233)- Temporal Cloud has only one regional endpoint for each cloud region. The same regional endpoint can access any Namespace that is active in that region (or that has a replica in that region).
- A Temporal Client can use a regional endpoint to ensure connection to a Namespace always happens within that region. This can be useful in advanced High Availability setups where you want explicit control over which region handles requests.
- When using mTLS to authenticate, the Temporal Client must set the
server_nameproperty to<namespace endpoint value>in its request to the value of the Namespace endpoint. This tells the client to expect a different SNI header during the TLS handshake, since the request to the regional endpoint is redirected to the specific Namespace.
Configuring a Temporal Client with API keys or mTLS
To use API keys to connect with the Temporal CLI, Client SDK, tcld, Cloud Ops API, and Terraform, see Use API keys to authenticate.
To use mTLS to connect with the Temporal CLI and Client SDK, see Configure Clients to use Client certificates.
Accessing the Temporal Web UI
For accessing the Temporal Web UI, use the HTTPS endpoint in the form:
https://cloud.temporal.io/namespaces/<namespace>.<account>. For example:
https://cloud.temporal.io/namespaces/accounting-production.f45a2.
Accessing Namespaces with Encryption and Private Connectivity
To ensure the security of your data, all traffic to and from your Namespace is encrypted with TLS 1.3.
For enhanced protection:
- Set up private connectivity to the Namespace.
- In your own networking architecture, set up an allow list for outgoing network requests from your Clients and Workers with the IP address ranges of the Cloud Provider region in which your Namespace is located:
How to manage Namespaces in Temporal Cloud
Manage Namespaces in Temporal Cloud using Temporal Cloud UI
To list Namespaces:
- On the left side of the window, select Namespaces.
To edit a Namespace (including custom Search Attributes, certificates, certificate filters, Codec Server endpoint, permissions, and users), find the Namespace and do either of the following:
- On the right end of the Namespace row, select the three vertical dots (⋮). Click Edit.
- Select the Namespace name. In the top-right portion of the page, select Edit.
On the Edit page, you can do the following:
- Add a custom Search Attribute.
- Manage CA certificates.
- Manage certificate filters.
- Set Codec Server endpoint for all users on the Namespace. Each user on the Namespace has the option to override this setting in their browser.
- Manage Namespace-level permissions.
- Add users.
To add a user to a Namespace, scroll to the bottom of the page and select Add User.
After you make changes, select Save in the top-right or bottom-left portion of the page.
Manage Namespaces in Temporal Cloud using tcld
To list Namespaces and get information about them, use the following tcld commands:
To manage certificates, use the tcld namespace accepted-client-ca commands. For more information, see How to manage certificates in Temporal Cloud.
To manage certificate filters, use the tcld namespace certificate-filters commands. For more information, see How to manage certificate filters in Temporal Cloud.
How to delete a Namespace in Temporal Cloud
To delete a Namespace, a user must have Namespace Admin permission for that Namespace.
Delete a Namespace using Temporal Cloud UI
- Go to the Temporal Cloud UI and log in.
- On the left side of the window, select Namespaces.
- On the Namespaces page, select a Namespace Name.
- On the Namespace page, select Edit in the upper-right portion of the window.
- On the Edit Namespace page, select Delete Namespace in the upper-right portion of the window.
- In the Delete Namespace dialog, type
DELETEto confirm the deletion of that Namespace. - Select Delete.
After deleting a Temporal Cloud Namespace, the Temporal Service immediately removes the Namespace's Workflow Executions and Task Queues. Make sure all Workflows have been completed, canceled, or terminated before removing a Namespace. The Namespace removal is permanent.
Closed Workflow Histories remain in Temporal storage until the user-defined retention period expires. This period reflects the policy in effect when the Workflow Execution was closed.
For further questions or concerns, contact Support.
Delete a Namespace using tcld
See the tcld namespace delete command reference for details.
Namespace deletion protection
To prevent accidental Namespace deletion, Temporal Cloud provides a protection feature. When you enable Deletion Protection for your production environment Namespace, you ensure that critical data won't be deleted unintentionally.
Follow these steps:
- Visit the Namespaces page on Temporal Cloud.
- Open your Namespace details page.
- Select the Edit button.
- Scroll down to Security and click the disclosure button (downward-facing caret).
- Enable Deletion Protection

Deletion Protection is enabled by toggling the switch
To enable or disable this feature using tcld, use the following command. Set the value to true to
enable or false to disable:
tcld namespace lifecycle set \
    --namespace <namespace_id.account_id> \
    --enable-delete-protection <Boolean>
How to tag a Namespace in Temporal Cloud
Tags are key-value metadata pairs that can be attached to namespaces in Temporal Cloud to help operators organize, track, and manage namespaces more easily.
Tag Structure and Limits
- Each namespace can have a maximum of 10 tags
- Each key must be unique for a given namespace (e.g., a namespace cannot have both
team:fooandteam:bartags) - Keys and values must be 1-63 characters in length
- Allowed characters: lowercase letters (
a-z), numbers (0-9), periods (.), underscores (_), hyphens (-), and at signs (@) - Tags are not a secure storage mechanism and should not store PII or PHI
- Tags will not change the behavior of the tagged resource
- There is a soft limit of 1000 unique tag keys per account
Permissions
- Only Account Admins and Account Owners can create and edit tags
- All users with access to a namespace can view its tags
tcld
See the tcld namespace tags command reference for details.
Terraform
See the Terraform provider for details.
Web UI
Tags can be viewed and managed through the Temporal Cloud web interface. When viewing a namespace, you'll see tags displayed and can add, edit, or remove them if you have the appropriate permissions.
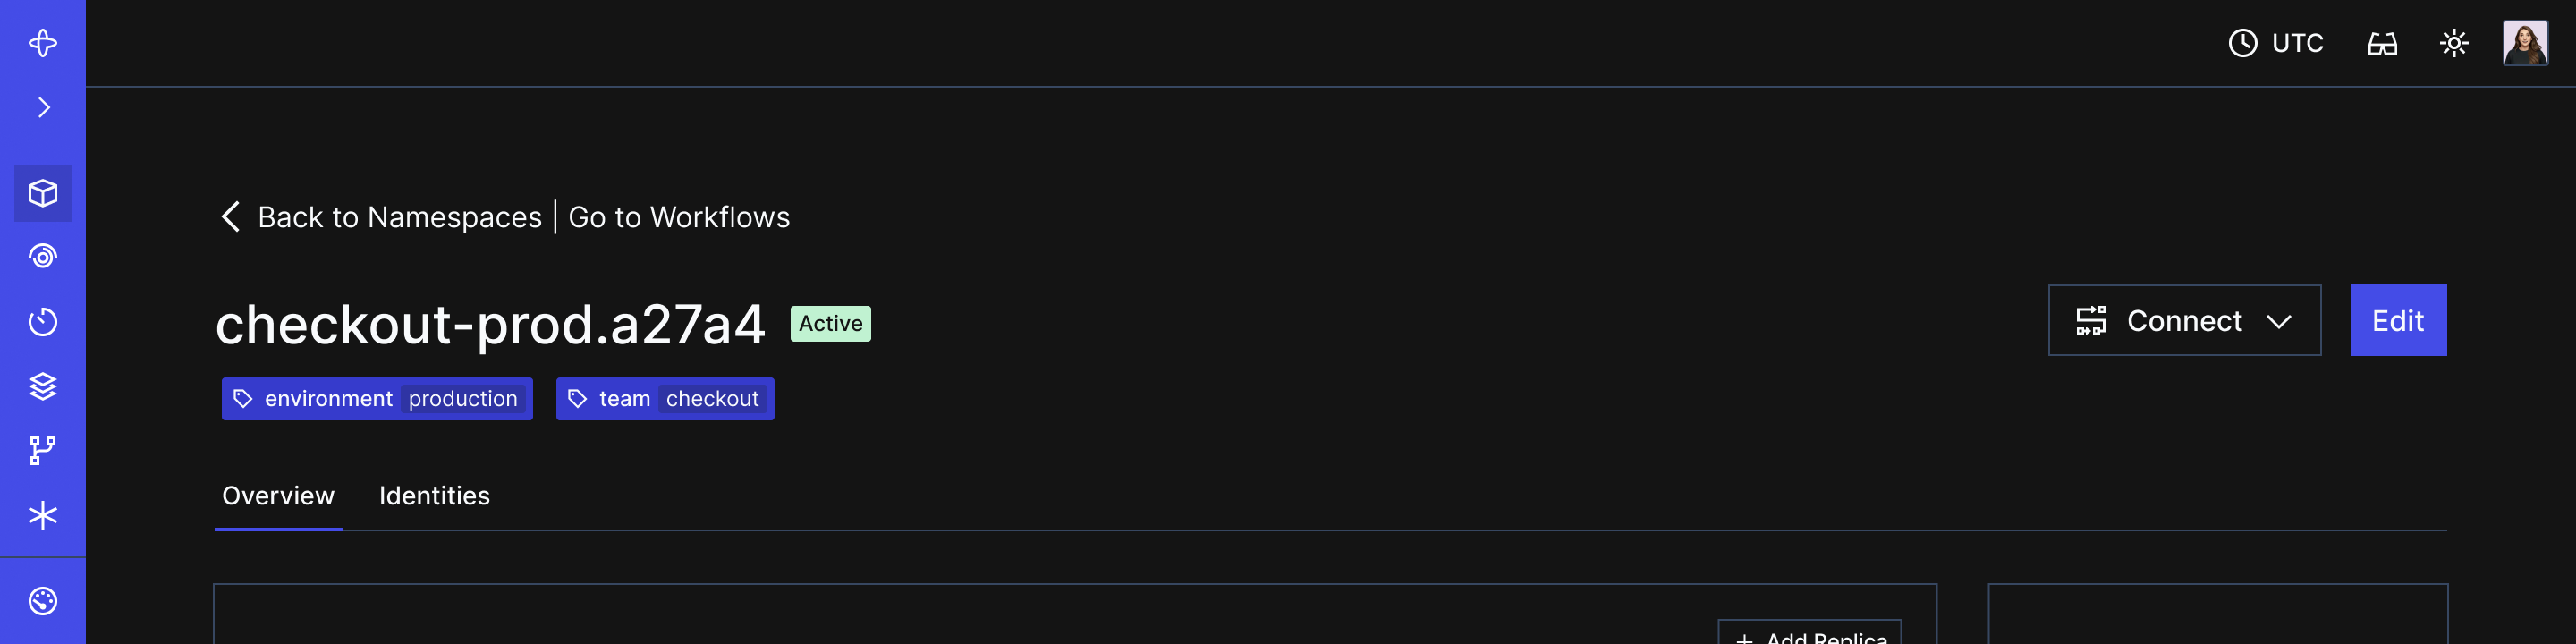
Tags appear in namespace details
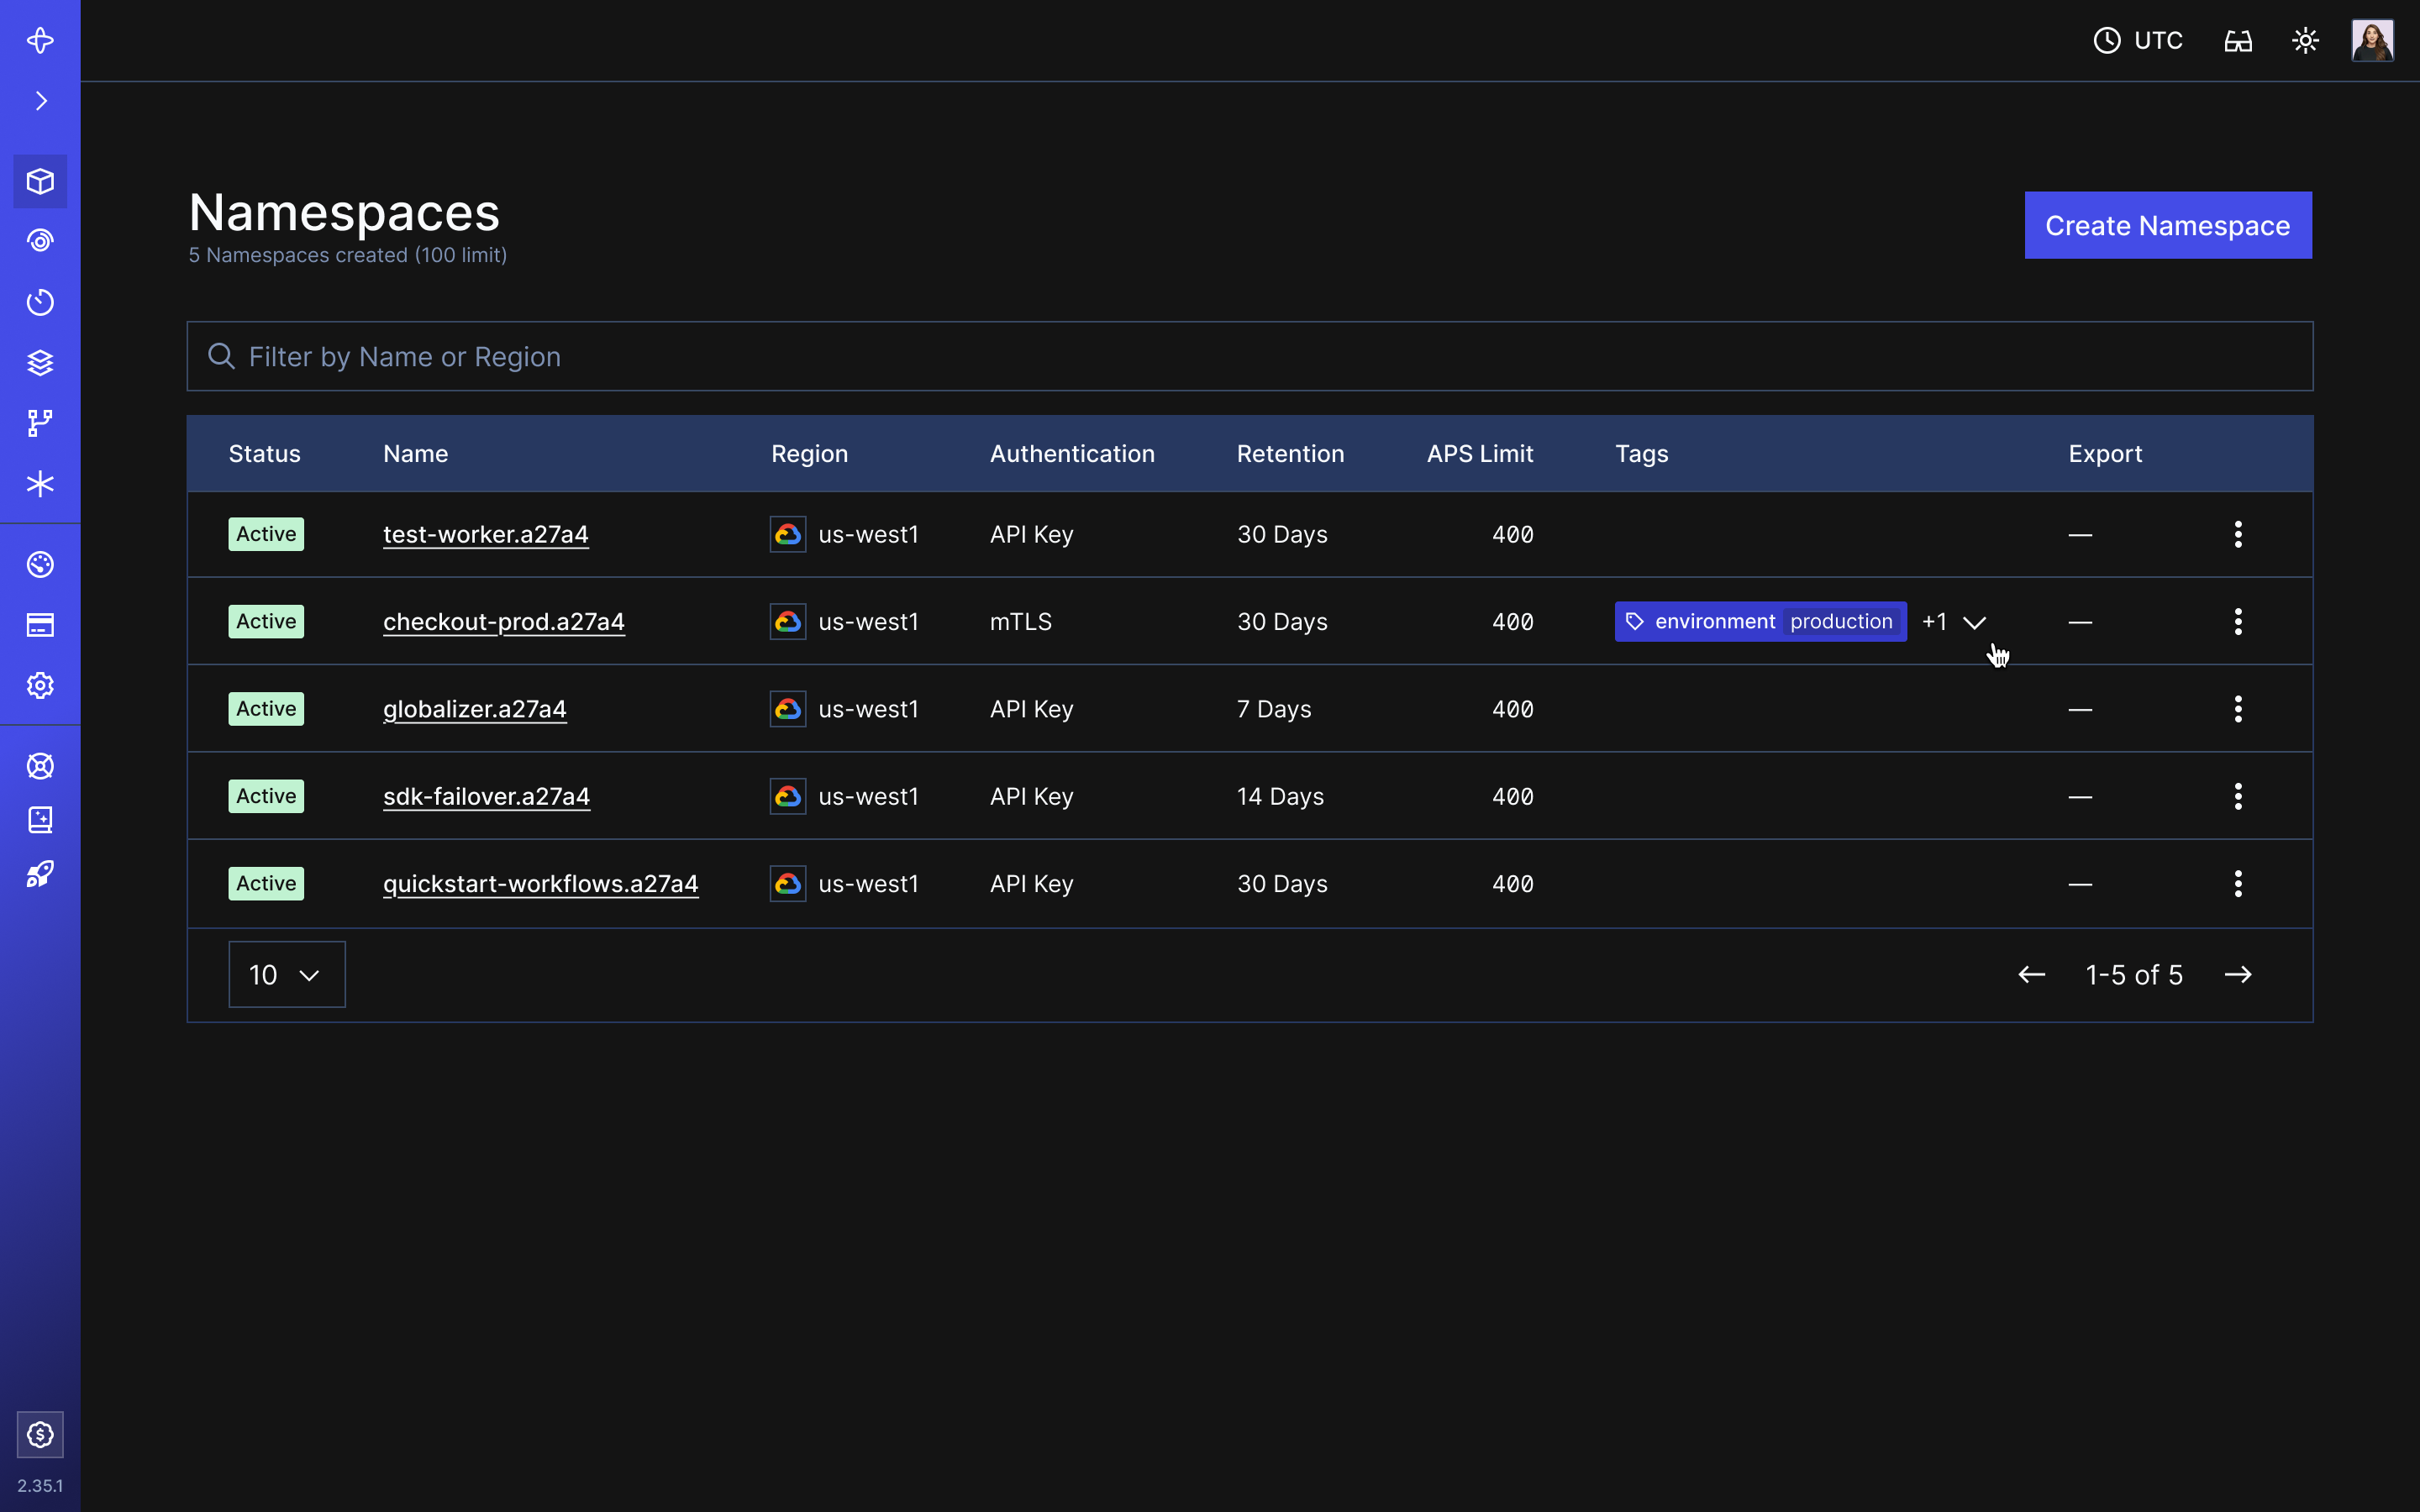
Tags appear on the list of namespaces
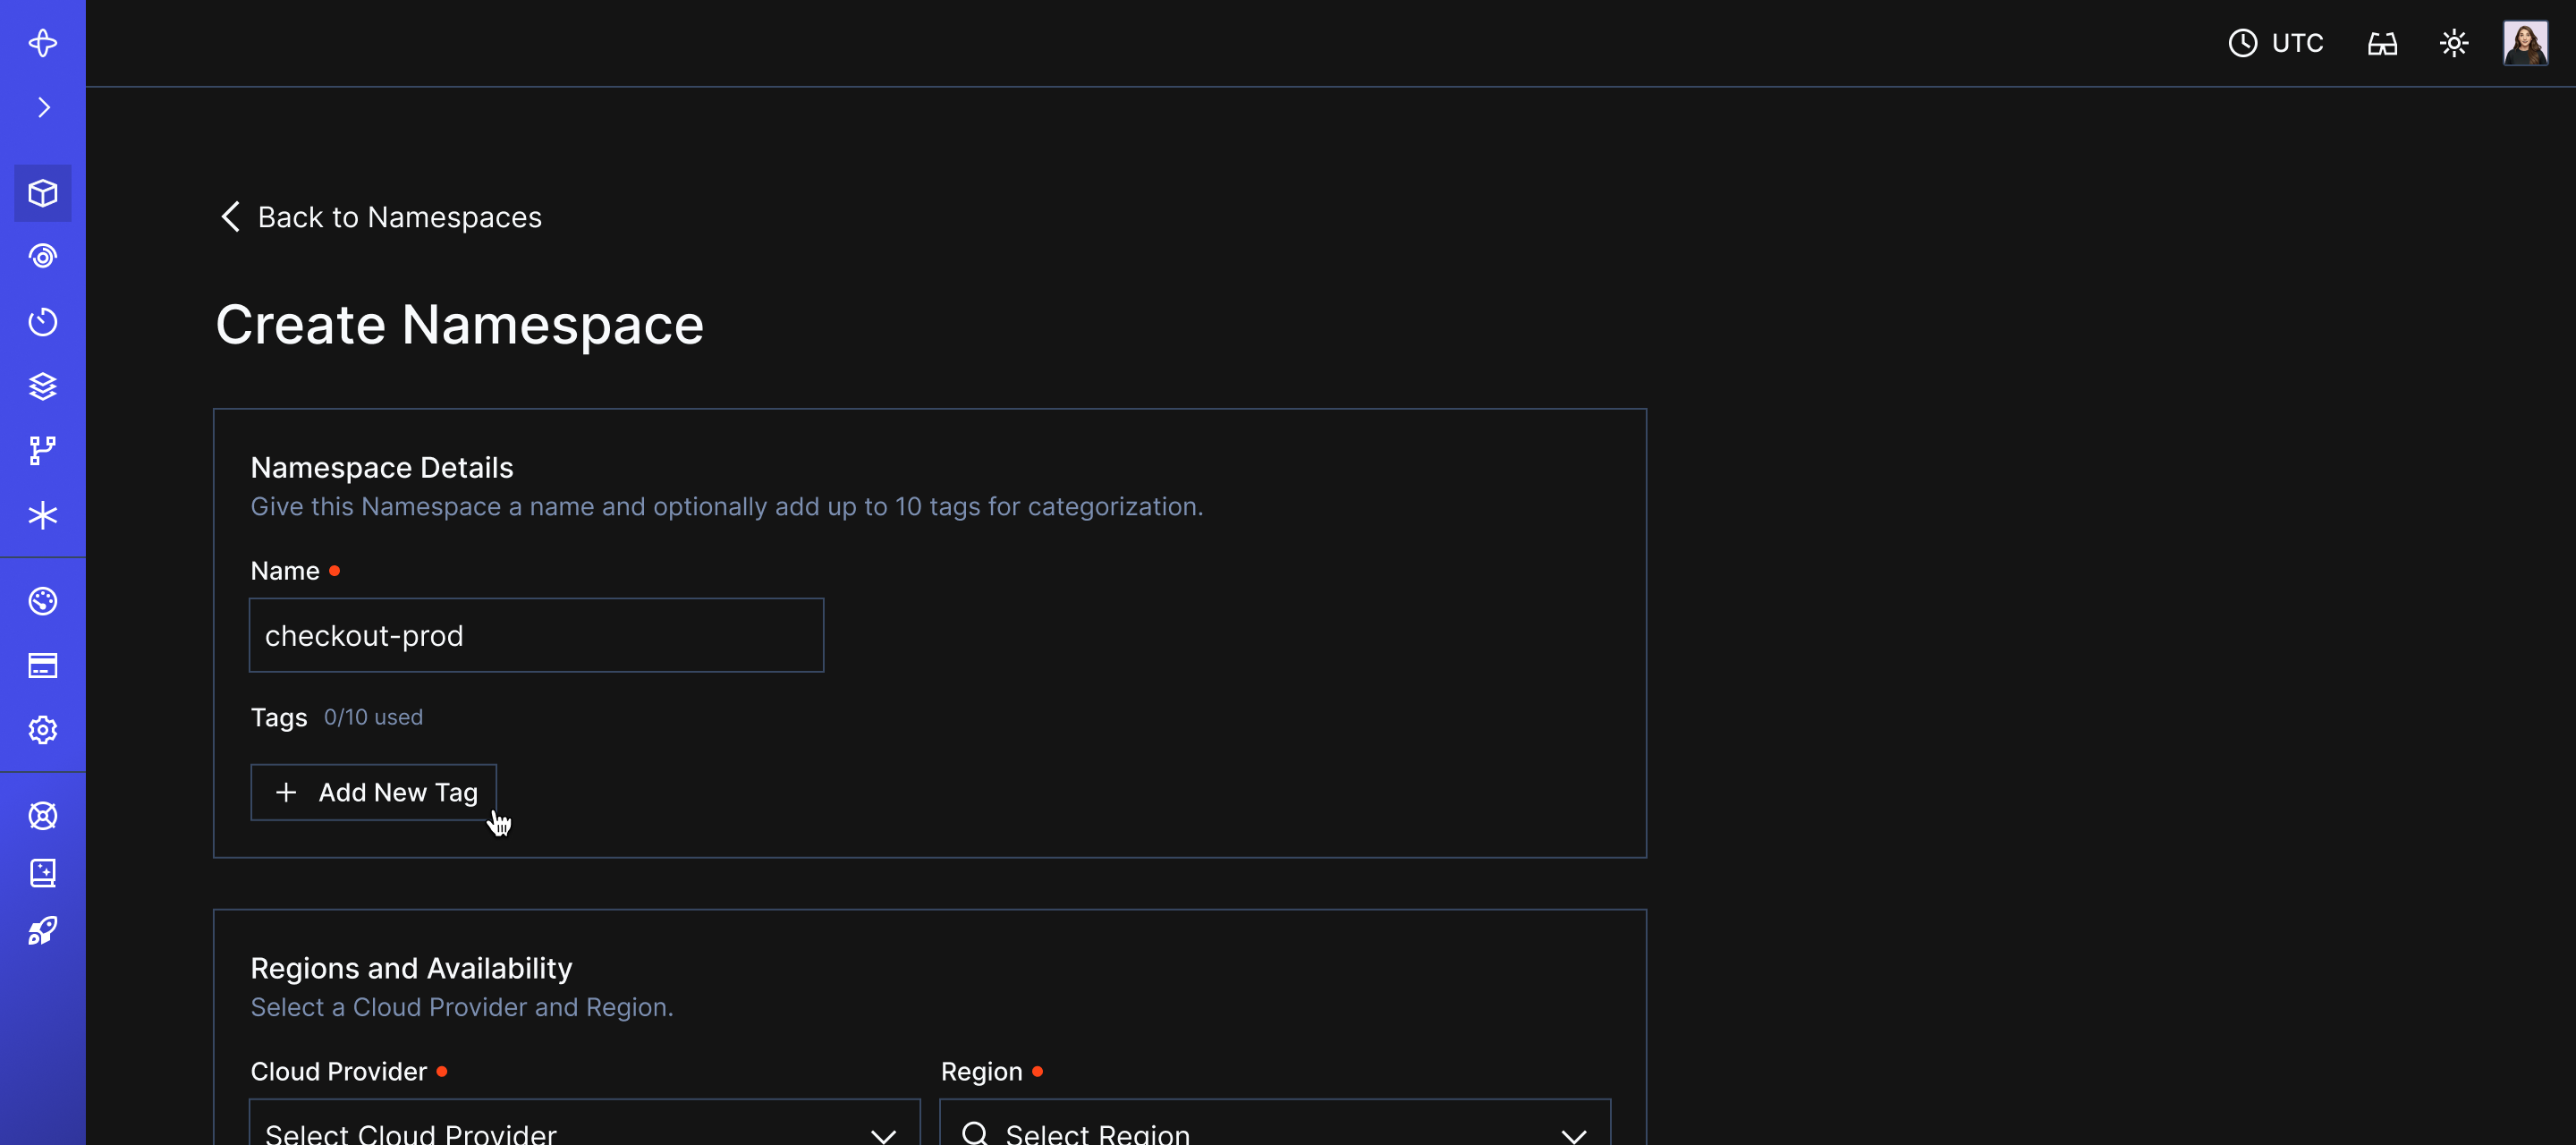
Where to add tags during namespace creation
After adding a tag during namespace creation