```
For more information on Temporal CLI environment variables, see [Environment variables](/cli#environment-variables).
---
## Get started with Temporal Cloud
Getting started with Temporal Cloud involves a few key steps:
1. [Sign up for Temporal Cloud](#sign-up-for-temporal-cloud)
1. [Create a Namespace](#create-a-namespace)
1. [Set up your Clients and Workers](#set-up-your-clients-and-workers)
1. [Run your first Workflow](#run-your-first-workflow)
1. [Invite your team](#invite-your-team)
## Sign up for Temporal Cloud
To create a Temporal Cloud account, you can:
- Sign up [directly](https://temporal.io/get-cloud); or
- Subscribe at the AWS Marketplace for
[Temporal Cloud Pay-As-You-Go](https://aws.amazon.com/marketplace/pp/prodview-xx2x66m6fp2lo). Signing up through the
AWS Marketplace is similar to signing up directly on the Temporal Cloud site, but billing goes through your AWS
account.
- To purchase Temporal Cloud on the Google Cloud Marketplace, please contact our team at sales@temporal.io.
For information about Temporal Cloud Pricing, see our [Pricing Page](/cloud/pricing).
## Create a Namespace
See [Managing Namespaces](/cloud/namespaces#create-a-namespace) to create your first namespace.
Temporal Cloud supports either [API key](/cloud/api-keys) or [mTLS](/cloud/certificates) authentication for each
namespace. If you're not sure which to use, we recommend using [API keys](/cloud/api-keys) because they're easier to
manage and rotate for most teams. If your organization already has private key infrastructure (PKI) and is familiar with
cert management, then [mTLS](/cloud/certificates) is an excellent choice.
## Set up your Clients and Workers
See our guides for connecting each SDK to your Temporal Cloud Namespace:
- [Connect to Temporal Cloud in Go](/develop/go/client/temporal-client#connect-to-temporal-cloud)
- [Connect to Temporal Cloud in Java](/develop/java/client/temporal-client#connect-to-temporal-cloud)
- [Connect to Temporal Cloud in Python](/develop/python/client/temporal-client#connect-to-temporal-cloud)
- [Connect to Temporal Cloud in TypeScript](/develop/typescript/client/temporal-client#connect-to-temporal-cloud)
- [Connect to Temporal Cloud in .NET](/develop/dotnet/client/temporal-client#connect-to-temporal-cloud)
- [Connect to Temporal Cloud in PHP](/develop/php/client/temporal-client#connect-to-temporal-cloud)
- [Connect to Temporal Cloud in Ruby](/develop/ruby/client/temporal-client#connect-to-temporal-cloud)
## Run your first Workflow
See our guides for starting a workflow using each SDK:
- [Start a workflow in Go](/develop/go/client/temporal-client#start-workflow-execution)
- [Start a workflow in Java](/develop/java/client/temporal-client#start-workflow-execution)
- [Start a workflow in Python](/develop/python/client/temporal-client#start-workflow-execution)
- [Start a workflow in TypeScript](/develop/typescript/client/temporal-client#start-workflow-execution)
- [Start a workflow in .NET](/develop/dotnet/client/temporal-client#start-workflow)
- [Start a workflow in PHP](/develop/php/client/temporal-client#start-workflow-execution)
- [Start a workflow in Ruby](/develop/ruby/client/temporal-client#start-workflow)
## Invite your team
See [Managing users](/cloud/users) to add other users and assign them roles.
You can also use [Service Accounts](/cloud/service-accounts) to represent machine identities.
Since you created the account when you signed up, your email address is the first
[Account Owner](/cloud/manage-access/roles-and-permissions#account-level-roles) for your account.
---
## Namespaces
:::info Temporal Cloud
This page covers namespace operations in **Temporal Cloud**.
For core namespace concepts, see [Temporal Namespace](/namespaces).
For open source Temporal, see [Managing Namespaces](/self-hosted-guide/namespaces).
:::
A Namespace is a unit of isolation within Temporal Cloud, providing security boundaries, Workflow management, unique
identifiers, and gRPC endpoints in Temporal Cloud.
- [Create a Namespace](#create-a-namespace)
- [Access a Namespace](#access-namespaces)
- [Manage Namespaces](#manage-namespaces)
- [Delete a Namespace](#delete-a-namespace)
- [Tag a Namespace](#tag-a-namespace)
## What is a Cloud Namespace Name? {#temporal-cloud-namespace-name}
A Cloud Namespace Name is a customer-supplied name for a [Namespace](/namespaces) in Temporal Cloud. Each Namespace
Name, such as `accounting-production`, is unique within the scope of a customer's account. It cannot be changed after
the Namespace is provisioned.
Each Namespace Name must conform to the following rules:
- A Namespace Name must contain at least 2 characters and no more than 39 characters.
- A Namespace Name must begin with a letter, end with a letter or number, and contain only letters, numbers, and the
hyphen (-) character.
- All letters in a Namespace Name must be lowercase.
## What is a Temporal Cloud Account ID? {#temporal-cloud-account-id}
A Temporal Cloud Account ID is a unique customer identifier assigned by Temporal Technologies. Each Id is a short string
of numbers and letters like `f45a2`, at least five characters long. This account identifier is retained throughout the
time each customer uses Temporal Cloud.
At times you may need to know your customer Account ID. Accessing the account's Namespaces provides an easy way to
capture this information. Each Temporal Namespace uses an Account ID suffix. This is the alphanumeric character string
found after the period in any Temporal Cloud Namespace name.
You can retrieve an Account ID from the [Temporal Cloud](https://cloud.temporal.io) Web UI or by using the `tcld`
utility at a command line interface (CLI). Follow these steps.
Follow these steps to retrieve your Account ID:
1. Log into Temporal Cloud.
1. Select your account avatar at the top right of the page.
A profile dropdown menu appears.
1. Copy the Cloud Account ID from the menu.
In this example, the Account ID is `123de`.
1. Use the `tcld` utility to log into an account.
```
tcld login
```
The `tcld` output presents a URL with an activation code at the end. Take note of this code. The utility blocks until the login/activation process completes.
```
Login via this url: https://login.tmprl.cloud/activate?user_code=KTGC-ZPWQ
```
A Web page automatically opens for authentication in your default browser.
1. Visit the browser.
Ensure the user code shown by the CLI utility matches the code shown in the Web browser.
Then, click Confirm in the browser to continue.
After confirmation, Web feedback lets you know that the CLI "device" is now connected.
1. Return to the command line.
Issue the following command.
```
tcld namespace list
```
The CLI tool returns a short JSON packet with your namespace information.
This is the same list found in the Temporal Cloud Web UI Namespaces list.
Like the browser version, each Namespace uses an Account ID suffix.
```
{
"namespaces": [
"your-namespace.123de",
"another-namespace.123de"
],
"nextPageToken": ""
}
```
Each Namespace automatically appends an Account ID suffix to its customer-supplied identifier.
This five-character-or-longer string appears after the name, separated by a period.
In this Namespace listing sample, the Account ID is 123de.
## What is a Cloud Namespace Id? {#temporal-cloud-namespace-id}
A Cloud Namespace Id is a globally unique identifier for a [Namespace](/namespaces) in Temporal Cloud. A Namespace Id is
formed by concatenating the following:
1. A [Namespace Name](#temporal-cloud-namespace-name)
1. A period (.)
1. The [Account ID](#temporal-cloud-account-id) to which the Namespace belongs
For example, for the Account ID `123de` and Namespace Name `accounting-production`, the Namespace Id is
`accounting-production.123de`.
## What is a Cloud gRPC Endpoint? {#temporal-cloud-grpc-endpoint}
Temporal Clients communicate between application code and a Temporal Server by sending and receiving messages via the
gRPC protocol. gRPC is a Remote Procedure Call framework featuring low latency and high performance. gRPC provides
Temporal with an efficient, language-agnostic communication framework.
Every Temporal Namespace uses a gRPC endpoint for communication. When migrating to Temporal Cloud, you'll need to switch
the gRPC endpoint in your code from your current hosting, whether self-hosted or locally-hosted, to Temporal Cloud.
A gRPC endpoint appears on the detail page for each Cloud Namespace. Follow these steps to find it:
1. Log into your account on [cloud.temporal.io](https://cloud.temporal.io/namespaces).
2. Navigate to the Namespace list page from the left-side vertical navigation.
3. Tap or click on the Namespace Name to select and open the page for the Namespace whose endpoint you want to retrieve.
4. On the Namespace detail page, click on the "Connect" button in the top right corner of the page.
5. Click the copy icon next to the gRPC address to copy it to your clipboard.
See [How to access a Namespace in Temporal Cloud](/cloud/namespaces/#access-namespaces) for more information on
different gRPC endpoint types and how to access them.
## How to create a Namespace in Temporal Cloud {#create-a-namespace}
:::info
The user who creates a [Namespace](/namespaces) is automatically granted
[Namespace Admin](/cloud/manage-access/roles-and-permissions#namespace-level-permissions) permission for that Namespace.
To create a Namespace, a user must have the Developer, Account Owner, or Global Admin account-level
[Role](/cloud/manage-access/roles-and-permissions#account-level-roles).
:::
:::tip
By default, each account starts with 10 Namespaces. This is automatically increased as you start creating namespaces. For large-scale needs, open a [support ticket](/cloud/support#support-ticket).
:::
### Information needed to create a Namespace
To create a Namespace in Temporal Cloud, gather the following information:
- [Namespace Name](/cloud/namespaces#temporal-cloud-namespace-name), region, and Cloud Provider
- [Retention Period](/temporal-service/temporal-server#retention-period) for the
[Event History](/workflow-execution/event#event-history) of closed [Workflow Executions](/workflow-execution).
- [CA certificate](/cloud/certificates#certificate-requirements) for the Namespace, if you are using mTLS
authentication.
- [Codec Server endpoint](/production-deployment/data-encryption#set-your-codec-server-endpoints-with-web-ui-and-cli) to
show decoded payloads to users in the Event History for Workflow Executions in the Namespace. For details, see
[Securing your data](/production-deployment/data-encryption).
- [Permissions](/cloud/manage-access/roles-and-permissions#namespace-level-permissions) for each user.
### Create a Namespace using Temporal Cloud UI
1. Gather the information listed earlier in
[Information needed to create a Namespace](#information-needed-to-create-a-namespace).
1. Go to the Temporal Cloud UI and log in.
1. On the left side of the window, click **Namespaces**.
1. On the **Namespaces** page, click **Create Namespace** in the upper-right portion of the window.
1. On the **Create Namespace** page in **Name**, enter the Namespace Name.
1. In **Cloud Provider**, select the cloud provider in which to host this Namespace.
1. In **Region**, select the region in which to host this Namespace.
1. In **Retention Period**, specify a value from 1 to 90 days. When choosing this value, consider your needs for Event
History versus the cost of maintaining that Event History. Typically, a development Namespace has a short retention
period and a production Namespace has a longer retention period. (If you need to change this value later, contact
[Temporal Support](/cloud/support#support-ticket).)
1. Select your authentication method: [API keys](/cloud/api-keys) or [mTLS](/cloud/certificates).
1. If using mTLS authentication, paste the CA certificate for this Namespace.
1. Optional: In **Codec Server**, enter the HTTPS URL (including the port number) of your Codec Server endpoint. You may
also enable "Pass the user access token with your endpoint" and "Include cross-origin credentials." For details, see
[Hosting your Codec Server](/production-deployment/data-encryption#set-your-codec-server-endpoints-with-web-ui-and-cli).
1. Click **Create Namespace**.
See the [`tcld` namespace create](/cloud/tcld/namespace/#create) command reference for details.
## What are some Namespace best practices? {#best-practices}
This section provides general guidance for organizing [Namespaces](/namespaces) across use cases, services,
applications, or domains. Temporal Cloud provides Namespace–as-a-service, so the Namespace is the endpoint. Customers
should consider not only a Namespace naming convention but also how to group or isolate workloads using the Namespace as
a boundary.
Each team can have their own Namespace for improved modularity, security, debugging, and fault isolation. Namespaces
contain the blast radius of misbehaving Workers that may exhaust rate limits. Sensitive Workflow state (PCI data) can be
secured with per-Namespace permissions and encrypted with a separate encryption key.
Temporal Applications in different Namespaces may be connected with [Nexus](/cloud/nexus) by exposing a clean service
contract for others to use with built-in [Nexus access controls](/cloud/nexus/security). Nexus supports cross-team,
cross-domain, multi-region, and multi-cloud use cases.
### Constraints and limitations
Before considering an appropriate Namespace configuration, you should be aware of the constraints
listed on the [Temporal Cloud Limits](/cloud/limits) page.
For advice on managing Namespaces within limits, see the [Namespace Best Practices](/best-practices/managing-namespace) page.
### General guidance
Namespace configuration requires some consideration. Following are some general guidelines to consider.
- Namespaces are usually defined per use case. A use case can encompass a broad range of Workflow types and a nearly
unlimited scale of concurrent [Workflow Executions](/workflow-execution).
- Namespaces can be split along additional boundaries such as service, application, domain or even sub-domain.
- Namespaces should be used to reduce the "blast radius" for mission-critical applications.
- Environments such as production and development usually have requirements for isolation. We recommend that each
environment has its own Namespace.
- Namespaces should be used to reduce the "blast radius" for mission-critical applications.
- Use [Nexus](/nexus) to communicate across team, domain, and Namespace boundaries with a clean service contract instead of sharing Temporal primitives directly.
Nexus enables each team to have their own Namespace for improved security, troubleshooting, and fault isolation while sharing capabilities through Nexus Endpoints.
### Examples
Following are some ideas about how to organize Namespaces.
#### Example 1: Namespace per use case and environment
We recommend using one Namespace for each use case and environment combination for simple configurations in which
multiple services and team or domain boundaries don't exist.
Sample naming convention:
<use-case>_<environment>
#### Example 2: Namespace per use case, service, and environment
We recommend using one Namespace for each use case, service, and environment combination when multiple services that are
part of same use case communicate externally to Temporal via API (HTTP/gRPC).
Sample naming convention:
<use-case>_<service>_<environment>
#### Example 3: Namespace per use case, domain, and environment
We recommend using one namespace per use case, domain, and environment combination when multiple services that are part
of the same use case need to communicate with each another via [Signals](/sending-messages#sending-signals) or by
starting [Child Workflows](/child-workflows). In this case, though, you must be mindful about Workflow Id uniqueness by
prefixing each Workflow Id with a service-specific string. The name of each Task Queue must also be unique. If multiple
teams are involved, the domain could also represent a team boundary.
Sample naming convention:
<use-case>_<domain>_<environment>
Sample workflowId convention:
<service-string>_<workflow-id>
## How to access a Namespace in Temporal Cloud {#access-namespaces}
{/* How to access a Namespace in Temporal Cloud */}
Temporal Cloud supports authentication to Namespaces using [API keys](/cloud/api-keys) _or_
[mTLS](/cloud/certificates). To migrate a Namespace from one authentication method to another, or to use both API
key and mTLS authentication on the same Namespace, please contact
[Support](https://docs.temporal.io/cloud/support#support-ticket).
:::info
Using **both** API key and mTLS authentication on the **same** Namespace is in
[pre-release](/evaluate/development-production-features/release-stages) and doesn't support
[High Availability features](/cloud/high-availability) or authenticating with an API Key to a Namespace Endpoint.
:::
Connecting to your Namespace requires a specific endpoint that works for the given Namespace.
There are two types of gRPC endpoints for accessing a Namespace in Temporal Cloud: a Namespace endpoint and a regional endpoint.
- **Namespace endpoint** (`..tmprl.cloud:7233`) — **Recommended**
- This endpoint is unique to each Namespace. It always connects to the Namespace, no matter which region(s) the Namespace is using.
- A Temporal Client that uses a Namespace endpoint doesn't have to be aware of which region the Namespace is in.
- For Namespaces with [High Availability](/cloud/high-availability), the Namespace endpoint automatically directs traffic to the active region, so Workers and Clients don't need to change endpoints during a failover.
- Regional endpoint (`..api.temporal.io:7233`)
- Temporal Cloud has only one regional endpoint for each cloud region. The same regional endpoint can access any Namespace that is active in that region (or that has a [replica](/cloud/high-availability) in that region).
- A Temporal Client can use a regional endpoint to ensure connection to a Namespace always happens within that region. This can be useful in advanced [High Availability](/cloud/high-availability) setups where you want explicit control over which region handles requests.
- When using mTLS to authenticate, the Temporal Client must set the `server_name` property to `` in its request to the value of the Namespace endpoint. This tells the client to expect a different SNI header during the TLS handshake, since the request to the regional endpoint is redirected to the specific Namespace.
### Configuring a Temporal Client with API keys or mTLS
To use API keys to connect with the [Temporal CLI](/cli), [Client SDK](/develop), [tcld](/cloud/tcld),
[Cloud Ops API](/ops), and [Terraform](/cloud/terraform-provider), see
[Use API keys to authenticate](/cloud/api-keys#using-apikeys).
To use mTLS to connect with the [Temporal CLI](/cli) and [Client SDK](/develop), see
[Configure Clients to use Client certificates](/cloud/certificates#configure-clients-to-use-client-certificates).
### Accessing the Temporal Web UI
For accessing the Temporal Web UI, use the HTTPS endpoint in the form:
`https://cloud.temporal.io/namespaces/.`. For example:
`https://cloud.temporal.io/namespaces/accounting-production.f45a2`.
### Accessing Namespaces with Encryption and Private Connectivity
To ensure the security of your data, all traffic to and from your Namespace is encrypted with TLS 1.3.
For enhanced protection:
- Set up [private connectivity](/cloud/connectivity#private-network-connectivity-for-namespaces) to the Namespace.
- In your own networking architecture, set up an allow list for outgoing network requests from your Clients and Workers with the IP address ranges of the
Cloud Provider region in which your Namespace is located:
- [AWS IP address ranges](https://docs.aws.amazon.com/vpc/latest/userguide/aws-ip-ranges.html)
- [GCP IP address ranges](https://cloud.google.com/compute/docs/faq#find_ip_range)
## How to manage Namespaces in Temporal Cloud {#manage-namespaces}
{/* How to manage Namespaces in Temporal Cloud using Temporal Cloud UI */}
### Manage Namespaces in Temporal Cloud using Temporal Cloud UI
To list Namespaces:
- On the left side of the window, select **Namespaces**.
To edit a Namespace (including custom Search Attributes, certificates, certificate filters, Codec Server endpoint,
permissions, and users), find the Namespace and do either of the following:
- On the right end of the Namespace row, select the three vertical dots (⋮). Click **Edit**.
- Select the Namespace name. In the top-right portion of the page, select **Edit**.
On the **Edit** page, you can do the following:
- Add a [custom Search Attribute](/search-attribute#custom-search-attribute).
- [Manage CA certificates](/cloud/certificates).
- [Manage certificate filters](/cloud/certificates#manage-certificate-filters-using-temporal-cloud-ui).
- Set
[Codec Server endpoint](/production-deployment/data-encryption#set-your-codec-server-endpoints-with-web-ui-and-cli)
for all users on the Namespace. Each user on the Namespace has the option to
[override this setting](/production-deployment/data-encryption#web-ui) in their browser.
- Manage [Namespace-level permissions](/cloud/manage-access/roles-and-permissions#namespace-level-permissions).
- Add users.
To add a user to a Namespace, scroll to the bottom of the page and select **Add User**.
After you make changes, select **Save** in the top-right or bottom-left portion of the page.
{/* How to manage Namespaces in Temporal Cloud using tcld */}
### Manage Namespaces in Temporal Cloud using tcld
To list Namespaces and get information about them, use the following [tcld](/cloud/tcld/) commands:
- [tcld namespace list](/cloud/tcld/namespace/#list)
- [tcld namespace get](/cloud/tcld/namespace/#get)
To manage certificates, use the [tcld namespace accepted-client-ca](/cloud/tcld/namespace/#accepted-client-ca) commands.
For more information, see [How to manage certificates in Temporal Cloud](/cloud/certificates).
To manage certificate filters, use the [tcld namespace certificate-filters](/cloud/tcld/namespace/#certificate-filters)
commands. For more information, see
[How to manage certificate filters in Temporal Cloud](/cloud/certificates#manage-certificate-filters).
## How to delete a Namespace in Temporal Cloud {#delete-a-namespace}
:::info
To delete a Namespace, a user must have Namespace Admin [permission](/cloud/manage-access/roles-and-permissions#namespace-level-permissions) for that
Namespace.
:::
### Delete a Namespace using Temporal Cloud UI
1. Go to the Temporal Cloud UI and log in.
1. On the left side of the window, select **Namespaces**.
1. On the **Namespaces** page, select a Namespace Name.
1. On the Namespace page, select **Edit** in the upper-right portion of the window.
1. On the **Edit** Namespace page, select **Delete Namespace** in the upper-right portion of the window.
1. In the **Delete Namespace** dialog, type `DELETE` to confirm the deletion of that Namespace.
1. Select **Delete**.
After deleting a Temporal Cloud Namespace, the Temporal Service immediately removes the Namespace's Workflow Executions
and Task Queues. Make sure all Workflows have been completed, canceled, or terminated before removing a Namespace. The
Namespace removal is permanent.
Closed Workflow Histories remain in Temporal storage until the user-defined retention period expires. This period
reflects the policy in effect when the Workflow Execution was closed.
For further questions or concerns, contact [Support](https://docs.temporal.io/cloud/support#support-ticket).
### Delete a Namespace using tcld
See the [tcld namespace delete](/cloud/tcld/namespace/#delete) command reference for details.
### Namespace deletion protection {#delete-protection}
To prevent accidental Namespace deletion, Temporal Cloud provides a protection feature. When you enable Deletion
Protection for your production environment Namespace, you ensure that critical data won't be deleted unintentionally.
Follow these steps:
- Visit the [Namespaces page](https://cloud.temporal.io/namespaces) on Temporal Cloud.
- Open your Namespace details page.
- Select the Edit button.
- Scroll down to Security and click the disclosure button (downward-facing caret).
- Enable **Deletion Protection**
To enable or disable this feature using [`tcld`](/cloud/tcld), use the following command. Set the value to `true` to
enable or `false` to disable:
```
tcld namespace lifecycle set \
--namespace \
--enable-delete-protection
```
## How to tag a Namespace in Temporal Cloud {#tag-a-namespace}
Tags are key-value metadata pairs that can be attached to namespaces in Temporal Cloud to help operators organize,
track, and manage namespaces more easily.
### Tag Structure and Limits
- Each namespace can have a maximum of 10 tags
- Each key must be unique for a given namespace (e.g., a namespace cannot have both `team:foo` and `team:bar` tags)
- Keys and values must be 1-63 characters in length
- Allowed characters: lowercase letters (`a-z`), numbers (`0-9`), periods (`.`), underscores (`_`), hyphens (`-`), and
at signs (`@`)
- Tags are not a secure storage mechanism and should not store PII or PHI
- Tags will not change the behavior of the tagged resource
- There is a soft limit of 1000 unique tag keys per account
### Permissions
- Only [**Account Admins** and **Account Owners**](/cloud/manage-access/roles-and-permissions#account-level-roles) can create and edit tags
- All users with access to a namespace can view its tags
### tcld
See the [tcld namespace tags](/cloud/tcld/namespace/#tags) command reference for details.
### Terraform
See the
[Terraform provider](https://github.com/temporalio/terraform-provider-temporalcloud/blob/main/docs/resources/namespace_tags.md)
for details.
### Web UI
Tags can be viewed and managed through the Temporal Cloud web interface. When viewing a namespace, you'll see tags
displayed and can add, edit, or remove them if you have the appropriate permissions.
---
## Manage service accounts
Temporal Cloud provides Account Owner and Global Admin [roles](/cloud/manage-access/roles-and-permissions#account-level-roles) with the option to create machine identities named Service Accounts.
Service Accounts are a type of identity in Temporal Cloud.
Temporal Cloud supports User identities as a representation of a human user who uses Temporal Cloud.
Service Accounts afford Temporal Cloud Account Owner and Global Admin [roles](/cloud/manage-access/roles-and-permissions#account-level-roles) the ability to create an identity for machine authentication, an identity not associated with a human user.
With the addition of Service Accounts, Temporal Cloud now supports 2 identity types:
- Users (tied to a human, identified by email address or ID)
- Service Accounts (not tied to a human, email address optional, identified by name or ID)
Service Accounts use API Keys as the authentication mechanism to connect to Temporal Cloud.
You should use Service Accounts to represent a non-human identity when authenticating to Temporal Cloud for operations automation or the Temporal SDKs and the Temporal CLI for Workflow Execution and management.
:::tip
Namespace Admins can now manage and create [Namespace-scoped Service Accounts](/cloud/service-accounts#scoped), regardless of their Account Role.
:::
## Manage Service Accounts
Account Owner and Global Admin [roles](/cloud/manage-access/roles-and-permissions#account-level-roles) can manage Service Accounts by creating, viewing, updating, deleting Service Accounts using the following tools:
- Temporal Cloud UI
- Temporal Cloud CLI (tcld)
- Use `tcld service-account --help` for a list of all service-account commands
Account Owner and Global Admin [roles](/cloud/manage-access/roles-and-permissions#account-level-roles) also have the ability to manage API Keys for Service Accounts.
### Prerequisites
- A Cloud user account with Account Owner or Global Admin [role](/cloud/manage-access/roles-and-permissions#account-level-roles) permissions
- Access to the Temporal Cloud UI or Temporal Cloud CLI (tcld)
- Enable access to API Keys for your Account
- To manage Service Accounts using the Temporal Cloud CLI (tcld), upgrade to the latest version of tcld (v0.18.0 or higher) using `brew upgrade tcld`.
- If using a version of tcld less than v0.31.0, enable Service Account commands with `tcld feature toggle-service-account`.
### Create a Service Account
Create a Service Account using the Temporal Cloud UI or tcld.
While User identities are invited to Temporal Cloud, Service Accounts are created in Temporal Cloud.
1. Go to [Settings → Identities](https://cloud.temporal.io/settings/identities)
2. Click the `Create Service Account` button located near the top of the `Identities` page
3. Provide the following information:
- **Name** (required)
- **Description** (optional)
- **Account Level Role** (required)
- **Namespace Permissions** (optional)
- Use this section of the Create Service Account page to grant the Service Account access to individual Namespaces
4. Click `Create Service Account` at the bottom of the page
- A status message is displayed at the bottom right corner of the screen and on the next screen
- You will be prompted to create an API Key for the Service Account (optional)
5. (Optional) Create API Key
- It is recommended to create an API Key for the Service Account right after you create the Service Account, though you can create/manage API Keys for Service Accounts at any time
- See the API Key [documentation](/cloud/api-keys) for more information on creating and managing API Keys
To create a Service Account using tcld, use the `tcld service-account create` command:
```
tcld service-account create -n "sa_test" -d "this is a test SA" --ar "Read"
```
This example creates a Service Account with the name `"sa_test"`, description `"this is a test SA"`, and a `Read` Account Role.
Creating a Service Account requires the following attributes: `name` and `account-role` (as above).
You can also provide the Namespace Permissions for the Service Account using the `—-np` flag.
Creating a Service Account returns the `ServiceAccountId` which is used to retrieve, update, or delete a Service Account.
### View Service Accounts
View a single or all Service Account(s) using the Temporal Cloud UI or tcld.
Service Accounts are listed on the `Identities` section of the `Settings` page, along with Users.
To locate a Service Account:
1. Go to [Settings → Identities](https://cloud.temporal.io/settings/identities)
2. Select the `Service Accounts` filter
To view all Service Accounts in your account using tcld, use the `tcld service-account list` command:
```
tcld service-account list
```
### Delete a Service Account
Delete a Service Account using the Temporal Cloud UI or tcld. When you delete a Service Account, all associated API keys are automatically deleted as well.
Therefore, you don't need to manually remove API keys after deleting a Service Account.
1. Go to [Settings → Identities](https://cloud.temporal.io/settings/identities)
2. Find the relevant Service Account
3. Select the vertical ellipsis menu in the Service Account row
4. Select `Delete`
5. Confirm the delete action when prompted
To delete a Service Account using tcld, use the `tcld service-account delete` command:
```
tcld service-account delete --service-account-id "e9d87418221548"
```
Use the tcld Service Account list command to validate the Service Account has been removed from the account.
The Service Account is deleted when it is no longer visible in the output of the list command.
### Update a Service Account {#update}
Update a Service Account's description using the Temporal Cloud UI or tcld.
1. Go to [Settings → Identities](https://cloud.temporal.io/settings/identities)
2. Find the relevant Service Account
3. Select the vertical ellipsis menu in the Service Account row
4. Select `Edit`
5. Make changes to the Service Account
- You can change the Service Account's name, description, Account Level Role, and Namespace Permissions
6. Click the `Save` button located in the bottom left of the screen
- A status message is displayed at the bottom right corner of the screen
Three different commands exist to help users update a Service Account using tcld:
- `tcld service-account update`: to update a Service Account's name or description field
- `tcld service-account set-account-role`: to update a Service Account's Account Role
- `tcld service-account set-namespace-permissions`: to update a Service Account's Namespace Permissions
Example:
```
tcld service-account update --id "2f68507677904e09b9bcdbf93380bb95" -d "new description"
```
## Namespace-scoped Service Accounts {#scoped}
There is a special type of Service Account, called a Namespace-scoped Service Account, which shares the
same functionality as the Service Accounts above, but is limited (or scoped) to a single namespace.
In particular, a Namespace-scoped Service Account must _always_ have:
- A `Read` Account Role
- A single Namespace Permission
Note that a Namespace-scoped Service Account cannot be reassigned to a different Namespace after creation, but its Namespace permission can be modified (e.g. from `Read` to `Write`).
Namespace-scoped Service Accounts are useful in situations when you need to restrict a client's access to a single Namespace.
You can retrieve, update, and delete a Namespace-scoped Service Account using the same process and commands as above, but creation is slightly different.
### Permissions
Unlike regular Service Accounts, which require a Global Admin or Account Owner role, Namespace-scoped Service Accounts can be created and managed by Namespace Admins.
For example, an Account Developer with Namespace Admin for `test_ns` can create a Service Account scoped to `test_ns`.
Global Admins and Account Owners can also create Namespace-scoped Service Accounts, as they implicitly have Namespace Admin rights for all Namespaces.
### Create a Namespace-scoped Service Account
As with regular Service Accounts, Namespace-scoped Service Accounts can be created using Temporal Cloud UI or tcld.
#### Using the Cloud UI {#scoped-ui}
Currently, creating a Namespace-scoped Service Account from the Temporal Cloud UI happens on an individual [Namespace](/cloud/namespaces#manage-namespaces) page.
If the current Namespace has API key authentication enabled, then there will be a `Generate API Key` button as a banner on the top of the Namespace page or in the `Authentication` section.
By clicking on the `Generate API Key` button, a Namespace-scoped Service Account will be automatically created for the given Namespace (if one does not already exist) and an associated API key will be displayed. This key will have the maximum expiration time, which is 2 years.
The resulting Namespace-scoped Service Account will be named `-service-account` and will have an `Admin` Namespace permission by default.
#### Using tcld
To create a Namespace-scoped Service Account with tcld, use the `tcld service-account create-scoped` command:
```
tcld service-account create-scoped -n "test-scoped-sa" --np "test-ns=Admin"
```
This example creates a Namespace-scoped Service Account for the Namespace `test-ns`, named `test-scoped-sa`, with `Admin` Namespace Permission.
Note that the Account Role is omitted, since Namespace-scoped Service Accounts always have a `Read` Account Role.
### Lifecycle
When a Namespace is deleted, all associated Namespace-scoped Service Accounts and their associated API keys are automatically deleted as well.
Therefore, you do not need to manually remove Namespace-scoped Service Accounts and their API keys after deleting a Namespace.
---
## Manage user groups
## What are user groups?
User groups can be used to help manage sets of users that should have the same
access. Instead of separately assigning the same role to individual users, a user group can be
created, assigned the desired roles, and then users added to the user group. This
eases the toil of managing individual user permissions and can simplify access management. When
a new role is needed, it can be added to the group once and all users' access will reflect the
new role.
User groups can be assigned both [account-level roles](/cloud/manage-access/roles-and-permissions#account-level-roles) and [namespace-level permissions](/cloud/manage-access/roles-and-permissions#namespace-level-permissions).
One user can be assigned to many groups. In the event that a user's group memberships have multiple roles for the same resource, the user will have an effective role of the most permissive of the permissions. For example if `Group A` grants a read-only role to a namespace, but `Group B` grants a write role to a namespace then a user that belongs to both `Group A` and `Group B` would have the write role to the namespace.
[Service accounts](/cloud/service-accounts) cannot be assigned to user groups.
Only users with the Account Owner or Global Admin account-level [role](/cloud/manage-access/roles-and-permissions#account-level-roles) can manage user groups.
## How SCIM groups work with user groups {#scim-groups}
[SCIM groups](/cloud/scim) work similarly to user groups with respect to role assignment. Unlike a user group, the lifecycle of a SCIM group is fully managed by the SCIM integration which means:
1. SCIM groups cannot be created except through the SCIM integration
1. SCIM groups cannot be deleted except through the SCIM integration
1. SCIM group membership is managed through the SCIM integration
User groups and SCIM groups can be used simultaneously in a single Temporal Cloud account. One user may belong to multiple SCIM groups and to multiple user groups.
Using user group and SCIM groups together can be useful when the groups defined in the identity provider (IDP) don't map cleanly to the access you need to grant in Temporal Cloud. Instead of having to update the IDP (which is often sensitive and time-consuming), you can use Temporal Cloud user groups to manage access.
:::info
All user group administration requires an Account Owner or Global Admin account-level [role](/cloud/manage-access/roles-and-permissions#account-level-roles).
:::
## How to create a user group in your Temporal Cloud account {#create-group}
User group names must be 3-64 characters long and can only contain lowercase letters, numbers, hyphens, and underscores.
1. Navigate to the [identities page](https://cloud.temporal.io/settings/identities)
1. Click the Create Group button
1. Name the group
1. Assign an account-level role to the group (you can assign namespace-level permissions after the group is created)
1. Click Save
See the [`tcld` user-group create](/cloud/tcld/user-group/#create) command reference for details.
See the [Terraform provider documentation](https://registry.terraform.io/providers/temporalio/temporalcloud/latest/docs/resources/group) for details.
## How to assign roles to a user group {#assign-group-roles}
To edit the account role of a group:
1. Navigate to the [identities page](https://cloud.temporal.io/settings/identities)
1. Find the group to edit (You can filter the list of identities to only show groups to find the relevant group by clicking the Groups tab on the table)
1. Click Edit Group
1. Click the Account Role dropdown
1. Select a new account role
1. Click Save
To add namespace permissions to a group:
1. Navigate to the [identities page](https://cloud.temporal.io/settings/identities)
1. Find the group to edit (You can filter the list of identities to only show groups to find the relevant group by clicking the Groups tab on the table)
1. Click Edit Group
1. Click Add Namespaces
1. Under Grant Access to a Namespace, search for the namespace you’d like to add permissions for
1. Select the namespace
1. Click the pencil to edit the permissions for the selected namespace
1. Click Save
To edit or remove namespace permissions from a group:
1. Click Edit Group
1. Click the pencil on a permission to edit it, or the trash can to delete it
1. Click Save
See the [`tcld` user-group set-access](/cloud/tcld/user-group/#set-access) command reference for details.
See the [Terraform provider documentation](https://registry.terraform.io/providers/temporalio/temporalcloud/latest/docs/resources/group) for details.
## How to manage users in a group {#assign-group-members}
To add users to the group:
1. Navigate to the [identities page](https://cloud.temporal.io/settings/identities)
1. Find the group to edit (You can filter the list of identities to only show groups to find the relevant group by clicking the Groups tab on the table)
1. Click Edit Group
1. Under Members, search for the user you’d like to add
1. Select the user
1. Click Save
To remove a user from the group:
1. Click Edit Group
1. Under Members, click the X next to the user you’d like to remove
1. Click Save
See the [`tcld` user-group add-users](/cloud/tcld/user-group/#add-users) and the [`tcld` user-group remove-users](/cloud/tcld/user-group/#remove-users) command reference for details.
See the [Terraform provider documentation](https://registry.terraform.io/providers/temporalio/temporalcloud/latest/docs/resources/group) for details.
## Delete a user group
1. Navigate to the [identities page](https://cloud.temporal.io/settings/identities)
1. Find the group to edit (You can filter the list of identities to only show groups to find the relevant group by clicking the Groups tab on the table)
1. Click the dropdown next to the edit button
1. Click Delete
1. Confirm by clicking Delete
See the [`tcld` user-group delete](/cloud/tcld/user-group/#delete) command reference for details.
See the [Terraform provider documentation](https://registry.terraform.io/providers/temporalio/temporalcloud/latest/docs/resources/group) for details.
---
## User management
To invite users using the Temporal Cloud UI:
1. In Temporal Web UI, select **Settings** in the left portion of the window.
1. On the **Settings** page, select **Create Users** in the upper-right portion of the window.
1. On the **Create Users** page in the **Email Addresses** box, type or paste one or more email addresses.
1. In **Account-Level Role**, select a [Role](/cloud/manage-access/roles-and-permissions#account-level-roles). The Role
applies to all users whose email addresses appear in **Email Addresses**.
1. If the account has any Namespaces, they are listed under **Grant access to Namespaces**. To add a permission, select
the checkbox next to a Namespace, and then select a
[permission](/cloud/manage-access/roles-and-permissions#namespace-level-permissions). Repeat as needed.
1. When all permissions are assigned, select **Send Invite**.
Use the [`tcld user invite`](/cloud/tcld/user/#invite) command. Specify the user's email, an account-level role, and
optionally one or more Namespace permissions.
Available account roles: `admin` | `developer` | `read`.
Available Namespace permissions: `Admin` | `Write` | `Read`.
```command
tcld user invite \
--user-email \
--account-role \
--namespace-permission =
```
You can invite multiple users and assign multiple Namespace permissions in a single command:
```command
tcld user invite \
--user-email user1@example.com \
--user-email user2@example.com \
--account-role developer \
--namespace-permission ns1=Admin \
--namespace-permission ns2=Write
```
Use the [CreateUser](https://saas-api.tmprl.cloud/docs/httpapi.html#tag/users) endpoint to invite a user.
```
POST /cloud/users
```
The request body includes a `spec` with the following fields:
- `spec.email` — The email address of the user to invite.
- `spec.access.account_access.role` — The account-level role to assign.
- `spec.access.namespace_accesses` — A map of Namespace names to permissions.
Available roles: `ROLE_ADMIN` | `ROLE_DEVELOPER` | `ROLE_READ` | `ROLE_OWNER` | `ROLE_FINANCE_ADMIN`.
Available Namespace permissions: `PERMISSION_ADMIN` | `PERMISSION_WRITE` | `PERMISSION_READ`.
The new users receive an email with a link to accept the invitation and complete their setup. The new user must use this
link to sign up to be added to your account unless the account has a SAML configuration. If your account has a SAML
configuration, the new user can sign in using their existing SAML credentials and be included in the account
automatically.
:::caution
The new user must use the same authentication method they originally signed up with to sign in to Temporal Cloud. If
they used single sign-on (SSO), they must use the same SSO provider to sign in to Temporal Cloud. If they used email and
password authentication, they must use the same email and password to sign in to Temporal Cloud, and cannot use SSO,
even if the underlying email address is the same.
:::
---
## Manage users
Users are one of the primary access principals in Temporal Cloud. Each user is assigned one
[account-level role](/cloud/manage-access/roles-and-permissions#account-level-roles), and each role has a set of
permissions. In addition to account-level roles, users can also be assigned
[Namespace-level permissions](/cloud/manage-access/roles-and-permissions#namespace-level-permissions) for specific
Namespaces. Each user can only perform an action if they have a role that grants them the necessary permissions.
When you register for Temporal Cloud without joining an existing account, you are assigned the Account Owner role for a
new account. You can then invite other users to join the account and assign them roles.
## Invite users to your Temporal Cloud account {#invite-users}
Global Admin roles cannot assign the Account Owner role or the Finance Admin role to new users they invite to the
account.
## Update a user's account-level role {#update-roles}
With Global Admin or Account Owner privileges, you can update any user's account-level
[role](/cloud/manage-access/roles-and-permissions#account-level-roles). The Account Owner role can only be granted by
existing Account Owners.
For security reasons, you cannot remove the Account Owner role from a user. Removing the Account Owner role must be made
through Temporal Support. To remove the Account Owner role, you must submit a
[support ticket](https://temporalsupport.zendesk.com/).
1. In Temporal Web UI, select **Settings** in the left portion of the window.
1. On the **Settings** page, select the user.
1. On the user profile page, select **Edit User**.
1. On the **Edit User** page in **Account Level Role**, select the role.
1. Select **Save**.
Use the [`tcld user set-account-role`](/cloud/tcld/user/#set-account-role) command. Specify the user by email or ID and
the new role.
Available account roles: `admin` | `developer` | `read`. The Account Owner and Finance Admin roles cannot be assigned
through tcld; use the Web UI or Cloud Ops API to assign these roles.
```command
tcld user set-account-role --user-email --account-role
```
You can also identify the user by ID:
```command
tcld user set-account-role --user-id --account-role
```
Use the [UpdateUser](https://saas-api.tmprl.cloud/docs/httpapi.html#tag/users) endpoint to update a user's account-level
role.
```
POST /cloud/users/{userId}
```
The request body includes a `spec` with the user's `access.account_access.role` field set to the desired role.
Available roles: `ROLE_OWNER` | `ROLE_ADMIN` | `ROLE_DEVELOPER` | `ROLE_FINANCE_ADMIN` | `ROLE_READ`.
## Update a user's Namespace-level permissions {#update-permissions}
With Account Owner, Global Admin, or Namespace Admin privileges, you can update
[Namespace-level permissions](/cloud/manage-access/roles-and-permissions#namespace-level-permissions) for users within
Namespaces you administer. Account Owners and Global Admins have Namespace Admin permissions on all Namespaces
automatically.
**Update a user's permissions across multiple Namespaces:**
1. In Temporal Web UI, select **Namespaces** in the left portion of the window.
1. On the **Namespaces** page, select the Namespace.
1. If necessary, scroll down to the list of permissions.
1. On the user profile page in **Namespace permissions**, select the Namespace.
1. On the Namespace page in **Account Level Role**, select the role.
1. Select **Save**.
**Update permissions for multiple users within a single Namespace:**
1. In Temporal Web UI, select **Settings** in the left portion of the window.
1. On the **Settings** page in the **Users** tab, select the user.
1. On the user profile page, select **Edit User**.
1. On the **Edit User** page in **Namespace permissions**, change the permissions for one or more Namespaces.
1. Select **Save**.
Use the [`tcld user set-namespace-permissions`](/cloud/tcld/user/#set-namespace-permissions) command. Specify the user
by email or ID and one or more Namespace permissions.
Each permission value must be in the format `namespace=permission-type`.
Available Namespace permissions: `Admin` | `Write` | `Read`.
```command
tcld user set-namespace-permissions --user-email --namespace-permission =
```
You can set multiple Namespace permissions in a single request:
```command
tcld user set-namespace-permissions --user-email \
--namespace-permission ns1=Admin \
--namespace-permission ns2=Write
```
Use the [SetUserNamespaceAccess](https://saas-api.tmprl.cloud/docs/httpapi.html#tag/users) endpoint to set a user's
permission for a specific Namespace.
```
POST /cloud/namespaces/{namespace}/users/{userId}/access
```
Set the `access.permission` field to the desired permission.
Available permissions: `PERMISSION_ADMIN` | `PERMISSION_WRITE` | `PERMISSION_READ`.
## Delete a user from your Temporal Cloud account {#delete-users}
With Account Owner or Global Admin privileges, you can delete a user from your Temporal Cloud account.
1. In Temporal Web UI, select **Settings** in the left portion of the window.
1. On the **Settings** page, find the user and, on the right end of the row, select **Delete**.
1. In the **Delete User** dialog, select **Delete**.
You can also delete a user in two other ways in Web UI:
- User profile page: Select the down arrow next to **Edit User** and then select **Delete**.
- **Edit User** page: Select **Delete User**.
Use the [`tcld user delete`](/cloud/tcld/user/#delete) command. Specify the user by email or ID.
```command
tcld user delete --user-email
```
You can also identify the user by ID:
```command
tcld user delete --user-id
```
Use the [DeleteUser](https://saas-api.tmprl.cloud/docs/httpapi.html#tag/users) endpoint to remove a user from your
account.
```
DELETE /cloud/users/{userId}
```
---
## Enable High Availability
You can enable [High Availability](/cloud/high-availability) features for a new or existing Namespace by adding a
replica. When you add a replica, Temporal Cloud begins asynchronously replicating ongoing and existing Workflow
Executions.
The replica region must be on the same continent as the primary region. Because of that, not all replication options are available in all Temporal Cloud regions. See the [Service regions](/cloud/regions) page for the supported replica regions for each active region.
Using private network connectivity with a HA namespace requires extra setup. See
[Connectivity for HA](/cloud/high-availability/ha-connectivity).
There are charges associated with Replication and enabling High Availability features. For pricing details, visit
Temporal Cloud's [Pricing](/cloud/pricing) page.
## Create a Namespace with High Availability features {#create}
To create a new Namespace with High Availability features, you can use the Temporal Cloud UI or the tcld command line
utility.
1. Visit Temporal Cloud in your Web browser.
1. During Namespace creation, specify the primary [region](/cloud/regions) for the Namespace.
1. Select "Add a replica".
1. Choose the [region](/cloud/regions) for the replica.
The web interface will present an estimated time for replication to complete.
This time is based on your selection and the size and scale of the Workflows in your Namespace.
At the command line, enter:
```
tcld namespace create \
--namespace . \
--region \
--region
```
Specify the [region codes](/cloud/regions) as arguments to the two `--region` flags.
If using API key authentication with the `--api-key` flag, you must add it directly after the tcld command and before
`namespace create`.
Temporal Cloud sends an email alert to all Namespace Admins once your Namespace replica is ready for use.
## Add High Availability to an existing Namespace {#upgrade}
A replica can be added after a namespace has already been created.
1. Visit Temporal Cloud Namespaces in your Web browser.
1. Navigate to the Namespace details page.
1. Select the “Add a replica” button.
1. Choose the [region](/cloud/regions) for the replica.
The web interface will present an estimated time for replication to complete. This time is based on your selection and
the size and scale of the Workflows in your Namespace.
Temporal Cloud sends an email alert to all Namespace Admins once your Namespace replica is ready for use.
At the command line, enter:
```
tcld namespace add-region \
--namespace . \
--region
```
Specify the region name (for example, `us-east-1`) of the region where you want to create the replica as an argument to the
`--region` flag. See [Regions](/cloud/regions) for available region names.
If using API key authentication with the `--api-key` flag, you must add it directly after the tcld command and before
`namespace add-region`.
Temporal Cloud sends an email alert once your Namespace is ready for use.
## Change a replica location {#changing}
Temporal Cloud can't change replica locations directly. To change a replica's location, you need to remove the replica
and add a new one.
:::caution
We discourage changing the location of your replica for deployed applications, except under exceptional circumstances.
If you remove your replica, you lose the availability guarantees of the Namespace, and it can take time to add another
replica.
If you remove a replica from a region, you must wait seven days before you can re-enable High Availability (HA) in that
same location. During this period, you may add a replica to a different region, provided you have not had one
there within the last seven days.
:::
Follow these steps to change the replica location:
1. [Remove your replica](#disable). This disables High Availability for your Namespace.
2. [Add a new replica](#upgrade) to your Namespace.
You will receive an email alert once your Namespace is ready for use.
## Disable High Availability (remove a replica) {#disable}
To disable High Availability features on a Namespace, remove the replica from that Namespace. Removing a replica
disables all High Availability features:
- Discontinues replication of the Workflows in the Namespace.
- Disables the Namespace's ability to trigger a failover to a different region or cloud.
- Ends High Availability charges.
:::caution
After removing a Namespace's replica, you cannot add a new replica to that same region for seven days.
During that time, you can still add a replica to any other region.
:::
Follow these steps to remove a replica from a Namespace:
1. Navigate to the Namespace details page in Temporal Cloud
1. Select the option to "Remove Replica" on the "Region" card.
Run the following command to remove the replica:
```
tcld namespace delete-region \
--api-key \
--namespace . \
--region
```
See [Regions](/cloud/regions) for available region names.
---
## Configure and trigger failovers
In case of an incident or an outage, Temporal will automatically your Namespace from the primary to the replica.
This lets Workflow Executions continue with minimal interruptions or data loss.
You can also [manually initiate failovers](/cloud/high-availability/failovers) based on your situational monitoring or for testing.
Returning control from the replica to the primary is called a .
After a Temporal-managed failover, Temporal automatically fails back to the original region once it is healthy.
See [Returning to the primary with failbacks](#failbacks) for details on automatic and manual failback options.
## Failovers
Occasionally, a Namespace may become temporarily unavailable due to an unexpected incident.
Temporal Cloud detects these issues using regular health checks.
### Health checks
Temporal Cloud monitors error rates, latencies, and infrastructure problems, such as request timeouts.
If it finds unhealthy conditions where indicators exceed the allowed thresholds, Temporal automatically switches the primary to the replica.
In most cases, the replica is unaffected by the issue.
This process is known as failover.
### Automatic failovers
Failovers prevent data loss and application interruptions.
Existing Workflows continue, and new Workflows start as the incident is addressed.
Temporal Cloud handles failovers automatically, ensuring continuity without manual intervention.
Once the incident is resolved, Temporal Cloud automatically performs a [failback](#failbacks), shifting Workflow Execution processing back to the original region.
For more control over the failover process, you can [disable automated failovers](/cloud/high-availability/failovers#disabling-temporal-initiated).
:::tip
You can test the failover of a Namespace with High Availability features by manually triggering a failover using the Web UI, the tcld CLI, or the Cloud Ops API.
The Terraform provider does not support triggering failovers.
In most scenarios, we recommend you let Temporal handle failovers for you.
After failover, be aware of the following points:
- When working with Multi-region Namespaces, your CNAME may change.
For example, it may switch from aws-us-west-1.region.tmprl.cloud to aws-us-east-1.region.tmprl.cloud.
This change doesn't affect same-region Namespaces.
- Your Namespace endpoint _will not change_.
If it is `my_namespace.my_account.tmprl.cloud:7233` before failover, it will be `my_namespace.my_account.tmprl.cloud:7233` after failover.
:::
### The failover process {#failover-process}
Temporal's automated failover process works as follows:
- During normal operation, the primary asynchronously copies operations and metadata to its replica, keeping them in sync.
- If the primary becomes unavailable, Temporal detects the issue through health checks.
It automatically switches to the replica, using one of its available [failover scenarios](#scenarios).
- The replica takes over the active role and becomes the primary.
Operations continue with minimal disruption.
- When the original primary recovers, the roles can either switch back (failback, by default) or remain as they are, based on your Namespace settings.
Automatic role switching with failover and failback minimizes downtime for consistent availability.
:::info
A Namespace failover, which updates the "active region" field in the Namespace record, is a metadata update.
This update is replicated through the Namespace metadata mechanism.
:::
## Failover scenarios {#scenarios}
The Temporal Cloud failover mechanism supports several modes for executing Namespace failovers.
These modes include graceful failover ("handover"), forced failover, and a hybrid mode.
The hybrid mode is Temporal Cloud’s default Namespace behavior.
### Graceful failover (handover) {#graceful-failover}
In this mode, Temporal Cloud fully processes and drains replication Tasks.
Temporal Cloud pauses traffic to the Namespace before the failover.
Graceful failover prevents the loss of progress and avoids data conflicts.
During graceful failover, the Namespace may experience a brief period of unavailability.
This duration can be limited by the caller and defaults to 10 seconds.
If the system is unable to reach a consistent state within this timeout, the failover attempt is aborted and the Namespace reverts to its previous state.
During this unavailable period:
- Existing Workflows stop progress.
- Temporal Cloud returns a "Service unavailable error".
This error is retryable by the Temporal SDKs.
- State transitions will not happen and tasks are not dispatched.
- User requests like start/signal Workflow are rejected.
- Operations are paused during handover.
This mode favors _consistency_ over availability.
### Forced failover {#forced-failover}
In this mode, a Namespace immediately activates in the replica.
Events not replicated due to replication lag undergo conflict resolution upon reaching the new active Namespace.
This mode prioritizes _availability_ over consistency.
### Hybrid failover mode {#hybrid-failover}
While graceful failovers are preferred for consistency, they aren’t always practical.
Temporal Cloud’s hybrid failover mode (the default mode) limits the initial graceful failover attempt to 10 seconds or less.
During this period:
- Existing Workflows stop progress.
- Temporal Cloud returns a "Service unavailable error", which is retried by SDKs.
If the graceful approach doesn’t resolve the issue, Temporal Cloud automatically switches to a forced failover.
This strategy balances _consistency_ and _availability_ requirements.
### Scenario summary
| Failover Scenario | Characteristics |
| ---------------------------- | ------------------------------------------------------- |
| Graceful failover (handover) | Favors _consistency_ over availability. |
| Forced failover | Prioritizes _availability_ over consistency. |
| Hybrid failover mode | Balances _consistency_ and _availability_ requirements. |
## Network partitions
At any time only the primary or the replica is active.
The only exception occurs in the event of a [network partition](https://en.wikipedia.org/wiki/Network_partition), when a Network splits into separate subnetworks.
Should this occur, you can promote a replica to active status.
**Caution:** This temporarily makes both regions active.
After the network partition is resolved and communication between the isolation domains/regions is restored, a conflict resolution algorithm determines whether the primary or replica remains active.
:::tip
In traditional active/active replication, multiple nodes serve requests and accept writes simultaneously, ensuring strong synchronous data consistency.
In contrast, with a Temporal Cloud Namespace with High Availability Features, only the primary accepts requests and writes at any given time.
Workflow History Events are written to the primary first and then asynchronously replicated to the replica, ensuring that the replica remains in sync.
:::
## Conflict resolution {#conflict-resolution}
Namespaces with replicas rely on asynchronous event replication.
Updates made to the primary may not immediately be reflected in the replica due to , particularly during failovers.
In the event of a non-graceful failover, replication lag may cause a temporary setback in Workflow progress.
Namespaces that aren't replicated can be configured to provide _at-most-once_ semantics for Activities execution when a retry policy's [maximum attempts](https://docs.temporal.io/retry-policies#maximum-attempts) is set to 0.
High Availability Namespaces provide _at-least-once_ semantics for execution of Activities.
Completed Activities _may_ be re-dispatched in a newly active Namespace, leading to repeated executions.
When a Workflow Execution is updated in a newly active replica following a failover, events from the previously active Namespace that arrive after the failover can't be directly applied.
At this point, Temporal Cloud has forked the Workflow History.
After failover, Temporal Cloud creates a new branch history for execution, and begins its process.
The Temporal Service ensures that Workflow Histories remain valid and are replayable by SDKs post-failover or after conflict resolution.
This capability is crucial for ensuring Workflow Executions continue forward without losing progress, and for maintaining consistency across replication, even during incidents that cause disruptions in replication.
## Perform a manual failover {#triggering-failovers}
For some users, Temporal's automated health checks and failovers don't provide sufficient nuance and control.
For this reason, you can manually trigger failovers based on your own custom alerts and for testing purposes.
This section explains how and what to expect afterward.
:::warning Check Your Replication Lag
Always check the before initiating a failover.
A forced failover when there is a significant replication lag has a higher likelihood of rolling back Workflow progress.
:::
### Trigger the failover {#manual-failovers}
You can trigger a failover manually using the Temporal Cloud Web UI, the tcld CLI, or the Cloud Ops API, depending on your preference and setup.
:::info Terraform not supported
The [Temporal Cloud Terraform provider](https://registry.terraform.io/providers/temporalio/temporalcloud/latest) does not support triggering failovers.
You must use the Web UI, tcld CLI, or Cloud Ops API.
:::
The following instructions outline the steps for each method:
1. Visit the [Namespace page](https://cloud.temporal.io/namespaces) on the Temporal Cloud Web UI.
1. Navigate to your Namespace details page and select the **Trigger a failover** option from the menu.
1. Confirm your action.
After confirmation, Temporal initiates the failover.
To manually trigger a failover, run the following command in your terminal:
```
tcld namespace failover \
--namespace . \
--region
```
The `` must be the name of a region (example: `us-east-1`) where the Namespace has a replica that is ready to be failed over to (replica state is `Activated`).
If using API key authentication with the `--api-key` flag, you must add it directly after the tcld command and before `namespace failover`.
You can trigger a failover programmatically using the [Cloud Ops API](/ops).
The API is available via both HTTP and gRPC.
**Using HTTP**
Send a POST request to the [`FailoverNamespaceRegion`](https://saas-api.tmprl.cloud/docs/httpapi.html#tag/high-availability/POST/cloud/namespaces/{namespace}/failover-region) endpoint:
```
POST https://saas-api.tmprl.cloud/cloud/namespaces//failover-region
```
Request body:
```json
{
"region": "",
"asyncOperationId": ""
}
```
- `region` (required): The [region code](/cloud/regions) of the region to failover to. Must be a region where the Namespace has a replica in `Activated` replica state, indicating the replica is ready to be failed over to. Example: `aws-us-east-1`
- `asyncOperationId` (optional): A user-defined ID for tracking the async operation. If not set, the server will assign one.
**Using gRPC**
Use the [`FailoverNamespaceRegion`](https://buf.build/temporalio/cloud-api/docs/main:temporal.api.cloud.cloudservice.v1#temporal.api.cloud.cloudservice.v1.CloudService.FailoverNamespaceRegion) RPC with a [`FailoverNamespaceRegionRequest`](https://buf.build/temporalio/cloud-api/docs/main:temporal.api.cloud.cloudservice.v1#temporal.api.cloud.cloudservice.v1.FailoverNamespaceRegionRequest):
```protobuf
message FailoverNamespaceRegionRequest {
// The namespace to failover.
string namespace = 1;
// The id of the region to failover to.
// Must be a region that the namespace is currently available in.
string region = 2;
// The id to use for this async operation - optional.
string async_operation_id = 3;
}
```
Both methods return a [`FailoverNamespaceRegionResponse`](https://buf.build/temporalio/cloud-api/docs/main:temporal.api.cloud.cloudservice.v1#temporal.api.cloud.cloudservice.v1.FailoverNamespaceRegionResponse) containing an async operation that you can use to track the failover status.
Once the failover async operation returns successfully, the Namespace will be failed over.
Temporal manages retries for the failover workflow.
In the rare event that an internal error prevents the failover from completing, the Temporal on-call team is automatically paged to intervene and force the failover to completion.
Temporal fails over the primary to the replica.
See [Returning to the primary with failbacks](#failbacks) for details on how and when failback occurs.
### Post-failover event information {#info}
After any failover, whether triggered by you or by Temporal, an event appears in both the [Temporal Cloud Web UI](https://cloud.temporal.io/namespaces) (on the Namespace detail page) and in your audit logs.
The audit log entry for Failover uses the `"operation": "FailoverNamespace"` event.
After failover, the replica becomes active, taking over in the isolation domain or region.
You don't need to monitor Temporal Cloud's failover response in real time.
Whenever there is a failover event, Temporal Cloud [notifies you via email](/cloud/notifications#admin-notifications)
### Returning to the primary with failbacks {#failbacks}
After a Temporal-managed (automatic) failover, Temporal Cloud automatically fails back to the original region once it is healthy.
Follow [Temporal's status page](https://status.temporal.io) for updates on the original region's health.
#### After a Temporal-managed failover
When Temporal triggers an automatic failover due to an outage, Temporal will also trigger an automatic failback to the original region once the region recovers.
No action is required from you.
If you prefer to manage failback yourself, you have two options:
- **Opt out of automatic failback (manage failback manually):**
[Disable Temporal-managed failovers](#disabling-temporal-initiated) on the Namespace.
When you're ready to fail back to the original region, [trigger a failover](#manual-failovers) to that region and then re-enable Temporal-managed failovers.
- **Stay on the new region permanently ("fail forward"):**
[Trigger a failover](#manual-failovers) to the region that is already active.
This tells Temporal that you want to treat the new region as your primary for as long as it's healthy.
Temporal-managed automatic failovers remain enabled, so Temporal will still protect you if the new region has an outage.
#### After a user-triggered failover
If you triggered a failover yourself during an outage (instead of relying on a Temporal-managed failover), Temporal will _not_ automatically fail back for you.
You must [trigger a failover](#manual-failovers) back to the original region when it is healthy.
Monitor [Temporal's status page](https://status.temporal.io) for updates on region health.
Automatic failback is only available after Temporal-managed (automatic) failovers.
#### How to check whether your Namespace will be automatically failed back
If you're not sure whether your Namespace will be automatically failed back, check the list of failovers in the Temporal Cloud Web UI on your Namespace's detail page:
- If the most recent failover was **Temporal-triggered**, then Temporal will automatically fail back the Namespace when the original region is healthy.
- If the most recent failover was **user-triggered**, then the Namespace will _not_ be automatically failed back. You must trigger the failback yourself.
## Disabling Temporal-initiated failovers {#disabling-temporal-initiated}
When you add a replica to a Namespace, in the event of an incident or an outage Temporal Cloud automatically fails over the Namespace to its replica.
_This is the recommended and default option._
However if you prefer to disable Temporal-initiated failovers and handle your own failovers, you can do so by following these instructions:
1. Navigate to the Namespace detail page in Temporal Cloud.
1. Choose the "Disable Temporal-initiated failovers" option.
To disable Temporal-initiated failovers, run the following command in your terminal:
```
tcld namespace update-high-availability \
--namespace . \
--disable-auto-failover=true
```
If using API key authentication with the `--api-key` flag, you must add it directly after the tcld command and before `namespace update-high-availability`
Temporal Cloud disables its health-check initiated failovers.
To restore the default behavior, unselect the option in the WebUI or change `true` to `false` in the CLI command.
## Best practices: Workers and failovers {#worker}
Enabling High Availability for Namespaces doesn't require specific Worker configuration.
The process is invisible to the Workers.
When a Namespace fails over to the replica, the DNS redirection orchestrated by Temporal ensures that your existing Workers continue to poll the Namespace without interruption.
When a Namespace fails over to a replica in a different region, Workers will be communicating cross-region.
- If your application can’t tolerate this latency, deploy a second set of Workers in the replica's region or opt for a replica in the same region:
- In the case of a complete regional outage, Workers in the original region may fail alongside the original Namespace.
To keep Workflows moving during this level of outage, deploy a second set of Workers to the secondary region.
:::tip
Temporal Cloud enforces a maximum connection lifetime of 5 minutes.
This offers your Workers an opportunity to re-resolve the DNS.
:::
## Best practices: scheduled failover testing {#testing}
Microservices and external dependencies will fail at some point.
Testing failovers ensures your app can handle these failures effectively.
Temporal recommends regular and periodic failover testing for mission-critical applications in production.
By testing in non-emergency conditions, you verify that your app continues to function, even when parts of the infrastructure fail.
:::tip Safety First
If this is your first time performing a failover test, run it with a test-specific namespace and application.
This helps you gain operational experience before applying it to your production environment.
Practice runs help ensure the process runs smoothly during real incidents in production.
:::
Failover testing (also known as ")" can:
- **Validate replicated deployments**:
In multi-region setups, failover testing ensures your app can run from another region when the primary region experiences outages.
In standard setups, failover testing instead works with an isolation domain.
This maintains high availability in mission-critical deployments.
Manual testing confirms the failover mechanism works as expected, so your system handles incidents effectively.
- **Assess replication lag**:
In multi-region deployment, monitoring [replication lag](/cloud/metrics/openmetrics/metrics-reference#temporal_cloud_v1_replication_lag_p99) between regions is crucial.
Check the lag before initiating a failover to avoid rolling back Workflow progress.
This is less important when using isolation domains as failover is usually instantaneous.
Manual testing helps you practice this critical step and understand its impact.
- **Assess recovery time**:
Manual testing helps you measure actual recovery time.
You can check if it meets your expected Recovery Time Objective (RTO) of 20 minutes or less, as stated in the [High Availability Namespace SLA](/cloud/sla).
- **Identify potential issues**:
Failover testing uncovers problems not visible during normal operation.
This includes issues like [backlogs and capacity planning](https://temporal.io/blog/workers-in-production#testing-failure-paths-2438) and how external dependencies behave during a failover event.
- **Validate fault-oblivious programming**:
Temporal uses a "fault-oblivious programming" model, where your app doesn’t need to explicitly handle many types of failures.
Testing failovers ensures that this model works as expected in your app.
- **Operational readiness**:
Regular testing familiarizes your team with the failover process, improving their ability to handle real incidents when they arise.
Testing failovers regularly ensures your Temporal-based applications remain resilient and reliable, even when infrastructure fails.
---
## Connectivity for High Availability
:::tip Namespaces with High Availability features and AWS PrivateLink
Proper networking configuration is required for failover to be transparent to clients and workers when using PrivateLink.
This page describes how to configure routing for Namespaces with High Availability features on AWS PrivateLink.
:::
To use AWS PrivateLink with High Availability features, you may need to:
- Override the regional DNS zone.
- Ensure network connectivity between the two regions.
These instructions assume you already have the PrivateLink connections in place. If not, follow our [guide for creating AWS PrivateLink connections and configuring private DNS](/cloud/connectivity/aws-connectivity).
## Customer side solutions
When using PrivateLink, you connect to Temporal Cloud through a VPC Endpoint, which uses addresses local to your network.
Temporal treats each `region.` as a separate zone.
This setup allows you to override the default zone, ensuring that traffic is routed internally for the regions you’re using.
A Namespace's active region is reflected in the target of a CNAME record.
For example, if the active region of a Namespace is AWS us-west-2, the DNS configuration would look like this:
| ha-namespace.account-id.tmprl.cloud | CNAME | aws-us-west-2.region.tmprl.cloud |
| ----------------------------------- | ----- | -------------------------------- |
After a failover, the CNAME record will be updated to point to the failover region, for example:
| ha-namespace.account-id.tmprl.cloud | CNAME | aws-us-east-1.region.tmprl.cloud |
| ----------------------------------- | ----- | -------------------------------- |
The Temporal domain did not change, but the CNAME updated from us-west-2 to us-east-1.
## Setting up the DNS override
:::caution
Private connectivity is not yet offered for GCP Multi-region Namespaces.
:::
To set up the DNS override, configure specific regions to target the internal VPC Endpoint IP addresses.
For example, you might set aws-us-west-1.region.tmprl.cloud to target 192.168.1.2.
In AWS, this can be done using a Route 53 private hosted zone for `region.tmprl.cloud`.
Link that private zone to the VPCs you use for Workers.
When your Workers connect to the Namespace, they first resolve the `..` record.
This points to `.region.tmprl.cloud`, which then resolves to your internal IP addresses.
Consider how you’ll configure Workers for this setup.
You can either have Workers run in both regions continuously or establish connectivity between regions using Transit Gateway or VPC Peering.
This way, Workers can access the newly activated region once failover occurs.
## Available regions, PrivateLink endpoints, and DNS record overrides
:::caution
The `sa-east-1` region is not yet available for use with Multi-region Namespaces. Currently, it is the only region on the continent.
:::
The following table lists the available Temporal regions, PrivateLink endpoints, and DNS record overrides:
When using a Namespace with High Availability features, the Namespace's DNS record `..` points to a regional DNS record in the format `.region.`.
Here, `` is the currently active region for your Namespace.
During failover, Temporal Cloud changes the target of the Namespace DNS record from one region to another.
Namespace DNS records are configured with a 15 second TTL.
Any DNS cache should re-resolve the record within this time.
As a rule of thumb, receiving an updated DNS record takes about twice (2x) the TTL.
Clients should converge to the newly targeted region within, at most, a 30-second delay.
---
## High Availability
Temporal Cloud's High Availability features use asynchronous across multiple to provide enhanced resilience and a 99.99% [SLA](/cloud/sla).
When you enable High Availability features, Temporal deploys your primary and its in separate isolation domains, giving you control over the location of both. This redundancy, combined with capability, enhances availability during outages.
:::tip White paper
For an in-depth guide covering everything from why you need High Availability to setting it up in production and advanced options, read the [High Availability White Paper](https://temporal.io/pages/high-availability-white-paper).
:::
## Built-in reliability
Even without High Availability features, Temporal Cloud provides robust reliability and a 99.9% contractual Service Level Agreement ([SLA](/cloud/sla)) guarantee against service errors.
Each standard Temporal Namespace uses replication across three [Availability Zones](https://docs.aws.amazon.com/AWSEC2/latest/UserGuide/using-regions-availability-zones.html#concepts-availability-zones) (AZs) to ensure high availability.
An Availability Zone is akin to an isolated datacenter managed by a cloud hyperscaler, with independent power, networking, and cooling infrastructure.
Replication across AZs makes sure that any changes to Workflow state or History are saved in all three AZs _before_ the Temporal Service acknowledges a change back to the Client.
As a result, your standard Temporal Namespace stays operational even if one of its three AZs becomes unavailable.
This provides the basis of the 99.9% service level agreement for Temporal Cloud Namespaces.
However some critical use cases--such as customer-facing applications--require even better availability. That is where Temporal Cloud's High Availability features come in.
## High Availability features {#high-availability-features}
High Availability features extend Temporal Cloud's replication offering across even more disparate isolation domains:
| **Deployment** | **Description** |
| --------------------------------------- | ---------------------------------------------------------- |
| **Multi‑region Replication** | Namespace is replicated across two cloud regions |
| **Multi‑cloud Replication** | Namespace is replicated across different cloud providers |
### Key features
- **Real-time replication** — Temporal replicates your Namespace across distant isolation domains with no performance impact to your Workers or Workflows.
- **Automatic failover with 20-minute RTO** — Temporal manages failover with a 20-minute [RTO](/cloud/rpo-rto). You can also [trigger failover](/cloud/high-availability/failovers) manually at any time, for example for testing.
- **Transparent DNS routing** — On failover, DNS reroutes your [Namespace Endpoint](/cloud/namespaces#access-namespaces) to the active region. Requests that reach the replica are forwarded to the active region automatically.
- **Sub-1-minute RPO** — In a failover during an outage, the [Recovery Point Objective](/cloud/rpo-rto) is under one minute.
- **Real-time lag monitoring** — Monitor your Namespace's replication lag in real time to understand your current RPO.
- **Conflict resolution** — If the two regions are not fully in sync at the time of failover, Temporal's conflict resolution process reconciles discrepancies and ensures data integrity.
:::info Region availability
You can usually choose your replica region, but the replica must be on the same continent as the primary region.
This means that a few Temporal Cloud regions do not yet support Multi-region Replication and/or Multi-cloud Replication.
See [Regions](/cloud/regions) for a full list of supported replica regions.
You can't enable both Multi-region Replication and Multi-cloud Replciation on the same Namepsace at the same time.
:::
### Multi-cloud Replication
Multi-cloud Replication spreads a Namespace across entirely different cloud providers, keeping your Namespace running even during a cloud-wide outage.
If a provider outage, service disruption, or network issue occurs, traffic automatically shifts to the replica.
Replicated data is encrypted and transmitted across the public internet between cloud providers.
This internet connectivity also allows Workers in one cloud to reach the replica in a different cloud during failover.
If you use [private connectivity](/cloud/high-availability/ha-connectivity), additional architecture work may be required to ensure your Workers can reach the replica region.
:::info
When you adopt Temporal's High Availability features, don't forget to consider the reliability of your own workers, infrastructure, and dependencies.
Issues like network outages, hardware failures, or misconfigurations in your own systems can affect your application performance.
For the highest level of reliability, distribute your dependencies across regions, and use our Multi-region or Multi-cloud replication features.
Using physically separated regions improves the fault tolerance of your application.
:::
## Service levels and recovery objectives
Namespaces using High Availability have a 99.99% [uptime SLA](/cloud/sla) with sub-1-minute [RPO](/cloud/rpo-rto) and 20-minute [RTO](/cloud/rpo-rto). For detailed information:
- [Service Level Agreement (SLA)](/cloud/sla)
- [Recovery Point Objective (RPO) and Recovery Time Objective (RTO)](/cloud/rpo-rto)
## Failover
High Availability Namespaces can automatically or manually [fail over](/cloud/high-availability/failovers) to the replica if the primary is unavailable or unhealthy.
## Target workloads
High Availability Namespaces are a great solution for Workloads where an outage would cause:
- Revenue loss
- Poor customer experience
- Problems stemming from policy/legal requirements that demand high availability
These are often major concerns for financial services, e-commerce, gaming, global SaaS platforms, bookings & reservations, delivery & shipping, and order management.
## Same-region Replication
In selected regions, you can add a replica to a Namespace in the same region.
Temporal operates a "cell architecture" and will replicate the Namespace across multiple cells in that region.
This feature is currently in [Public Preview](/evaluate/development-production-features/release-stages) in selected regions.
---
## Monitoring High Availability
Temporal Cloud offers several ways for you to track the health and performance of your
[High Availability](/cloud/high-availability) namespaces.
## Replication status
You can monitor your replica status with the Temporal Cloud UI. If the replica is unhealthy, Temporal Cloud disables the
"Trigger a failover" option to prevent failing over to an unhealthy replica. An unhealthy replica might be due to:
- **Data synchronization issues:** The replica fails to remain in sync with the primary due to network or performance
problems.
- **Replication lag:** The replica falls behind the primary, causing it to be out of sync.
- **Network issues:** Loss of communication between the replica and the primary causes problems.
- **Failed health checks:** If the replica fails health checks, it's marked as unhealthy.
These issues prevent the replica from being used during a failover, ensuring system stability and consistency.
## Monitoring replication
Temporal Cloud's High Availability features use asynchronous replication between the primary and the replica. Workflow
updates in the primary, along with associated History Events, are transmitted to the replica. Replication lag refers to
the transmission delay of Workflow updates and history events from the primary to the replica.
:::tip
Temporal Cloud strives to maintain a replication lag of less than 1 minute. In this context,
P95 means 95% of updates are processed faster than this limit.
:::
A forced failover, when there is significant replication lag, increases the likelihood of rolling back Workflow
progress. Always check the replication lag metrics before initiating a failover.
Temporal Cloud emits replication lag [metrics](/cloud/metrics/openmetrics/metrics-reference#replication-metrics)
as pre-computed percentiles (p50, p95, p99) that are labeled with `temporal_namespace`.
When a Namespace is using a replica, you may notice that the Action count in `temporal_cloud_v1_total_action_count` is
2x what it was before adding a replica. This happens because Actions are replicated; they occur on both the primary and
the replica.
## Failover audit log
When Temporal triggers failovers, the [audit log](/cloud/audit-logs) will update with details.
Look for `"operation": "FailoverNamespace"` in the logs.
---
## Temporal Cloud guide
Welcome to the Temporal Cloud guide.
In this guide you will find information about Temporal Cloud, onboarding, features, and how to use them.
To create a Temporal Cloud account, sign up [here](https://temporal.io/get-cloud).
**[Get started with Temporal Cloud.](/cloud/get-started)**
## Become familiar with Temporal Cloud
- [Overview of Temporal Cloud](/cloud/overview)
- [Security model](/cloud/security)
- [Service availability](/cloud/service-availability) (availability, region support, throughput, latency, and limits)
- [Account, Namespace, and application level configurations](/cloud/limits)
- [Service Level Agreement (SLA)](/cloud/sla)
- [Pricing](/cloud/pricing)
- [Support](/cloud/support)
## Feature guides
- [Get started with Temporal Cloud](/cloud/get-started)
- [Manage certificates](/cloud/certificates)
- [Manage API keys](/cloud/api-keys)
- [Manage Namespaces](/cloud/namespaces)
- [Manage users](/cloud/users)
- [Manage user groups](/cloud/user-groups)
- [Manage billing](/cloud/billing-and-cost)
- [Manage Service Accounts](/cloud/service-accounts)
- [API key feature guide](/cloud/api-keys)
- [Metrics feature guide](/cloud/metrics)
- [Temporal Nexus](/cloud/nexus)
- [SAML authentication feature guide](/cloud/saml)
- [Cloud Ops API](/ops)
- [Audit logging feature guide](/cloud/audit-logs)
- [`tcld` (Temporal Cloud command-line interface) reference](/cloud/tcld)
---
## Account access
Access to Temporal Cloud is governed by role-based access control (RBAC). Within an account, each access principal, such
as user, user group or service account, has one account-level role and optionally, one or more Namespace-level
permissions. Each principal can only perform actions that are allowed by their assigned roles and permissions.
Temporal Cloud supports Security Assertion Markup Language (SAML) and System for Cross-domain Identity Management (SCIM)
for integration with your organization's identity provider (IdP). SAML enables single sign-on (SSO) by allowing your
identity provider to authenticate users into Temporal Cloud. SCIM automatically creates, updates, and removes users and
groups in Temporal Cloud based on changes in your identity provider.
## Temporal Cloud accounts
Accounts are the top-level container for access control. Each account has at least one user assigned the Account Owner
role, which has full administrative permissions across the account, including users, billing and usage. An account is
**not** an access principal itself.
When you sign up for Temporal Cloud without joining an existing account, you are automatically assigned the Account
Owner role for a new account. You can then invite other users to join the account and assign them roles. If your
organization has an IdP, we recommend using [a SAML integration](/cloud/saml) for enterprise identity management.
:::info
Multiple accounts can coexist on the same email domain. Each account can have its own independent SAML configuration,
tied to its unique Account ID.
However, each email address can only be associated with a single Temporal Cloud account. If you need access to multiple
accounts, you’ll need a separate invite for each one using a different email address.
:::
## Access principals
Temporal Cloud offers the following principals for access control:
- [**Users**](/cloud/users) - Manage individual user accounts and permissions
- [**User Groups**](/cloud/user-groups) - Organize users into groups for simplified access management
- [**Service Accounts**](/cloud/service-accounts) - Configure service accounts for automated access
These principals can assume [account-level roles](/cloud/manage-access/roles-and-permissions#account-level-roles) and be
granted [Namespace-level permissions](/cloud/manage-access/roles-and-permissions#namespace-level-permissions) to perform
actions within the account and a Namespace, respectively.
## Roles and permissions
Temporal Cloud's RBAC model works in a hierarchical manner. Account-level roles grant permissions to perform actions
within the account, and Namespace-level permissions grant permissions to perform actions within a Namespace. Refer to
the [Roles and permissions](/cloud/manage-access/roles-and-permissions) page for more details.
## Integration with identity providers
Temporal Cloud supports SAML and SCIM for integration with your organization's identity provider (IDP).
- [**SAML**](/cloud/saml) - Configure SAML-based SSO integration
- [**SCIM**](/cloud/scim) - Use your IDP to manage Temporal Cloud users and access via SCIM integration
## Troubleshoot account access issues
### Recover your account after losing access to your authenticator app {#mfa-recovery}
Accounts registered with email and password require multi-factor authentication (MFA) with an authenticator app. If you
lose access to your authenticator app, you can still log in by clicking **Try another method** on the MFA screen. From
there, you can either:
- Enter your recovery code (provided when you first set up MFA)
- Receive a verification code through email
Once you're logged in, you can reset your authenticator app by navigating to **My Profile** > **Password and
Authentication** and then clicking **Authenticator App** > **Remove method**.
### Reset your password {#reset-password}
If you're currently logged in and would like to change your password, click your profile icon at the top right of the
Temporal Cloud UI, navigate to **My Profile** > **Password and Authentication**, and then click **Reset Password**.
If you're not currently logged in, navigate to the login page of the Temporal Cloud UI, enter your email address, click
**Continue**, and then select **Forgot password**. In both cases, you will receive an email with instructions on how to
reset your password.
### Sign in after email domain changes {#email-domain-change}
If your organization changed its email domain (for example, from `@oldcompany.com` to `@newcompany.com`), you may be
unable to sign in to Temporal Cloud with your existing account.
**Why this happens:** When you sign in using "Continue with Google" or "Continue with Microsoft", Temporal Cloud
identifies your account by your email address. If your email address changes, Temporal Cloud sees this as a different
identity and cannot match it to your existing account.
**How to resolve this:** [Create a support ticket](/cloud/support#support-ticket) with the following information:
- Your previous email address (the one originally used to access Temporal Cloud)
- Your new email address
- Your Temporal Cloud Account Id (if known)
Temporal Support can update your account to use your new email address.
:::tip Use SAML for enterprise identity management
If your organization frequently changes email domains or wants centralized control over user authentication, consider
using [SAML authentication](/cloud/saml). With SAML, your identity provider (IdP) manages user identities, and email
domain changes can be handled within your IdP without affecting Temporal Cloud access.
:::
---
## Permissions reference
Temporal Cloud access controls are organized across two scopes:
- Account-level role permissions
- Namespace-level permissions
Within each scope, permissions apply to publicly documented [Temporal Cloud Ops API](https://docs.temporal.io/ops)
endpoints and to additional non-Cloud Ops capabilities, such as Temporal Cloud UI and internal automation behaviors.
## Account-level access {#account-level-access}
Account-level access is granted to users and service accounts by assigning them an account-level role. Temporal Cloud
supports the following account-level roles:
- Account Owner
- Global Admin
- Developer
- Finance Admin
- Read-Only
### Cloud Ops API permissions
This table provides API-level details for permissions granted through account-level roles. These permissions are
configured per user.
| Permission | Read-only | Developer | Finance Admin | Global Admin | Account Owner |
| --------------------------- | :-------: | :-------: | :-----------: | :----------: | :-----------: |
| [AddUserGroupMember](https://saas-api.tmprl.cloud/docs/httpapi.html#tag/groups/POST/cloud/user-groups/%7BgroupId%7D/members) | | | | ✔ | ✔ |
| [CreateAccountAuditLogSink](https://saas-api.tmprl.cloud/docs/httpapi.html#tag/account/POST/cloud/audit-log-sinks) | | | | ✔ | ✔ |
| [CreateApiKey](https://saas-api.tmprl.cloud/docs/httpapi.html#tag/api-keys/POST/cloud/api-keys) | ✔\* | ✔\* | ✔\* | ✔\* | ✔\* |
| [CreateConnectivityRule](https://saas-api.tmprl.cloud/docs/httpapi.html#tag/connectivity-rules/POST/cloud/connectivity-rules) | | | | ✔ | ✔ |
| [CreateNamespace](https://saas-api.tmprl.cloud/docs/httpapi.html#tag/namespaces/POST/cloud/namespaces) | | ✔ | | ✔ | ✔ |
| [CreateNexusEndpoint](https://saas-api.tmprl.cloud/docs/httpapi.html#tag/nexus/POST/cloud/nexus/endpoints) | | ✔ | | ✔ | ✔ |
| [CreateServiceAccount](https://saas-api.tmprl.cloud/docs/httpapi.html#tag/service-accounts/POST/cloud/service-accounts) | ✔† | ✔† | ✔† | ✔† | ✔† |
| [CreateUser](https://saas-api.tmprl.cloud/docs/httpapi.html#tag/users/POST/cloud/users) | | | | ✔ | ✔ |
| [CreateUserGroup](https://saas-api.tmprl.cloud/docs/httpapi.html#tag/groups/POST/cloud/user-groups) | | | | ✔ | ✔ |
| [DeleteAccountAuditLogSink](https://saas-api.tmprl.cloud/docs/httpapi.html#tag/account/DELETE/cloud/audit-log-sinks/%7Bname%7D) | | | | ✔ | ✔ |
| [DeleteApiKey](https://saas-api.tmprl.cloud/docs/httpapi.html#tag/api-keys/DELETE/cloud/api-keys/%7BkeyId%7D) | ✔\* | ✔\* | ✔\* | ✔\* | ✔\* |
| [DeleteConnectivityRule](https://saas-api.tmprl.cloud/docs/httpapi.html#tag/connectivity-rules/DELETE/cloud/connectivity-rules/%7BconnectivityRuleId%7D) | | | | ✔ | ✔ |
| [DeleteNexusEndpoint](https://saas-api.tmprl.cloud/docs/httpapi.html#tag/nexus/DELETE/cloud/nexus/endpoints/%7BendpointId%7D) | | ✔ | | ✔ | ✔ |
| [DeleteServiceAccount](https://saas-api.tmprl.cloud/docs/httpapi.html#tag/service-accounts/DELETE/cloud/service-accounts/%7BserviceAccountId%7D) | ✔† | ✔† | ✔† | ✔† | ✔† |
| [DeleteUser](https://saas-api.tmprl.cloud/docs/httpapi.html#tag/users/DELETE/cloud/users/%7BuserId%7D) | | | | ✔ | ✔ |
| [DeleteUserGroup](https://saas-api.tmprl.cloud/docs/httpapi.html#tag/groups/DELETE/cloud/user-groups/%7BgroupId%7D) | | | | ✔ | ✔ |
| [GetAccount](https://saas-api.tmprl.cloud/docs/httpapi.html#tag/account/GET/cloud/account) | ✔ | ✔ | ✔ | ✔ | ✔ |
| [GetAccountAuditLogSink](https://saas-api.tmprl.cloud/docs/httpapi.html#tag/account/GET/cloud/audit-log-sinks/%7Bname%7D) | | | | ✔ | ✔ |
| [GetAccountAuditLogSinks](https://saas-api.tmprl.cloud/docs/httpapi.html#tag/account/GET/cloud/audit-log-sinks) | | | | ✔ | ✔ |
| [GetApiKey](https://saas-api.tmprl.cloud/docs/httpapi.html#tag/api-keys/GET/cloud/api-keys/%7BkeyId%7D) | ✔\* | ✔\* | ✔\* | ✔\* | ✔\* |
| [GetApiKeys](https://saas-api.tmprl.cloud/docs/httpapi.html#tag/api-keys/GET/cloud/api-keys) | ✔\* | ✔\* | ✔\* | ✔\* | ✔\* |
| [GetAsyncOperation](https://saas-api.tmprl.cloud/docs/httpapi.html#tag/operations/GET/cloud/operations/%7BasyncOperationId%7D) | ✔ | ✔ | ✔ | ✔ | ✔ |
| [GetAuditLogs](https://saas-api.tmprl.cloud/docs/httpapi.html#tag/account/GET/cloud/audit-logs) | | | | ✔ | ✔ |
| [GetConnectivityRule](https://saas-api.tmprl.cloud/docs/httpapi.html#tag/connectivity-rules/GET/cloud/connectivity-rules/%7BconnectivityRuleId%7D) | | ✔ | | ✔ | ✔ |
| [GetConnectivityRules](https://saas-api.tmprl.cloud/docs/httpapi.html#tag/connectivity-rules/GET/cloud/connectivity-rules) | | ✔ | | ✔ | ✔ |
| [GetCurrentIdentity](https://saas-api.tmprl.cloud/docs/httpapi.html#tag/account/GET/cloud/current-identity) | ✔ | ✔ | ✔ | ✔ | ✔ |
| [GetNamespaces](https://saas-api.tmprl.cloud/docs/httpapi.html#tag/namespaces/GET/cloud/namespaces) | ✔ | ✔ | ✔ | ✔ | ✔ |
| [GetNexusEndpoint](https://saas-api.tmprl.cloud/docs/httpapi.html#tag/nexus/GET/cloud/nexus/endpoints/%7BendpointId%7D) | ✔ | ✔ | ✔ | ✔ | ✔ |
| [GetNexusEndpoints](https://saas-api.tmprl.cloud/docs/httpapi.html#tag/nexus/GET/cloud/nexus/endpoints) | ✔ | ✔ | ✔ | ✔ | ✔ |
| [GetRegion](https://saas-api.tmprl.cloud/docs/httpapi.html#tag/regions/GET/cloud/regions/%7Bregion%7D) | ✔ | ✔ | ✔ | ✔ | ✔ |
| [GetRegions](https://saas-api.tmprl.cloud/docs/httpapi.html#tag/regions/GET/cloud/regions) | ✔ | ✔ | ✔ | ✔ | ✔ |
| [GetServiceAccount](https://saas-api.tmprl.cloud/docs/httpapi.html#tag/service-accounts/GET/cloud/service-accounts/%7BserviceAccountId%7D) | ✔† | ✔† | ✔† | ✔† | ✔† |
| [GetServiceAccounts](https://saas-api.tmprl.cloud/docs/httpapi.html#tag/service-accounts/GET/cloud/service-accounts) | ✔† | ✔† | ✔† | ✔† | ✔† |
| [GetUsage](https://saas-api.tmprl.cloud/docs/httpapi.html#tag/account/GET/cloud/usage) | | | ✔ | ✔ | ✔ |
| [GetUser](https://saas-api.tmprl.cloud/docs/httpapi.html#tag/users/GET/cloud/users/%7BuserId%7D) | ✔ | ✔ | ✔ | ✔ | ✔ |
| [GetUserGroup](https://saas-api.tmprl.cloud/docs/httpapi.html#tag/groups/GET/cloud/user-groups/%7BgroupId%7D) | ✔ | ✔ | ✔ | ✔ | ✔ |
| [GetUserGroupMembers](https://saas-api.tmprl.cloud/docs/httpapi.html#tag/groups/GET/cloud/user-groups/%7BgroupId%7D/members) | ✔ | ✔ | ✔ | ✔ | ✔ |
| [GetUserGroups](https://saas-api.tmprl.cloud/docs/httpapi.html#tag/groups/GET/cloud/user-groups) | ✔ | ✔ | ✔ | ✔ | ✔ |
| [GetUsers](https://saas-api.tmprl.cloud/docs/httpapi.html#tag/users/GET/cloud/users) | ✔ | ✔ | ✔ | ✔ | ✔ |
| [RemoveUserGroupMember](https://saas-api.tmprl.cloud/docs/httpapi.html#tag/groups/POST/cloud/user-groups/%7BgroupId%7D/remove-member) | | | | ✔ | ✔ |
| [UpdateAccount](https://saas-api.tmprl.cloud/docs/httpapi.html#tag/account/POST/cloud/account) | | | | ✔ | ✔ |
| [UpdateAccountAuditLogSink](https://saas-api.tmprl.cloud/docs/httpapi.html#tag/account/POST/cloud/audit-log-sinks/%7Bspec.name%7D) | | | | ✔ | ✔ |
| [UpdateApiKey](https://saas-api.tmprl.cloud/docs/httpapi.html#tag/api-keys/POST/cloud/api-keys/%7BkeyId%7D) | ✔\* | ✔\* | ✔\* | ✔\* | ✔\* |
| [UpdateNamespaceTags](https://saas-api.tmprl.cloud/docs/httpapi.html#tag/namespaces/POST/cloud/namespaces/%7Bnamespace%7D/update-tags) | | | | ✔ | ✔ |
| [UpdateNexusEndpoint](https://saas-api.tmprl.cloud/docs/httpapi.html#tag/nexus/POST/cloud/nexus/endpoints/%7BendpointId%7D) | | ✔ | | ✔ | ✔ |
| [UpdateServiceAccount](https://saas-api.tmprl.cloud/docs/httpapi.html#tag/service-accounts/POST/cloud/service-accounts/%7BserviceAccountId%7D) | ✔† | ✔† | ✔† | ✔† | ✔† |
| [UpdateUser](https://saas-api.tmprl.cloud/docs/httpapi.html#tag/users/POST/cloud/users/%7BuserId%7D) | | | | ✔ | ✔ |
| [UpdateUserGroup](https://saas-api.tmprl.cloud/docs/httpapi.html#tag/groups/POST/cloud/user-groups/%7BgroupId%7D) | | | | ✔ | ✔ |
| [ValidateAccountAuditLogSink](https://saas-api.tmprl.cloud/docs/httpapi.html#tag/account/POST/cloud/audit-log-sink-validate) | | | | ✔ | ✔ |
- \* See [API Key Authorization Behavior](#api-key-authorization-behavior)
- † See [Service Account Authorization Behavior](#service-account-authorization-behavior)
{/* ### Additional account-level capabilities
| Capability | Read-only | Developer | Finance Admin | Global Admin | Account Owner |
| ---------------------------------------------------------------- | :-------: | :-------: | :-----------: | :----------: | :-----------: |
| View billing plan information | ✔ | ✔ | ✔ | ✔ | ✔ |
| Manage MFA enrollments, password resets, and decode certificates | ✔ | ✔ | ✔ | ✔ | ✔ |
| Manage own API keys and service account API keys | ✔\*† | ✔\*† | ✔\*† | ✔\*† | ✔\*† |
| Manage self-hosted to cloud migrations | | ✔ | | ✔ | ✔ |
| Complete user onboarding and quickstart Workflows | | ✔ | | ✔ | ✔ |
| View monthly costs | | | ✔ | | ✔ |
| View invoices, credit ledger entries, grants, and promotions | | | ✔ | ✔‡ | ✔ |
| Manage Stripe payment portal | | | ✔ | ✔‡ | ✔ |
| View usage metrics | | | ✔ | ✔ | ✔ |
| Invite and re-invite users | | | | ✔ | ✔ |
| Manage tag keys | | | | ✔ | ✔ |
| Configure account settings | | | | ✔ | ✔ |
| Self-service account offboarding | | | | | ✔ |
| SCIM administration | | | | | ✔ |
| Change account plan type | | | | | ✔ |
- \* See [API Key Authorization Behavior](#api-key-authorization-behavior) — legacy API key endpoints have the same
scoped behavior as their Cloud Ops API counterparts.
- † See [Service Account Authorization Behavior](#service-account-authorization-behavior) — creating service account API
keys follows the same scoped authorization as other service account operations. ‡ Temporary — Global Admin access to
billing and invoicing data will be removed once the Account Owner role is fully rolled out.
> **Note:** Access to external observability endpoints (metrics and metric descriptors) is controlled separately and is
> not tied to the standard account-level role hierarchy. */}
## Namespace-level permissions
Namespace-level permissions are granted to users and service accounts by assigning them a Namespace-level permission.
Temporal Cloud supports the following Namespace-level permissions:
- Namespace Admin
- Write
- Read
Users with the Global Admin and Account Owner roles automatically have Namespace Admin permissions on all Namespaces in
the account.
### Cloud Ops API permissions
This table provides API-level details for permissions granted through Namespace-level permissions. These permissions are
configured per Namespace per user.
| Permission | Read | Write | Namespace Admin |
| -------------------------------- | :--: | :---: | :-------------: |
| [AddNamespaceRegion](https://saas-api.tmprl.cloud/docs/httpapi.html#tag/high-availability/POST/cloud/namespaces/%7Bnamespace%7D/add-region) | | | ✔ |
| [CreateNamespaceExportSink](https://saas-api.tmprl.cloud/docs/httpapi.html#tag/export/POST/cloud/namespaces/%7Bnamespace%7D/export-sinks) | | | ✔ |
| [DeleteNamespace](https://saas-api.tmprl.cloud/docs/httpapi.html#tag/namespaces/DELETE/cloud/namespaces/%7Bnamespace%7D) | | | ✔ |
| [DeleteNamespaceExportSink](https://saas-api.tmprl.cloud/docs/httpapi.html#tag/export/DELETE/cloud/namespaces/%7Bnamespace%7D/export-sinks/%7Bname%7D) | | | ✔ |
| [DeleteNamespaceRegion](https://saas-api.tmprl.cloud/docs/httpapi.html#tag/high-availability/DELETE/cloud/namespaces/%7Bnamespace%7D/regions/%7Bregion%7D) | | | ✔ |
| [FailoverNamespaceRegion](https://saas-api.tmprl.cloud/docs/httpapi.html#tag/high-availability/POST/cloud/namespaces/%7Bnamespace%7D/failover-region) | | | ✔ |
| [GetNamespace](https://saas-api.tmprl.cloud/docs/httpapi.html#tag/namespaces/GET/cloud/namespaces/%7Bnamespace%7D) | ✔ | ✔ | ✔ |
| [GetNamespaceCapacityInfo](https://saas-api.tmprl.cloud/docs/httpapi.html#tag/namespaces/GET/cloud/namespaces/%7Bnamespace%7D/capacity-info) | ✔ | ✔ | ✔ |
| [GetNamespaceExportSink](https://saas-api.tmprl.cloud/docs/httpapi.html#tag/export/GET/cloud/namespaces/%7Bnamespace%7D/export-sinks/%7Bname%7D) | ✔ | ✔ | ✔ |
| [GetNamespaceExportSinks](https://saas-api.tmprl.cloud/docs/httpapi.html#tag/export/GET/cloud/namespaces/%7Bnamespace%7D/export-sinks) | ✔ | ✔ | ✔ |
| [RenameCustomSearchAttribute](https://saas-api.tmprl.cloud/docs/httpapi.html#tag/namespaces/POST/cloud/namespaces/%7Bnamespace%7D/rename-custom-search-attribute) | | | ✔ |
| [SetServiceAccountNamespaceAccess](https://saas-api.tmprl.cloud/docs/httpapi.html#tag/service-accounts/POST/cloud/namespaces/%7Bnamespace%7D/service-accounts/%7BserviceAccountId%7D/access) | | | ✔ |
| [SetUserGroupNamespaceAccess](https://saas-api.tmprl.cloud/docs/httpapi.html#tag/groups/POST/cloud/namespaces/%7Bnamespace%7D/user-groups/%7BgroupId%7D/access) | | | ✔ |
| [SetUserNamespaceAccess](https://saas-api.tmprl.cloud/docs/httpapi.html#tag/users/POST/cloud/namespaces/%7Bnamespace%7D/users/%7BuserId%7D/access) | | | ✔ |
| [UpdateNamespace](https://saas-api.tmprl.cloud/docs/httpapi.html#tag/namespaces/POST/cloud/namespaces/%7Bnamespace%7D) | | | ✔ |
| [UpdateNamespaceExportSink](https://saas-api.tmprl.cloud/docs/httpapi.html#tag/export/POST/cloud/namespaces/%7Bnamespace%7D/export-sinks/%7Bspec.name%7D) | | | ✔ |
| [ValidateNamespaceExportSink](https://saas-api.tmprl.cloud/docs/httpapi.html#tag/export/POST/cloud/namespaces/%7Bnamespace%7D/export-sink-validate) | | | ✔ |
### Workflow-level permissions
This table provides API-level details for Workflow-level Data Plane permissions granted through Namespace-level
permissions. These permissions are configured per Namespace per user.
| Permission | Read | Write | Namespace Admin |
| ------------------------------------- | :--: | :---: | :-------------: |
| CountActivityExecutions | ✔ | ✔ | ✔ |
| CountSchedules | ✔ | ✔ | ✔ |
| CountWorkflowExecutions | ✔ | ✔ | ✔ |
| CreateSchedule | | ✔ | ✔ |
| CreateWorkflowRule | | ✔ | ✔ |
| DeleteActivityExecution | | ✔ | ✔ |
| DeleteSchedule | | ✔ | ✔ |
| DeleteWorkerDeployment | | ✔ | ✔ |
| DeleteWorkerDeploymentVersion | | ✔ | ✔ |
| DeleteWorkflowExecution | | ✔ | ✔ |
| DeleteWorkflowRule | | ✔ | ✔ |
| DescribeActivityExecution | ✔ | ✔ | ✔ |
| DescribeBatchOperation | ✔ | ✔ | ✔ |
| DescribeNamespace | ✔ | ✔ | ✔ |
| DescribeSchedule | ✔ | ✔ | ✔ |
| DescribeTaskQueue | ✔ | ✔ | ✔ |
| DescribeWorker | ✔ | ✔ | ✔ |
| DescribeWorkerDeployment | ✔ | ✔ | ✔ |
| DescribeWorkerDeploymentVersion | ✔ | ✔ | ✔ |
| DescribeWorkflowExecution | ✔ | ✔ | ✔ |
| DescribeWorkflowRule | ✔ | ✔ | ✔ |
| ExecuteMultiOperation | | ✔ | ✔ |
| FetchWorkerConfig | ✔ | ✔ | ✔ |
| GetSearchAttributes | ✔ | ✔ | ✔ |
| GetWorkerBuildIdCompatibility | ✔ | ✔ | ✔ |
| GetWorkerTaskReachability | ✔ | ✔ | ✔ |
| GetWorkerVersioningRules | ✔ | ✔ | ✔ |
| GetWorkflowExecutionHistory | ✔ | ✔ | ✔ |
| GetWorkflowExecutionHistoryReverse | ✔ | ✔ | ✔ |
| ListActivityExecutions | ✔ | ✔ | ✔ |
| ListBatchOperations | ✔ | ✔ | ✔ |
| ListClosedWorkflowExecutions | ✔ | ✔ | ✔ |
| ListOpenWorkflowExecutions | ✔ | ✔ | ✔ |
| ListScheduleMatchingTimes | ✔ | ✔ | ✔ |
| ListSchedules | ✔ | ✔ | ✔ |
| ListTaskQueuePartitions | ✔ | ✔ | ✔ |
| ListWorkerDeployments | ✔ | ✔ | ✔ |
| ListWorkers | ✔ | ✔ | ✔ |
| ListWorkflowExecutions | ✔ | ✔ | ✔ |
| ListWorkflowRules | ✔ | ✔ | ✔ |
| PatchSchedule | | ✔ | ✔ |
| PauseActivity | | ✔ | ✔ |
| PauseWorkflowExecution | | ✔ | ✔ |
| PollActivityExecution | | ✔ | ✔ |
| PollActivityTaskQueue | | ✔ | ✔ |
| PollNexusTaskQueue | | ✔ | ✔ |
| PollWorkflowExecutionUpdate | | ✔ | ✔ |
| PollWorkflowTaskQueue | | ✔ | ✔ |
| QueryWorkflow | ✔ | ✔ | ✔ |
| RecordActivityTaskHeartbeat | | ✔ | ✔ |
| RecordActivityTaskHeartbeatById | | ✔ | ✔ |
| RecordWorkerHeartbeat | | ✔ | ✔ |
| RequestCancelActivityExecution | | ✔ | ✔ |
| RequestCancelWorkflowExecution | | ✔ | ✔ |
| ResetActivity | | ✔ | ✔ |
| ResetStickyTaskQueue | | ✔ | ✔ |
| ResetWorkflowExecution | | ✔ | ✔ |
| RespondActivityTaskCanceled | | ✔ | ✔ |
| RespondActivityTaskCanceledById | | ✔ | ✔ |
| RespondActivityTaskCompleted | | ✔ | ✔ |
| RespondActivityTaskCompletedById | | ✔ | ✔ |
| RespondActivityTaskFailed | | ✔ | ✔ |
| RespondActivityTaskFailedById | | ✔ | ✔ |
| RespondNexusTaskCompleted | | ✔ | ✔ |
| RespondNexusTaskFailed | | ✔ | ✔ |
| RespondQueryTaskCompleted | | ✔ | ✔ |
| RespondWorkflowTaskCompleted | | ✔ | ✔ |
| RespondWorkflowTaskFailed | | ✔ | ✔ |
| SetWorkerDeploymentCurrentVersion | | ✔ | ✔ |
| SetWorkerDeploymentManager | | ✔ | ✔ |
| SetWorkerDeploymentRampingVersion | | ✔ | ✔ |
| ShutdownWorker | | ✔ | ✔ |
| SignalWithStartWorkflowExecution | | ✔ | ✔ |
| SignalWorkflowExecution | | ✔ | ✔ |
| StartActivityExecution | | ✔ | ✔ |
| StartBatchOperation | | ✔ | ✔ |
| StartWorkflowExecution | | ✔ | ✔ |
| StopBatchOperation | | ✔ | ✔ |
| TerminateActivityExecution | | ✔ | ✔ |
| TerminateWorkflowExecution | | ✔ | ✔ |
| TriggerWorkflowRule | | ✔ | ✔ |
| UnpauseActivity | | ✔ | ✔ |
| UnpauseWorkflowExecution | | ✔ | ✔ |
| UpdateActivityOptions | | ✔ | ✔ |
| UpdateSchedule | | ✔ | ✔ |
| UpdateTaskQueueConfig | | ✔ | ✔ |
| UpdateWorkerBuildIdCompatibility | | ✔ | ✔ |
| UpdateWorkerConfig | | ✔ | ✔ |
| UpdateWorkerDeploymentVersionMetadata | | ✔ | ✔ |
| UpdateWorkerVersioningRules | | ✔ | ✔ |
| UpdateWorkflowExecution | | ✔ | ✔ |
| UpdateWorkflowExecutionOptions | | ✔ | ✔ |
{/* ### Additional Namespace-level capabilities
| Capability | Read | Write | Namespace Admin |
| ------------------------------------------------------------- | :--: | :---: | :-------------: |
| View extended Namespace details and usage metrics | ✔ | ✔ | ✔ |
| View export sink configurations | ✔ | ✔ | ✔ |
| View Namespace user access assignments | ✔ | ✔ | ✔ |
| View replication status, replica health, and failover history | ✔ | ✔ | ✔ |
| Manage export sinks — create, update, validate, and delete | | | ✔ |
| Bulk update custom Search Attributes | | | ✔ |
| Manage user and identity Namespace access | | | ✔ |
| Initiate Namespace failover | | | ✔ |
| Convert single-region Namespace to multi-region | | | ✔ | */}
## Additional authorization behaviors
Some APIs are granted to all account-level roles but enforce additional authorization rules at runtime. The action group
grants access to call the API, but the scope of what the caller can interact with depends on their role.
### API key authorization behavior
All roles can create and manage their **own** API keys. An API key inherits the permissions of its owner — it cannot
grant access beyond what the owning user or service account already has.
| Behavior | Read-only | Developer | Finance Admin | Global Admin | Account Owner |
| --------------------------------------------------- | :-------: | :-------: | :-----------: | :----------: | :-----------: |
| Create, view, update, and delete own API keys | ✔ | ✔ | ✔ | ✔ | ✔ |
| View, update, and delete any API key in the account | | | | ✔ | ✔ |
**Affected APIs:** CreateApiKey, GetApiKey, GetApiKeys, UpdateApiKey, DeleteApiKey
### Service account authorization behavior
All roles can list service accounts within their account. However, the ability to create, update, and delete service
accounts depends on the scope of the service account and the caller's role.
| Behavior | Read-only | Developer | Finance Admin | Global Admin | Account Owner |
| ------------------------------------------------ | :-------: | :-------: | :-----------: | :----------: | :-----------: |
| List all service accounts in the account | ✔ | ✔ | ✔ | ✔ | ✔ |
| Manage unscoped (account-level) service accounts | | | | ✔ | ✔ |
| Manage Namespace-scoped service accounts | § | § | § | ✔ | ✔ |
§ Requires Namespace Admin permission on the target Namespace. Any role can manage Namespace-scoped service accounts if
they hold Namespace Admin on that Namespace.
**Affected APIs:** CreateServiceAccount, GetServiceAccount, GetServiceAccounts, UpdateServiceAccount,
DeleteServiceAccount
---
## Roles and permissions
Temporal Cloud uses role-based access control (RBAC) to manage access to resources. Access is governed both on the
account-level and within a Namespace. On the account-level, each access principal is assigned one account-level role. On
the Namespace-level, each access principal can be assigned one Namespace-level permission. Some account-level roles,
such as Account Owner and Global Admin, automatically have Namespace Admin permissions on all Namespaces in the account.
## Account-level roles
Account-level roles are assigned to access principals at the account level. They control access to account resources,
such as:
- Users and Service Accounts
- Billing and usage
- Namespaces. This includes creating and managing Namespaces only, not access to resources within a Namespace, which is
controlled by [Namespace-level permissions](#namespace-level-permissions).
- Nexus Endpoints
The following table provides a summary of the account-level roles and their primary purpose. Refer to the
[Permissions reference](/cloud/manage-access/permissions-reference#account-level-access) for API-level details.
| Role | Primary purpose | Can create Namespaces | Automatic Namespace Admin | Billing and usage access |
| ------------- | ------------------------------------------- | --------------------- | --------------------------------------- | --------------------------------- |
| Account Owner | Owns and governs the account | Yes | All Namespaces (cannot be revoked) | Full billing, payments, and usage |
| Global Admin | Administers account configuration and users | Yes | All Namespaces (cannot be revoked) | Usage only |
| Developer | Creates and manages Namespaces they own | Yes | Namespaces they create (can be revoked) | None |
| Finance Admin | Manages billing and payment information | No | None | Full billing and payments |
| Read-Only | Views account configuration and resources | No | None | None |
Account-level roles don't govern day-to-day operations within a Namespace. Access to resources inside a Namespace, such
as Workflows and Workflow Executions, is controlled by [Namespace-level permissions](#namespace-level-permissions).
Account Owner and Global Admin roles automatically have Namespace Admin permissions on all Namespaces in the account,
and these permissions cannot be revoked without removing the role. Developers can create Namespaces, and have Namespace
Admin permissions for each Namespace they create. This permission can be revoked. Developer roles also don't have
automatic access to Namespaces that they didn't create.
### Best practice for assigning the Account Owner role
The Account Owner role holds the highest level of access in the system. This role configures account-level parameters
and manages Temporal billing and payment information. It allows users to perform all actions within the Temporal Cloud
account.
We strongly recommend the following precautions when assigning the Account Owner role to users:
- Assign the role to at least two users in your organization. Otherwise, limit the number of users with this role.
- Associate a person’s direct email address to the Account Owner, rather than a shared or generic address, so Temporal
Support can contact the right person in urgent situations.
This latter rule is useful for anyone on your team who may need to be contacted urgently, regardless of their Account
role.
## Namespace-level permissions {#namespace-level-permissions}
Namespace-level permissions govern access to resources within a Namespace, such as the following:
- Workflows
- Workflow Executions
- Task Queues
- Activity Executions
- Search Attributes
- History
- Events
Namespace-level permissions are assigned to access principals within a Namespace. Each permission has a set of actions
that grant access to specific resources within the Namespace.
The following table provides a summary of the Namespace-level permissions and their primary purpose. Refer to the
[Permissions reference](/cloud/manage-access/permissions-reference#namespace-level-permissions) for API-level details.
| Permission level | Intended use | Human access | Worker runtime access | Namespace administration |
| ---------------- | --------------------------------- | -------------------------------------------------------------------------------------------- | --------------------------------------------------------- | --------------------------------------------------------------------------------------------------------- |
| Read | Observe Namespace activity | View Workflows, Workflow Executions, Schedules, Task Queues, and metadata | None | None |
| Write | Operate Workflows and run Workers | Start, signal, cancel, terminate, and reset Workflows; manage Schedules and batch operations | Poll Task Queues and complete Workflow and Activity Tasks | None |
| Namespace Admin | Administer the Namespace | All Read and Write capabilities | All Read and Write capabilities | Update Namespace settings, manage Search Attributes, Export Sinks, replication, and Namespace user access |
You can grant Namespace Admin, Write, or Read-Only permissions to principals with the account-level roles of Developer,
Finance Admin, or Read-Only. Account Owners and Global Admins already have Namespace Admin permissions on all Namespaces
in the account and do not need to be manually assigned Namespace-level permissions.
---
## General observability setup with metrics
:::danger PromQL endpoint deprecated
The PromQL endpoint and its `temporal_cloud_v0_*` metrics were deprecated on April 2, 2026 and are no longer accepting new users.
The PromQL endpoint will be disabled for all users on **October 5, 2026**.
New users should set up the [OpenMetrics endpoint](/cloud/metrics/openmetrics) instead.
Existing users should follow the [migration guide](/cloud/metrics/openmetrics/migration-guide) to transition to the OpenMetrics endpoint.
:::
You will learn how to do the following:
- [Configure an endpoint using the UI](#configure-via-ui)
- [Configure an endpoint using tcld](#configure-via-cli-tcld)
- [Query for metrics with a PromQL endpoint](#query-promql)
## Configure using the UI {#configure-via-ui}
**How to configure a metrics endpoint using Temporal Cloud UI**
:::note
To view and manage third-party integration settings, your user account must have the Account Owner or Global Admin [role](/cloud/manage-access/roles-and-permissions#account-level-roles).
:::
To assign a certificate and generate your metrics endpoint, follow these steps:
1. Log in to Temporal Cloud UI with an Account Owner or Global Admin [role](/cloud/manage-access/roles-and-permissions#account-level-roles).
2. Go to **Settings** and select **Observability**.
4. Add your root CA certificate (.pem) and save it.
Note that if an observability endpoint is already set up, you can append your root CA certificate here to use the generated observability endpoint in your observability tool.
5. To test your endpoint, run the following command on your host:
```
curl -v --cert --key "/api/v1/query?query=temporal_cloud_v0_state_transition_count"
```
If you have Workflows running on a Namespace in your Temporal Cloud instance, you should see some data as a result of running this command.
After the page refreshes, the new metrics endpoint appears below **Endpoint**, in the form `https://.tmprl.cloud/prometheus`.
Use the endpoint to configure your observability tool.
For example, if you use Grafana, see [Grafana data source configuration](/cloud/metrics/prometheus-grafana#grafana-data-source-configuration).
You can also query via the [Prometheus HTTP API](https://prometheus.io/docs/prometheus/latest/querying/api/) at URLs like:
```
https://.tmprl.cloud/prometheus/api/v1/query?query=temporal_cloud_v0_state_transition_count
```
For example:
```
$ curl --cert client.pem --key client-key.pem "https://.tmprl.cloud/prometheus/api/v1/query?query=temporal_cloud_v0_state_transition_count" | jq .
{
"status": "success",
"data": {
"resultType": "vector",
"result": [
{
"metric": {
"__name__": "temporal_cloud_v0_state_transition_count",
"__rollup__": "true",
"operation": "WorkflowContext",
"temporal_account": "your-account",
"temporal_namespace": "your-namespace.your-account-is",
"temporal_service_type": "history"
},
"value": [
1672347471.2,
"0"
]
},
...
}
```
## Configure endpoint using tcld {#configure-via-cli-tcld}
**How to configure a metrics endpoint using the tcld CLI.**
To add a certificate to a metrics endpoint, use [`tcld account metrics accepted-client-ca add`](/cloud/tcld/account#add).
To enable a metrics endpoint, use [`tcld account metrics enable`](/cloud/tcld/account#enable).
To disable a metrics endpoint, use [`tcld account metrics disable`](/cloud/tcld/account#disable).
For more information, see [tcld account metrics command](/cloud/tcld/account#metrics).
## Query for metrics with a PromQL endpoint {#query-promql}
Temporal Cloud emits metrics in a Prometheus-supported format.
Prometheus is an open-source toolkit for alerting and monitoring.
The Temporal Service exposes Cloud metrics with a [Prometheus HTTP API endpoint](https://prometheus.io/docs/prometheus/latest/querying/api/).
Temporal Cloud metrics provide a compatible data source for visualizing, monitoring, and observability platforms.
You can use functions like [rate](https://prometheus.io/docs/prometheus/latest/querying/functions/#rate) or [increase](https://prometheus.io/docs/prometheus/latest/querying/functions/#increase) to calculate the rate of increase for a Temporal Cloud metric:
```
rate(temporal_cloud_v0_frontend_service_request_count[$__rate_interval])
```
Or you might use Prometheus to calculate average latencies or histogram quartiles:
```
# Average latency
rate(temporal_cloud_v0_service_latency_sum[$__rate_interval])
/ rate(temporal_cloud_v0_service_latency_count[$__rate_interval])
# Approximate 99th percentile latency broken down by operation
histogram_quantile(0.99, sum(rate(temporal_cloud_v0_service_latency_bucket[$__rate_interval])) by (le, operation))
```
Metrics are scraped every 30 seconds and exposed to the metrics endpoint with a 1-minute lag.\
The endpoint returns data with a 15-second resolution, which results in displaying the same value twice.
Set up Grafana with Temporal Cloud observability to view metrics by creating or getting your Prometheus endpoint for Temporal Cloud metrics and enabling SDK metrics.
---
## Temporal Cloud Metrics
Temporal offers two distinct sources of metrics: [Cloud Metrics](/cloud/metrics/openmetrics/metrics-reference) and [SDK Metrics](/references/sdk-metrics).
Each source provides different levels of granularity, filtering options, monitoring-tool integrations, and configuration.
- **SDK metrics** monitor individual Workers and your code's behavior from the perspective of your application.
- **Cloud metrics** monitor Temporal Cloud's behavior from the perspective of the Temporal Service.
When used together, Cloud and SDK metrics measure the health and performance of your full Temporal infrastructure, including the Temporal Cloud Service and user-supplied Temporal Workers.
## Cloud Metrics
Cloud metrics for all Namespaces in your account are available from the [OpenMetrics endpoint](/cloud/metrics/openmetrics), a Prometheus-compatible scrapable endpoint at `metrics.temporal.io`.
- [OpenMetrics overview](/cloud/metrics/openmetrics) - Getting started and key concepts
- [Metrics integrations](/cloud/metrics/openmetrics/metrics-integrations) - Datadog, Grafana Cloud, New Relic, ClickStack, and more
- [API reference](/cloud/metrics/openmetrics/api-reference) - Endpoint specification and advanced configuration
- [Metrics reference](/cloud/metrics/openmetrics/metrics-reference) - Complete catalog of all `temporal_cloud_v1_*` metrics
## SDK Metrics
SDK metrics are emitted by your Workers and Clients.
For setup instructions, see [SDK metrics setup](/cloud/metrics/sdk-metrics-setup).
## PromQL Endpoint (Deprecated) {#promql-deprecated}
:::danger PromQL endpoint deprecated
The PromQL endpoint and its `temporal_cloud_v0_*` metrics were deprecated on April 2, 2026 and are no longer accepting new users.
The PromQL endpoint will be disabled for all users on **October 5, 2026**.
Migrate to the [OpenMetrics endpoint](/cloud/metrics/openmetrics).
See the [migration guide](/cloud/metrics/openmetrics/migration-guide) for a complete v0-to-v1 metric mapping.
:::
The legacy PromQL endpoint uses mTLS certificate authentication and exposes `temporal_cloud_v0_*` metrics via a Prometheus query API.
- [PromQL endpoint](/cloud/metrics/promql)
- [PromQL metrics reference](/cloud/metrics/reference)
- [PromQL setup with Grafana](/cloud/metrics/prometheus-grafana)
---
## OpenMetrics API reference
The Temporal Cloud OpenMetrics API provides actionable operational metrics about your Temporal Cloud deployment. This is a scrapable HTTP API that returns metrics in OpenMetrics format, suitable for ingestion by Prometheus-compatible monitoring systems.
## Available Metrics Reference
Metrics descriptions are also available programmatically via the `/v1/descriptors` endpoint. You can see the Metrics Reference for a list of available metrics.
## Authentication
Temporal uses API keys for integrating with the OpenMetrics endpoint. Applications must be authorized and authenticated before they can access metrics from Temporal Cloud.
An API key is owned by a Service Account and inherits the permissions granted to the owner.
### Creating API Keys
API keys can be created using the [Temporal Cloud UI](https://cloud.temporal.io):
1. Navigate to Settings → Service Accounts
2. Create a service account with **"Metrics Read-Only"** Account Level Role
3. Generate an API key within the service account
:::info
See the [docs](https://docs.temporal.io/cloud/api-keys#serviceaccount-api-keys) for more details on generating API keys.
:::
### Using API Keys
All API requests must be made over HTTPS. Calls made over plain HTTP will fail. API requests without authentication will also fail.
```shell
curl -H "Authorization: Bearer " https://metrics.temporal.io/v1/metrics
```
## Object Model
The object model for the Metrics API follows the [OpenMetrics](https://openmetrics.io/) standard.
### Metrics
A metric is a numeric attribute measured at a specific point in time, labeled with contextual metadata gathered at the point of instrumentation.
### Metric Types
All Temporal Cloud metrics are exposed as *gauges* in OpenMetrics format, but represent different measurement types:
* **Rate metrics**: Pre-computed per-second rates with delta temporality (e.g., `temporal_cloud_v1_workflow_success_count` \- workflows completed per second)
* **Value metrics**: Current or instantaneous values (e.g., `temporal_cloud_v1_approximate_backlog_count` \- current number of tasks in queue)
The list of metrics and their labels are available via the [List Descriptors](/cloud/metrics/openmetrics/api-reference#list-metric-descriptors) endpoint or in the [Metrics Reference](/cloud/metrics/openmetrics/metrics-reference).
### Labels
A label is a key-value attribute associated with a metric data point. Labels can be used to filter or aggregate metrics.
Common labels include:
* `temporal_namespace`: The Temporal namespace
* `temporal_account`: The Temporal account
* `region`: The cloud region where the metric originated
* `temporal_workflow_type`: The workflow type (where applicable)
* `temporal_task_queue`: The task queue name (where applicable)
Each metric has its own set of applicable labels. See the Metrics Reference for complete details.
### Metric Family
A [Metric Family](https://github.com/prometheus/OpenMetrics/blob/main/specification/OpenMetrics.md#metricfamily) may have zero or more metrics. The set of metrics returned will vary based on actual system activity. Metrics only appear in a Metric Family if they were reported during the aggregation window.
## Client Considerations
### Rate Limiting
To protect the stability of the API and keep it available to all users, Temporal employs multiple safeguards.
When a rate limit is breached, an HTTP `429 Too Many Requests` error is returned with the following headers:
| Header | Description |
| ----- | ----- |
| `Retry-After` | The time in seconds until the rate limit window resets |
#### Rate Limit Scopes
:::note
Rate limit scopes are subject to change.
:::
| Scope | Limit |
| ----- | ----- |
| Account | 180 requests per hour |
### Response Completeness
The `X-Completeness` header indicates whether the response contains all available data:
* `complete`: The response contains all metrics requested
* `limited`: Response truncated due to size limits (30k metric data points max). Use namespace or metric filtering to reduce the response size.
* `unknown`: Completeness cannot be determined (possibly due to regional issues or timeouts). Clients are encouraged to retry.
### Retry Logic
Implement retry logic in your client to gracefully handle transient API failures. Use exponential backoff with jitter to avoid retry storms with reasonable retry intervals to avoid reaching rate limits.
### Data Latency
Metric data points are available for query within 3 minutes of their origination. This is in line with the freshest metrics [available from any major service provider](https://docs.datadoghq.com/integrations/guide/cloud-metric-delay/). This latency should be accounted for when setting up monitoring alerts.
## Endpoints
:::info
All endpoints are served from: `metrics.temporal.io`
:::
### Get Metrics
`GET /v1/metrics`
Returns metrics in OpenMetrics format suitable for scraping by Prometheus-compatible systems.
#### Timestamp Offset
To account for metric data latency, this endpoint returns metrics from the current timestamp minus a fixed offset. The current offset is 3 minutes rounded down to the start of the minute. To accommodate this offset, the timestamps in the response should be honored when importing the metrics. For example, in Prometheus this can be controlled using the `honor\_timestamps` flag.
#### Query Parameters
| Parameter | Type | Description |
| ----- | ----- | ----- |
| `namespaces` | string array | Filter to specific Namespaces. Supports wildcards (e.g., `production-*`) |
| `metrics` | string array | Filter to specific metrics |
#### Response Headers
| Header | Description |
| ----- | ----- |
| `X-Completeness` | Indicates the response status: `complete`, `limited`, or `unknown` |
| `Content-Type` | `application/openmetrics-text` |
:::info Example
Request:
```shell
curl -H "Authorization: Bearer " \
"https://metrics.temporal.io/v1/metrics?namespaces=production-*"
```
Response:
```
# TYPE temporal_cloud_v1_workflow_success_count gauge
# HELP temporal_cloud_v1_workflow_success_count The number of successful workflows per second
temporal_cloud_v1_workflow_success_count{temporal_namespace="production",temporal_workflow_type="payment-processing",region="aws-us-west-2"} 42.0 1609459200000
temporal_cloud_v1_workflow_success_count{temporal_namespace="production",temporal_workflow_type="order-fulfillment",region="aws-us-west-2"} 128.0 1609459200000
# TYPE temporal_cloud_v1_approximate_backlog_count gauge
# HELP temporal_cloud_v1_approximate_backlog_count Approximate number of tasks in a task queue
temporal_cloud_v1_approximate_backlog_count{temporal_namespace="production",temporal_task_queue="critical-queue",task_type="workflow", region="aws-us-west-2"} 15.0 1609459200000
```
:::
#### Summary of Best Practices
* *Honor timestamps*: Set `honor_timestamps: true` in Prometheus
* *Scrape interval*: Use 30 or 60 second intervals
* *Timeout*: Set scrape timeout to 10 seconds for large responses
* *Filtering*: Use query parameters to reduce response size
### List Metric Descriptors
`GET /v1/descriptors`
Lists all metric descriptors including metadata, data types, and available dimensions (a.k.a. labels).
#### Query Parameters
| Parameter | Type | Description |
| ----- | ----- | ----- |
| `limit` | integer | Page size (1-100, default: 100\) |
| `offset` | integer | Page offset |
:::info Example
Request:
```shell
curl -H "Authorization: Bearer " \
"https://metrics.temporal.io/v1/descriptors"
```
Response:
```json
{
"meta": {
"pagination": {
"total": 35,
"limit": 100,
"offset": 0
}
},
"descriptors": [
{
"name": "temporal_cloud_v1_workflow_success_count",
"help": "The number of successful workflows per second",
"dimensions": [
"temporal_namespace",
"temporal_workflow_type",
"temporal_task_queue",
"region"
]
}
]
}
```
:::
## Managing High Cardinality
:::caution
High-cardinality labels like `temporal_task_queue` and `temporal_workflow_type` can significantly increase metric volume and impact performance of your monitoring system.
:::
### Cardinality Estimation
To estimate your metric cardinality and see if this is an issue:
```
Total series = Base metrics × Namespaces × Task queues × Workflow types
```
Example:
* 6 workflow metrics with both labels
* 10 namespaces
* 50 task queues
* 20 workflow types
* \= 6 × 10 × 50 × 20 \= 60,000 time series
:::note
60,000 time series in the above example results in exceeding the 30,000 data points per scrape limit.
:::
If the cardinality is too high or you are hitting API limits, consider the following strategies.
### Filtering at Scrape Time
You can isolate only the metrics/namespaces you need. For example, the following shows examples of filtering by modifying the `metrics_path.`
```shell
# Only specific namespaces matching the wildcard pattern
/v1/metrics?namespaces=production-*
# Only specific metrics
/v1/metrics?metrics=temporal_cloud_v1_workflow_success_count
# Combined filtering
/v1/metrics?namespaces=prod-*&metrics=temporal_cloud_v1_approximate_backlog_count
```
:::info
In Prometheus, the `params` config can be set to match the same behavior as above.
```yaml
scrape_configs:
- job_name: 'temporal-cloud'
...
static_configs:
- targets: ['metrics.temporal.io']
metrics_path: '/v1/metrics'
params:
namespaces: ['prod-*']
metrics: ['temporal_cloud_v1_approximate_backlog_count']
```
:::
### Label Management
#### Prometheus
If using Prometheus, you can configure it to drop metrics with a specific label or even rename specific label values to reduce the cardinality.
```yaml
metric_relabel_configs:
# Consolidate non-critical task queues
- source_labels: [temporal_task_queue]
regex: '(critical-queue|payment-queue)'
target_label: __tmp_keep_original
replacement: 'true'
- source_labels: [__tmp_keep_original]
regex: ''
target_label: temporal_task_queue
replacement: 'other'
- regex: '__tmp_keep_original'
action: labeldrop
```
#### OpenTelemetry Collector
To accomplish the same as Prometheus, a filter can be used in the collector along with any other processors.
```
processors:
filter:
metrics:
include:
match_type: regexp
expressions:
# Only keep metrics with critical-queue or payment-queue
- Label("temporal_task_queue") == nil or IsMatch(Label("temporal_task_queue"), "^(critical-queue|payment-queue)$")
```
### Monitoring Cardinality
Cardinality can be monitored using this PromQL query.
```shell
# Count the total number of series
count({__name__=~"temporal_cloud_v1_.*"})
# Count the total number of series by metric
count({__name__=~"temporal_cloud_v1_.*"}) by (__name__)
```
## API Limits
| Limit | Impact | Mitigation |
| ----- | ----- | ----- |
| 30k total datapoints per scrape | Response may be truncated | Use namespace/metric filtering |
| 180 requests per account per hour (~3 requests per minute) | HTTP 429 returned | Set appropriate scrape interval of 30-60s |
---
## Temporal Cloud OpenMetrics
:::tip PRICING
Future pricing may apply to high-volume usage that exceeds standard [limits](/cloud/metrics/openmetrics/api-reference#api-limits).
:::
Temporal Cloud's [OpenMetrics](https://openmetrics.io/) endpoint provides operational metrics for your Temporal Cloud workloads in industry-standard Prometheus format, enabling comprehensive monitoring across Namespaces, Workflows, and Task Queues with your existing observability stack.
## Quick Links
* [Integrations](/cloud/metrics/openmetrics/metrics-integrations) - Get started exporting metrics with common integrations
* [API Documentation](/cloud/metrics/openmetrics/api-reference) - Endpoint specification and advanced configuration
* [Metrics Reference](/cloud/metrics/openmetrics/metrics-reference) - Complete catalog of all metrics with descriptions and labels
* [Migration Guide](/cloud/metrics/openmetrics/migration-guide) - Guide on how to transition from the Prometheus query endpoint
## Overview
Temporal Cloud OpenMetrics exposes 50+ metrics covering workflow lifecycles, task queue operations, service performance, and system limits. All metrics are aggregated over one-minute windows and available for scraping within three minutes.
* [Set up authentication and scraping](/cloud/metrics/openmetrics/api-reference#authentication) with the API documentation.
* Browse the [complete metrics catalog](/cloud/metrics/openmetrics/metrics-reference) for descriptions and labels.
* Teams using the query endpoint should review the [migration guide](/cloud/metrics/openmetrics/migration-guide).
## API key authentication
Create a [service account](/cloud/metrics/openmetrics/migration-guide#create-an-api-key) with the "Metrics Read-Only" role, generate an API key, and start scraping immediately - no certificate rotation or distribution required.
## Global endpoint
This is a single endpoint at `metrics.temporal.io` which serves all metrics across your entire account with API key authentication and standard HTTPS.
## Namespace and metric filtering
You can use query parameters to enable selective scraping to manage data volume and costs, which support wildcards for flexible namespace selection and specific metric filtering.
## Dashboard templates
Production-ready [Grafana dashboards](https://github.com/grafana/jsonnet-libs/blob/master/temporal-mixin/dashboards/temporal-overview.json) provide immediate visibility with pre-built queries and visualizations.
---
## Metrics integrations
Metrics can be exported from Temporal Cloud using the OpenMetrics endpoint. This document describes configuring integrations that have third party support or are based on open standards.
This document is for basic configuration only. For advanced concepts such as label management and high cardinality scenarios see the
[general API reference](/cloud/metrics/openmetrics/api-reference).
## Integrations
### Datadog
Datadog provides a serverless integration with the OpenMetrics endpoint. This integration will scrape metrics, store them in Datadog, and provides a default dashboard with some built in monitors. See the [integration page](https://docs.datadoghq.com/integrations/temporal-cloud-openmetrics/) for more details.
### Grafana Cloud
Grafana provides a serverless integration with the OpenMetrics endpoint for Grafana Cloud. This integration will scrape metrics, store them in Grafana Cloud, and provides a default dashboard
for visualizing the metrics in Grafana Cloud. See the [integration page](https://grafana.com/docs/grafana-cloud/monitor-infrastructure/integrations/integration-reference/integration-temporal/)
for more details.
### ClickStack
ClickHouse provides an integration with the OpenMetrics endpoint for ClickStack. This integration uses an OpenTelemetry collector to read from the OpenMetrics endpoint, ingest data into ClickHouse, and
includes a default dashboard to visualize the data with HyperDX. See the [integration page](https://clickhouse.com/docs/use-cases/observability/clickstack/integrations/temporal-metrics) for more details.
### New Relic
New Relic integrates with Temporal Cloud via the infrastructure agent using a flex integration that pulls data from the OpenMetrics endpoint. See the [integration page](https://docs.newrelic.com/docs/infrastructure/host-integrations/host-integrations-list/temporal-cloud-integration/) for more details.
### Prometheus \+ Grafana
Self hosted Prometheus can be used to scrape the OpenMetrics endpoint.
1. Add a new scrape job for the OpenMetrics endpoint with your [API key](/cloud/metrics/openmetrics/api-reference#creating-api-keys).
```yaml
scrape_configs:
- job_name: 'temporal-cloud'
scrape_interval: 60s
scrape_timeout: 30s
honor_timestamps: true
scheme: https
authorization:
type: Bearer
credentials: ''
static_configs:
- targets: ['metrics.temporal.io']
metrics_path: '/v1/metrics'
```
2. Import the [Grafana dashboard](https://github.com/grafana/jsonnet-libs/blob/master/temporal-mixin/dashboards/temporal-overview.json) and configure your Prometheus datasource.
### OpenTelemetry Collector Configuration
Collect metrics with a self-hosted OpenTelemetry Collector to ingest into the system of your choosing.
1. Add a new prometheus receiver for the OpenMetrics endpoint with your [API key](/cloud/metrics/openmetrics/api-reference#creating-api-keys).
```yaml
receivers:
prometheus:
config:
scrape_configs:
- job_name: 'temporal-cloud'
scrape_interval: 60s
scrape_timeout: 30s
honor_timestamps: true
scheme: https
authorization:
type: Bearer
credentials_file:
static_configs:
- targets: ['metrics.temporal.io']
metrics_path: '/v1/metrics'
processors:
batch:
exporters:
otlphttp:
endpoint:
service:
pipelines:
metrics:
receivers: [prometheus]
processors: [batch]
exporters: [otlphttp]
```
:::info
Examples for these integrations and more are [here](https://github.com/temporal-community/cloud-metrics-scrape-examples).
:::
---
## OpenMetrics metrics reference
This document describes all metrics available from the Temporal Cloud OpenMetrics endpoint.
## Metric Conventions
### Metric Types
All metrics are exposed as OpenMetrics gauges, but represent different measurement types:
* *Rate Metrics*: per-second rate of the aggregated values
* *Value Metrics*: The most recent aggregate value within a look-back window (e.g. backlogs, limits)
* *Percentile Metrics*: Pre-calculated aggregated latency percentiles in seconds
:::note
All metrics are stored as 1 minute aggregates.
:::
### Common Labels
All metrics include these base labels:
| Label | Description |
| ----- | ----- |
| `temporal_namespace` | The Temporal namespace |
| `temporal_account` | The Temporal account identifier |
| `region` | Cloud region where the metric originated |
### Opt-in Labels
Some labels are **opt-in** due to their high cardinality.
These labels are not included by default when you scrape the OpenMetrics endpoint.
To enable an opt-in label, add it to the `labels` query parameter on your scrape URL.
When an opt-in label is enabled, it is populated on **all metrics** that support it.
| Label | Available on | Description |
| ----- | ----- | ----- |
| `temporal_activity_type` | Activity metrics | The activity type name |
| `worker_version` | `temporal_cloud_v1_approximate_backlog_count` | The Worker version |
For example, to include `temporal_activity_type` in your scrape results:
```
/v1/metrics?labels=temporal_activity_type
```
## Metrics Catalog
### Frontend Service Metrics
#### temporal\_cloud\_v1\_service\_request\_count
gRPC requests received per second.
| Label | Description |
| ----- | ----- |
| `operation` | The name of the RPC operation |
**Type**: Rate
#### temporal\_cloud\_v1\_service\_request\_throttled\_count
gRPC requests throttled per second.
| Label | Description |
| ----- | ----- |
| `operation` | The name of the RPC operation |
**Type**: Rate
#### temporal\_cloud\_v1\_service\_error\_count
gRPC errors per second.
| Label | Description |
| ----- | ----- |
| `operation` | The name of the RPC operation |
**Type**: Rate
#### temporal\_cloud\_v1\_service\_pending\_requests
The number of pollers that are actively long polling for a task. Use this to track against ``temporal_cloud_v1_poller_limit``
| Label | Description |
| ----- | ----- |
| `operation` | The name of the operation |
**Type**: Value
#### temporal\_cloud\_v1\_resource\_exhausted\_error\_count
Resource exhaustion errors per second. This metric does not include throttling due to Namespace limits.
| Label | Description |
| ----- | ----- |
| `operation` | The name of the operation |
**Type**: Rate
#### temporal\_cloud\_v1\_service\_latency\_p50
:::caution
Avoid aggregating this metric across dimensions because the percentile won't be accurate.
:::
The 50th percentile latency of service requests in seconds
| Label | Description |
| ----- | ----- |
| `operation` | The name of the operation |
**Type**: Latency
#### temporal\_cloud\_v1\_service\_latency\_p95
:::caution
Avoid aggregating this metric across dimensions because the percentile won't be accurate.
:::
The 95th percentile latency of service requests in seconds
| Label | Description |
| ----- | ----- |
| `operation` | The name of the operation |
**Type**: Latency
#### temporal\_cloud\_v1\_service\_latency\_p99
:::caution
Avoid aggregating this metric across dimensions as the percentile won't be accurate.
:::
The 99th percentile latency of service requests in seconds
| Label | Description |
| ----- | ----- |
| `operation` | The name of the operation |
**Type**: Latency
### Workflow Completion Metrics
:::caution High Cardinality
These metrics could have high cardinality depending on number of workflow types and task queues.
:::
#### temporal\_cloud\_v1\_workflow\_success\_count
Successful workflow completions per second.
| Label | Description |
| ----- | ----- |
| `temporal_task_queue` | The task queue name |
| `temporal_workflow_type` | The workflow type |
**Type**: Rate
#### temporal\_cloud\_v1\_workflow\_failed\_count
Workflow failures per second.
| Label | Description |
| ----- | ----- |
| `temporal_task_queue` | The task queue name |
| `temporal_workflow_type` | The workflow type |
**Type**: Rate
#### temporal\_cloud\_v1\_workflow\_timeout\_count
Workflow timeouts per second.
| Label | Description |
| ----- | ----- |
| `temporal_task_queue` | The task queue name |
| `temporal_workflow_type` | The workflow type |
**Type**: Rate
#### temporal\_cloud\_v1\_workflow\_cancel\_count
Workflow cancellations per second.
| Label | Description |
| ----- | ----- |
| `temporal_task_queue` | The task queue name |
| `temporal_workflow_type` | The workflow type |
**Type**: Rate
#### temporal\_cloud\_v1\_workflow\_terminate\_count
Workflow terminations per second.
| Label | Description |
| ----- | ----- |
| `temporal_task_queue` | The task queue name |
| `temporal_workflow_type` | The workflow type |
**Type**: Rate
#### temporal\_cloud\_v1\_workflow\_continued\_as\_new\_count
Workflows continued as new per second.
| Label | Description |
| ----- | ----- |
| `temporal_task_queue` | The task queue name |
| `temporal_workflow_type` | The workflow type |
**Type**: Rate
#### temporal\_cloud\_v1\_workflow\_schedule\_to\_close\_latency\_p50
:::caution
Avoid aggregating this metric across dimensions because the percentile won't be accurate.
:::
The 50th percentile workflow schedule-to-close latency in seconds.
| Label | Description |
| ----- | ----- |
| `temporal_workflow_type` | The workflow type |
**Type**: Latency
#### temporal\_cloud\_v1\_workflow\_schedule\_to\_close\_latency\_p95
:::caution
Avoid aggregating this metric across dimensions because the percentile won't be accurate.
:::
The 95th percentile workflow schedule-to-close latency in seconds.
| Label | Description |
| ----- | ----- |
| `temporal_workflow_type` | The workflow type |
**Type**: Latency
#### temporal\_cloud\_v1\_workflow\_schedule\_to\_close\_latency\_p99
:::caution
Avoid aggregating this metric across dimensions because the percentile won't be accurate.
:::
The 99th percentile workflow schedule-to-close latency in seconds.
| Label | Description |
| ----- | ----- |
| `temporal_workflow_type` | The workflow type |
**Type**: Latency
### Activity Metrics
:::caution High Cardinality
These metrics could have high cardinality depending on number of activity types, workflow types, and task queues. The `temporal_activity_type` label is [opt-in](#opt-in-labels) to help manage cardinality.
:::
:::note Standalone Activities
Standalone Activities are Activity Executions that are started independently, without an associated Workflow. For Activity metrics that include the `temporal_workflow_type` label, Standalone Activities use the placeholder value `"__standalone_activity"`.
:::
#### temporal\_cloud\_v1\_activity\_success\_count
Successful activity completions per second.
| Label | Description |
| ----- | ----- |
| `temporal_task_queue` | The task queue name |
| `temporal_workflow_type` | The workflow type |
| `temporal_activity_type` | The activity type (opt-in) |
**Type**: Rate
#### temporal\_cloud\_v1\_activity\_fail\_count
Activity failures per second.
| Label | Description |
| ----- | ----- |
| `temporal_task_queue` | The task queue name |
| `temporal_workflow_type` | The workflow type |
| `temporal_activity_type` | The activity type (opt-in) |
**Type**: Rate
#### temporal\_cloud\_v1\_activity\_timeout\_count
Activity timeouts per second.
| Label | Description |
| ----- | ----- |
| `temporal_task_queue` | The task queue name |
| `temporal_workflow_type` | The workflow type |
| `temporal_activity_type` | The activity type (opt-in) |
| `timeout_type` | The timeout type |
**Type**: Rate
#### temporal\_cloud\_v1\_activity\_task\_fail\_count
Activity task failures per second.
| Label | Description |
| ----- | ----- |
| `temporal_task_queue` | The task queue name |
| `temporal_workflow_type` | The workflow type |
| `temporal_activity_type` | The activity type (opt-in) |
**Type**: Rate
#### temporal\_cloud\_v1\_activity\_task\_timeout\_count
Activity task timeouts per second.
| Label | Description |
| ----- | ----- |
| `temporal_task_queue` | The task queue name |
| `temporal_workflow_type` | The workflow type |
| `temporal_activity_type` | The activity type (opt-in) |
| `timeout_type` | The timeout type |
**Type**: Rate
#### temporal\_cloud\_v1\_activity\_cancel\_count
Activity cancellations per second.
| Label | Description |
| ----- | ----- |
| `temporal_task_queue` | The task queue name |
| `temporal_workflow_type` | The workflow type |
| `temporal_activity_type` | The activity type (opt-in) |
**Type**: Rate
#### temporal\_cloud\_v1\_activity\_terminate\_count
Activity terminations per second. This metric only applies to Standalone Activities. Regular Activities that run within a Workflow cannot be terminated independently.
| Label | Description |
| ----- | ----- |
| `temporal_task_queue` | The task queue name |
| `temporal_workflow_type` | The workflow type |
| `temporal_activity_type` | The activity type (opt-in) |
**Type**: Rate
:::info Activity latency labels
Activity latency metrics include only the `temporal_activity_type` label.
Labels such as `temporal_task_queue` and `temporal_workflow_type` are intentionally excluded because pre-calculated percentile values cannot be accurately aggregated across additional dimensions.
:::
#### temporal\_cloud\_v1\_activity\_start\_to\_close\_latency\_p50
:::caution
Avoid aggregating this metric across dimensions because the percentile won't be accurate.
:::
The 50th percentile activity start-to-close latency in seconds.
| Label | Description |
| ----- | ----- |
| `temporal_activity_type` | The activity type (opt-in) |
**Type**: Latency
#### temporal\_cloud\_v1\_activity\_start\_to\_close\_latency\_p95
:::caution
Avoid aggregating this metric across dimensions because the percentile won't be accurate.
:::
The 95th percentile activity start-to-close latency in seconds.
| Label | Description |
| ----- | ----- |
| `temporal_activity_type` | The activity type (opt-in) |
**Type**: Latency
#### temporal\_cloud\_v1\_activity\_start\_to\_close\_latency\_p99
:::caution
Avoid aggregating this metric across dimensions because the percentile won't be accurate.
:::
The 99th percentile activity start-to-close latency in seconds.
| Label | Description |
| ----- | ----- |
| `temporal_activity_type` | The activity type (opt-in) |
**Type**: Latency
#### temporal\_cloud\_v1\_activity\_schedule\_to\_close\_latency\_p50
:::caution
Avoid aggregating this metric across dimensions because the percentile won't be accurate.
:::
The 50th percentile activity schedule-to-close latency in seconds.
| Label | Description |
| ----- | ----- |
| `temporal_activity_type` | The activity type (opt-in) |
**Type**: Latency
#### temporal\_cloud\_v1\_activity\_schedule\_to\_close\_latency\_p95
:::caution
Avoid aggregating this metric across dimensions because the percentile won't be accurate.
:::
The 95th percentile activity schedule-to-close latency in seconds.
| Label | Description |
| ----- | ----- |
| `temporal_activity_type` | The activity type (opt-in) |
**Type**: Latency
#### temporal\_cloud\_v1\_activity\_schedule\_to\_close\_latency\_p99
:::caution
Avoid aggregating this metric across dimensions because the percentile won't be accurate.
:::
The 99th percentile activity schedule-to-close latency in seconds.
| Label | Description |
| ----- | ----- |
| `temporal_activity_type` | The activity type (opt-in) |
**Type**: Latency
### Task Queue Metrics
:::caution High Cardinality
These metrics could have high cardinality depending on number of task queues present.
:::
#### temporal\_cloud\_v1\_approximate\_backlog\_count
The approximate number of tasks pending in a task queue. Started Activities are not included in the count as they have been dequeued from the task queue.
| Label | Description |
| ----- | ----- |
| `temporal_task_queue` | The task queue name |
| `task_type` | Type of task: `workflow` or `activity` |
| `task_priority` | The task priority |
| `worker_version` | The Worker version (opt-in) |
**Type**: Value
#### temporal\_cloud\_v1\_poll\_success\_count
Successfully matched tasks per second.
| Label | Description |
| ----- | ----- |
| `operation` | The poll operation name |
| `task_type` | Type of task: `workflow` or `activity` |
| `temporal_task_queue` | The task queue name |
**Type**: Rate
#### temporal\_cloud\_v1\_poll\_success\_sync\_count
Tasks matched synchronously per second (no polling wait).
| Label | Description |
| ----- | ----- |
| `operation` | The poll operation name |
| `task_type` | Type of task: `workflow` or `activity` |
| `temporal_task_queue` | The task queue name |
**Type**: Rate
#### temporal\_cloud\_v1\_poll\_timeout\_count
The rate of poll requests that timed out without receiving a task.
| Label | Description |
| ----- | ----- |
| `operation` | The poll operation name |
| `task_type` | Type of task: `workflow` or `activity` |
| `temporal_task_queue` | The task queue name |
**Type**: Rate
#### temporal\_cloud\_v1\_no\_poller\_tasks\_count
The rate of tasks added to queues with no active pollers.
| Label | Description |
| ----- | ----- |
| `temporal_task_queue` | The task queue name |
| `task_type` | Type of task: `workflow` or `activity` |
**Type**: Rate
### Namespace Metrics
#### temporal\_cloud\_v1\_namespace\_open\_workflows
The current number of open workflows in a namespace.
**Type**: Value
#### temporal\_cloud\_v1\_total\_action\_count
The total number of actions performed per second. Actions with `is_background=false` are counted toward the ``temporal_cloud_v1_action_limit``.
| Label | Description |
| ----- | ----- |
| `is_background` | Whether the action was background: `true` or `false`. Background actions (e.g. History export) do not count toward the action rate limit |
| `namespace_mode` | Indicates if actions are produced by an `active` or a `standby` Namespace |
:::note
Does not include the `region` label. Actions are scoped to the Namespace level.
:::
**Type**: Rate
#### temporal\_cloud\_v1\_total\_action\_throttled\_count
The total number of actions throttled per second.
**Type**: Rate
#### temporal\_cloud\_v1\_operations\_count
Operations performed per second.
| Label | Description |
| ----- | ----- |
| `operation` | The name of the operation |
| `is_background` | Whether the operation was background: `true` or `false`. Background operations do not count toward the operation rate limit |
| `namespace_mode` | Indicates if operations are produced by an `active` or a `standby` Namespace |
**Type**: Rate
#### temporal\_cloud\_v1\_operations\_throttled\_count
Operations throttled due to rate limits per second.
| Label | Description |
| ----- | ----- |
| `operation` | The name of the operation |
| `is_background` | Whether the operation was background: `true` or `false`. Background operations do not count toward the operation rate limit |
| `namespace_mode` | Indicates if actions are throttled in an `active` or a `standby` Namespace |
**Type**: Rate
### Schedule Metrics
#### temporal\_cloud\_v1\_schedule\_action\_success\_count
Successfully executed scheduled workflows per second.
**Type**: Rate
#### temporal\_cloud\_v1\_schedule\_buffer\_overruns\_count
The rate of schedule buffer overruns when using `BUFFER_ALL` overlap policy.
**Type**: Rate
#### temporal\_cloud\_v1\_schedule\_missed\_catchup\_window\_count
The rate of missed schedule executions outside the catchup window.
**Type**: Rate
#### temporal\_cloud\_v1\_schedule\_rate\_limited\_count
The rate of scheduled workflows delayed due to rate limiting.
**Type**: Rate
### Replication Metrics
#### temporal\_cloud\_v1\_replication\_lag\_p50
The 50th percentile cross-region replication lag in seconds.
**Type**: Latency
#### temporal\_cloud\_v1\_replication\_lag\_p95
The 95th percentile cross-region replication lag in seconds.
**Type**: Latency
#### temporal\_cloud\_v1\_replication\_lag\_p99
The 99th percentile cross-region replication lag in seconds.
**Type**: Latency
### Limit Metrics
#### temporal\_cloud\_v1\_operations\_limit
The current configured operations per second limit for a namespace.
**Type**: Value
#### temporal\_cloud\_v1\_action\_limit
The current configured actions per second limit for a namespace. Track utilization against this limit with ``temporal_cloud_v1_total_action_count`` and `is_background=false`.
**Type**: Value
#### temporal\_cloud\_v1\_service\_request\_limit
The current configured frontend service RPS limit for a namespace. Track utilization against this limit with ``temporal_cloud_v1_service_request_count``
**Type**: Value
#### temporal\_cloud\_v1\_poller\_limit
The current configured poller limit for a namespace. Track utilization against this limit with ``temporal_cloud_v1_service_pending_requests``.
**Type**: Value
#### temporal\_cloud\_v1\_action\_on\_demand\_envelope\_limit
The on-demand envelope limit for actions per second. For Namespaces in provisioned capacity mode, this shows what the action limit would be if operating in on-demand mode. For Namespaces already in on-demand mode, this tracks the same value as `temporal_cloud_v1_action_limit`.
:::note
Does not include the `region` label. Limits are scoped to the Namespace level.
:::
**Type**: Value
#### temporal\_cloud\_v1\_operations\_on\_demand\_envelope\_limit
The on-demand envelope limit for operations per second. For Namespaces in provisioned capacity mode, this shows what the operations limit would be if operating in on-demand mode. For Namespaces already in on-demand mode, this tracks the same value as `temporal_cloud_v1_operations_limit`.
:::note
Does not include the `region` label. Limits are scoped to the Namespace level.
:::
**Type**: Value
#### temporal\_cloud\_v1\_service\_request\_on\_demand\_envelope\_limit
The on-demand envelope limit for service requests per second. For Namespaces in provisioned capacity mode, this shows what the service request limit would be if operating in on-demand mode. For Namespaces already in on-demand mode, this tracks the same value as `temporal_cloud_v1_service_request_limit`.
:::note
Does not include the `region` label. Limits are scoped to the Namespace level.
:::
**Type**: Value
---
## OpenMetrics migration guide
Temporal Cloud is transitioning from our Prometheus query endpoint to an industry-standard OpenMetrics
(Prometheus-compatible) endpoint for metrics collection. This migration represents a significant improvement in how you
can monitor your Temporal Cloud workloads, bringing enhanced capabilities, better integration with observability tools,
and access to high-cardinality metrics that were previously unavailable.
:::danger PromQL endpoint deprecated
The PromQL endpoint was deprecated on April 2, 2026 and is no longer accepting new users.
The PromQL endpoint will be disabled for all users on **October 5, 2026**.
Complete your migration to the OpenMetrics endpoint before this date.
:::
## Why We're Making This Change
1. **Industry-Standard Format**: Native compatibility with Prometheus and OpenTelemetry and all major observability
platforms (Datadog, New Relic etc.) without custom integrations.
2. **High-Cardinality Metrics**: Access to previously unavailable dimensions including:
- `temporal_task_queue` labels on multiple metrics
- `temporal_workflow_type` labels for workflow-specific monitoring
- New task queue backlog metrics for better operational visibility
3. **Accurate Percentiles**: Our new system provides accurate percentile calculations for latency metrics, even in the
presence of substantial outliers, unlike Prometheus-style histograms.
4. **Simplified Integration**: Direct scraping from your observability tools without intermediate translation layers.
5. **Enhanced Performance**: Optimized for high-cardinality data with built-in safeguards for system stability. Data is
available to scrape three minutes from the time it was emitted, in line with the freshest metrics
[available from any major service provider](https://docs.datadoghq.com/integrations/guide/cloud-metric-delay/).
## What's Changing
| Aspect | Current Query Endpoint | New OpenMetrics Endpoint |
| ---------------------- | -------------------------------------------------- | ------------------------------------------- |
| **Protocol** | Prometheus Query API (`/api/v1/query`) | OpenMetrics scrape endpoint (`/v1/metrics`) |
| **Authentication** | mTLS certificates with customer-specific endpoints | API keys with global endpoint |
| **Metric Temporality** | Cumulative counters | Delta temporality (pre-computed rates) |
| **Query Requirement** | Direct queries supported | Requires observability platform |
| **Cardinality** | Limited labels | High-cardinality labels available |
| **Metric Naming** | `*_v0_*` metrics | `*_v1_*` metrics |
## Migration Timeline
**April 2, 2026 - PromQL endpoint deprecated**
- The PromQL endpoint is no longer accepting new users.
- Existing users should begin migrating to the OpenMetrics endpoint.
**October 5, 2026 - PromQL endpoint disabled**
- The PromQL endpoint will be disabled for all users.
- All metrics consumption must use the OpenMetrics endpoint by this date.
:::important Action Required
Complete migration before October 5, 2026.
:::
## Notable Differences
### 1\. No longer use `rate()` in Prometheus queries
Metrics are now pre-computed as per-second rates with delta temporality.
**Before (Prometheus query endpoint)**:
```
rate(temporal_cloud_v0_frontend_service_request_count[1m])
```
**After (OpenMetrics endpoint)**:
```
temporal_cloud_v1_service_request_count
```
### 2\. Functions that no longer apply
Metrics from OpenMetrics are already rates, therefore certain Prometheus functions no longer make sense. Below is a
non-exhaustive list of some of the functions:
- ❌ `rate()` \- Already computed
- ❌ `increase()` \- Increase of a rate is meaningless
- ❌ `irate()` \- Instant rate not applicable
- ❌ `histogram_quantile()` \- Not applicable (explicit percentiles provided instead)
- ✅ `sum()`, `avg()`, `max()`, `min()` \- Still work normally
### 3\. Percentile metrics
The new endpoint provides explicit percentile metrics (p50, p95, p99) rather than histogram buckets:
**Before (Prometheus query endpoint)**: Calculate percentiles using `histogram_quantile()`
```shell
histogram_quantile(0.95, rate(temporal_cloud_v0_service_latency_bucket[5m]))
```
**After (OpenMetrics endpoint)**: Use pre-calculated percentiles directly
```
temporal_cloud_v1_service_latency_p95
```
**Important Tradeoff**: While pre-calculated percentiles are more accurate for individual time series, they _cannot be
accurately aggregated_. For example:
- ❌ Cannot sum or average p95 values across Namespaces to get a global p95
- ❌ Cannot aggregate p95 values across regions or Task Queues
- ✅ Can still view individual namespace/task queue percentiles accurately
- ✅ More accurate percentile calculations for individual series, especially with outliers
### 4\. Authentication Setup
**Before**: mTLS certificates with customer-specific endpoint
```shell
curl --cert /path/to/client.pem \
--key /path/to/client.key \
--cacert /path/to/ca.pem \
"https://.tmprl.cloud/api/v1/query?query=rate(temporal_cloud_v0_frontend_service_request_count[5m])&time=2025-01-15T10:00:00Z"
```
**After**: API key with global endpoint
```shell
curl -H "Authorization: Bearer " https://metrics.temporal.io/v1/metrics
```
## Migration Steps
### Create an API Key
Create a service account within the Temporal Cloud UI settings with the “Metrics Read-Only” Account Level Role.
:::note
As this is an account-level role, scoping it to specific namespaces has no effect as it will have access to the full
account’s metrics.
:::
Once this is created, you can create an API key within this service account which will inherit the role. Save this API
key in a secure location and use it to access the metrics APIs.
To test that this works, curl the endpoint with your API Key.
The output should resemble the following example:
```shell
$ curl -H "Authorization: Bearer " https://metrics.temporal.io/v1/metrics
# TYPE temporal_cloud_v1_service_error_count gauge
# HELP temporal_cloud_v1_service_error_count The number of gRPC errors returned by frontend service
# TYPE temporal_cloud_v1_service_pending_requests gauge
# HELP temporal_cloud_v1_service_pending_requests The number of pollers that are waiting for a task
# TYPE temporal_cloud_v1_service_request_count gauge
# HELP temporal_cloud_v1_service_request_count The number of RPC requests received by the service..
```
Now you are ready to scrape your metrics\!
### Configuring Grafana \+ Prometheus
#### Update Prometheus Configuration
Add a new scrape job for the OpenMetrics endpoint with your API key.
```yaml
scrape_configs:
- job_name: temporal-cloud
static_configs:
- targets:
- 'metrics.temporal.io'
scheme: https
metrics_path: '/v1/metrics'
honor_timestamps: true
scrape_interval: 60s
scrape_timeout: 30s
authorization:
type: Bearer
credentials: 'API_KEY'
```
:::note
This replaces the direct Grafana datasource configuration you used with the query endpoint.
:::
#### Install New Dashboards
- Download the new Grafana dashboard:
[temporal_cloud_openmetrics.json](https://github.com/temporalio/dashboards/blob/master/cloud/temporal_cloud_openmetrics.json)
- Import alongside existing dashboards during transition
- Update any custom alerts and queries to use new metrics and remove `rate()` functions
#### Other Observability Providers
Consult the documentation for your observability system for how to configure it to scrape this endpoint and retrieve
your metrics:
- [Datadog](https://docs.datadoghq.com/integrations/temporal-cloud-openmetrics/)
- [NewRelic](https://docs.newrelic.com/docs/infrastructure/prometheus-integrations/install-configure-openmetrics/configure-prometheus-openmetrics-integrations/)
- [OpenTelemetry Collector](https://opentelemetry.io/docs/collector/configuration/#receivers)
Examples for all these integrations live [here](https://github.com/temporal-community/cloud-metrics-scrape-examples).
### Metric Mapping Reference
Below is a template for mapping metrics from the old query endpoint to the new OpenMetrics endpoint. Note that all metrics follow the pattern of `v0` → `v1` version change, and the fundamental difference is the shift from cumulative counters to pre-computed rates for the majority of the metrics. Note that the labels below are only new labels added to the metrics. For the complete list of labels, see the /cloud/metrics/openmetrics/metrics-reference.
#### Frontend Service Metrics
| Old Metric (v0) | New Metric (v1) | New Labels |
| -------------------------------------------------- | -------------------------------------------------- | ---------- |
| `temporal_cloud_v0_frontend_service_error_count` | `temporal_cloud_v1_service_error_count` | `region` |
| `temporal_cloud_v0_frontend_service_request_count` | `temporal_cloud_v1_service_request_count` | `region` |
| `temporal_cloud_v0_resource_exhausted_error_count` | `temporal_cloud_v1_resource_exhausted_error_count` | `region` |
| `temporal_cloud_v0_state_transition_count` | No direct equivalent | - |
| `temporal_cloud_v0_total_action_count` | `temporal_cloud_v1_total_action_count` | `region` |
:::note State transition count removed
`temporal_cloud_v0_state_transition_count` does not have an equivalent metric in the OpenMetrics endpoint.
To size workloads for Temporal Cloud (for example, when migrating from self-hosted), use action-based metrics (`temporal_cloud_v1_total_action_count`) and request-based metrics (`temporal_cloud_v1_service_request_count`) together instead.
:::
#### Workflow Metrics
| Old Metric (v0) | New Metric (v1) | New Labels |
| --------------------------------------------------- | --------------------------------------------------- | ------------------------------------------------------- |
| `temporal_cloud_v0_workflow_cancel_count` | `temporal_cloud_v1_workflow_cancel_count` | `region` `temporal_workflow_type` `temporal_task_queue` |
| `temporal_cloud_v0_workflow_continued_as_new_count` | `temporal_cloud_v1_workflow_continued_as_new_count` | `region` `temporal_workflow_type` `temporal_task_queue` |
| `temporal_cloud_v0_workflow_failed_count` | `temporal_cloud_v1_workflow_failed_count` | `region` `temporal_workflow_type` `temporal_task_queue` |
| `temporal_cloud_v0_workflow_success_count` | `temporal_cloud_v1_workflow_success_count` | `region` `temporal_workflow_type` `temporal_task_queue` |
| `temporal_cloud_v0_workflow_terminate_count` | `temporal_cloud_v1_workflow_terminate_count` | `region` `temporal_workflow_type` `temporal_task_queue` |
| `temporal_cloud_v0_workflow_timeout_count` | `temporal_cloud_v1_workflow_timeout_count` | `region` `temporal_workflow_type` `temporal_task_queue` |
#### Poll Metrics
| Old Metric (v0) | New Metric (v1) | New Labels |
| ------------------------------------------- | ------------------------------------------- | ------------------------------ |
| `temporal_cloud_v0_poll_success_count` | `temporal_cloud_v1_poll_success_count` | `region` `temporal_task_queue` |
| `temporal_cloud_v0_poll_success_sync_count` | `temporal_cloud_v1_poll_success_sync_count` | `region` `temporal_task_queue` |
| `temporal_cloud_v0_poll_timeout_count` | `temporal_cloud_v1_poll_timeout_count` | `region` `temporal_task_queue` |
#### Latency Metrics
| Old Metric (v0) | New Metric (v1) | New Labels |
| ------------------------------------------------------------------------------------------------------------------------ | ------------------------------------------------------------------------------------------------------------------- | ---------- |
| `temporal_cloud_v0_service_latency_bucket temporal_cloud_v0_service_latency_count temporal_cloud_v0_service_latency_sum` | `temporal_cloud_v1_service_latency_p99 temporal_cloud_v1_service_latency_p95 temporal_cloud_v1_service_latency_p50` | `region` |
| `temporal_cloud_v0_replication_lag_bucket temporal_cloud_v0_replication_lag_count temporal_cloud_v0_replication_lag_sum` | `temporal_cloud_v1_replication_lag_p99 temporal_cloud_v1_replication_lag_p95 temporal_cloud_v1_replication_lag_p50` | `region` |
#### Schedule Metrics
| Old Metric (v0) | New Metric (v1) | New Labels |
| -------------------------------------------------------- | -------------------------------------------------------- | ---------- |
| `temporal_cloud_v0_schedule_action_success_count` | `temporal_cloud_v1_schedule_action_success_count` | `region` |
| `temporal_cloud_v0_schedule_buffer_overruns_count` | `temporal_cloud_v1_schedule_buffer_overruns_count` | `region` |
| `temporal_cloud_v0_schedule_missed_catchup_window_count` | `temporal_cloud_v1_schedule_missed_catchup_window_count` | `region` |
| `temporal_cloud_v0_schedule_rate_limited_count` | `temporal_cloud_v1_schedule_rate_limited_count` | `region` |
In addition to these metrics, there are a number of new metrics provided by our OpenMetrics endpoint.
:::info
See the [metrics reference](/cloud/metrics/openmetrics/metrics-reference) for an up-to-date list of all available metrics and their full descriptions.
:::
### Managing High-Cardinality
The new endpoint provides access to high-cardinality labels that can significantly increase your metric volume:
#### High-Cardinality Labels
- `temporal_task_queue`
- `temporal_workflow_type`
#### Best Practices
##### Namespace/Metric filtering
Namespace filtering can be used to ensure that metrics are scraped for relevant Namespaces, which reduces cardinality.
```
https://metrics.temporal.io/v1/metrics?namespaces=production-*
```
This can be taken further by only scraping relevant metrics for a given namespace which ensures that any new high
cardinality metrics won’t be an issue for your observability system.
```
https://metrics.temporal.io/v1/metrics?metrics=temporal_cloud_v1_workflow_success_count?namespaces=production-*
```
##### Relabeling
If the above doesn’t work, consider dropping problematic labels post-scrape but pre-ingestion into your observability
system.
For example, in Prometheus this can be done via
[relabeling rules](https://prometheus.io/docs/prometheus/latest/configuration/configuration/#relabel_config).
```yaml
metric_relabel_configs:
- source_labels: [__name__]
regex: 'temporal_cloud_v1_poll_success_count'
action: labeldrop
regex: 'temporal_task_queue'
```
Or you can even relabel certain label values in order to keep significant ones. For example, it’s possible to rename
less important task queues to “unknown” while retaining important ones.
```yaml
metric_relabel_configs:
- source_labels: [temporal_task_queue]
regex: '(critical-queue|payment-queue)'
target_label: __tmp_keep_original
replacement: 'true'
# For anything without the keep flag, replace with "unknown"
- source_labels: [__tmp_keep_original]
regex: '' # empty/missing value
target_label: temporal_task_queue
replacement: 'unknown'
# Clean up the temporary label
- regex: '__tmp_keep_original'
action: labeldrop
```
## Limits
See [API limits](/cloud/metrics/openmetrics/api-reference#api-limits) for details.
## FAQ
### Q: Will metrics match between promQL and OpenMetrics endpoints?
No. The metrics will be approximately the same but due to aggregation differences and windowing, values likely won't
match exactly between the two endpoints. Some metrics may be consistently different such as
`temporal_cloud_v1_total_action_count` which includes History Export actions in the OpenMetrics endpoint. In the case of
consistent differences the OpenMetrics endpoint is considered to be more accurate.
### Q: Can I still query metrics directly (e.g. with a Grafana dashboard)?
Currently, the OpenMetrics endpoint requires an observability platform to collect and query metrics. Direct querying via
API to return a time series of data is not supported. Supporting this type of query pattern is a future roadmap item.
### Q: What happens to my existing dashboards and alerts?
During the transition period, both endpoints remain active.
### Q: Will historical data be preserved?
Historical data from the query endpoint will remain in your observability platform. To maintain continuity:
- Combine old (`v0`) and new (`v1`) metrics in your queries during transition
- Consider using the PromQL `or` operator: `metric_v1 or metric_v0`
### Q: Are there limits to how frequently I can scrape or how much data will be returned?
The limits are documented [here](/cloud/metrics/openmetrics/api-reference#api-limits).
### Q: Why are some metrics missing from my scrapes? I don’t see all the metrics documented.
The OpenMetrics endpoint only returns metrics that were generated during the one-minute aggregation window. This is
different from the query endpoint which might return zeros.
**What this means:**
- If no workflows failed in the last minute, `temporal_cloud_v1_workflow_failed_count` won't appear in that scrape.
- If a specific task queue had no activity, its metrics will be absent.
- The set of metrics returned varies between scrapes based on system activity.
**This is normal behavior.** Unlike some metrics systems that populate zeros, the OpenMetrics endpoint follows a sparse
reporting pattern \- metrics only appear when there's actual data to report.
**How to handle this in queries:**
```
(temporal_cloud_v1_workflow_failed_count{namespace="production"} or vector(0))
```
This ensures your dashboards and alerts work correctly even when metrics are temporarily absent due to no activity.
---
## Prometheus Grafana setup
:::danger PromQL endpoint deprecated
The PromQL endpoint and its `temporal_cloud_v0_*` metrics were deprecated on April 2, 2026 and are no longer accepting new users.
The PromQL endpoint will be disabled for all users on **October 5, 2026**.
For Grafana setup with the OpenMetrics endpoint, see the [OpenMetrics integrations page](/cloud/metrics/openmetrics/metrics-integrations).
:::
**How to set up Grafana with Temporal Cloud PromQL endpoint to view Cloud metrics.**
Temporal Cloud emits metrics through a
[Prometheus HTTP API endpoint](https://prometheus.io/docs/prometheus/latest/querying/api/), which can be directly used
as a Prometheus data source in Grafana or to query and export Cloud metrics to any observability platform.
:::note
For setting up SDK metrics (emitted by your Workers and Clients), see
[SDK metrics setup](/cloud/metrics/sdk-metrics-setup).
:::
The process for setting up Temporal Cloud PromQL to work with Grafana includes the following steps:
1. [Generate a Prometheus HTTP API endpoint](/cloud/metrics/general-setup) on Temporal Cloud using valid certificates.
2. Run Grafana and [set up a data source for Temporal Cloud metrics](#grafana-data-source-configuration) in Grafana.
3. [Create dashboards](#grafana-dashboards-setup) in Grafana to view Temporal Cloud metrics. Temporal provides
[sample community-driven Grafana dashboards](https://github.com/temporalio/dashboards) for Cloud metrics that you can
use and customize according to your requirements.
If you're following through with the examples provided here, ensure that you have the following:
- Root CA certificates and end-entity certificates. See [Certificate requirements](/cloud/certificates#certificate-requirements) for details.
- Set up your connections to Temporal Cloud using an SDK of your choice and have some Workflows running on Temporal Cloud. See Connect to a Temporal Service for details.
- [Go](/develop/go/client/temporal-client#connect-to-temporal-cloud)
- [Java](/develop/java/client/temporal-client#connect-to-temporal-cloud)
- [PHP](/develop/php/client/temporal-client#connect-to-a-dev-cluster)
- [Python](/develop/python/client/temporal-client#connect-to-temporal-cloud)
- [TypeScript](/develop/typescript/client/temporal-client#connect-to-temporal-cloud)
- [.NET](/develop/dotnet/client/temporal-client#connect-to-temporal-cloud)
- Grafana installed.
## Temporal Cloud metrics setup
Before you set up your Temporal Cloud metrics, ensure that you have the following:
- Account Owner or Global Admin [role privileges](/cloud/manage-access/roles-and-permissions#account-level-roles) for
the Temporal Cloud account.
- [CA certificate and key](/cloud/certificates) for the Observability integration. You will need the certificate to set
up the Observability endpoint in Temporal Cloud.
The following steps describe how to set up Observability on Temporal Cloud to generate an endpoint:
1. Log in to Temporal Cloud UI with an Account Owner or Global Admin
[role](/cloud/manage-access/roles-and-permissions#account-level-roles).
2. Go to **Settings** and select **Integrations**.
3. Select **Configure Observability** (if you're setting it up for the first time) or click **Edit** in the
Observability section (if it was already configured before).
4. Add your root CA certificate (.pem) and save it. Note that if an observability endpoint is already set up, you can
append your root CA certificate here to use the generated observability endpoint with your instance of Grafana.
5. To test your endpoint, run the following command on your host:
```
curl -v --cert --key "/api/v1/query?query=temporal_cloud_v0_state_transition_count"
```
If you have Workflows running on a Namespace in your Temporal Cloud instance, you should see some data as a result of
running this command.
6. Copy the HTTP API endpoint that is generated (it is shown in the UI).
This endpoint should be configured as a data source for Temporal Cloud metrics in Grafana. See
[Grafana data source configuration](#grafana-data-source-configuration) for details.
## SDK metrics setup
SDK metrics are emitted by SDK Clients used to start your Workers and to start, signal, or query your Workflow
Executions. You must configure a Prometheus scrape endpoint for Prometheus to collect and aggregate your SDK metrics.
Each language development guide has details on how to set this up.
- [Go SDK](/develop/go/platform/observability#metrics)
- [Java SDK](/develop/java/platform/observability#metrics)
- [TypeScript SDK](/develop/typescript/platform/observability#metrics)
- [Python](/develop/python/platform/observability#metrics)
- [.NET](/develop/dotnet/platform/observability#metrics)
The following example uses the Java SDK to set the Prometheus registry and Micrometer stats reporter, set the scope, and
expose an endpoint from which Prometheus can scrape the SDK metrics.
```java
//You need the following packages to set up metrics in Java.
//See the Developer's guide for packages required for other SDKs.
//…
//…
{
// See the Micrometer documentation for configuration details on other supported monitoring systems.
// Set up the Prometheus registry.
PrometheusMeterRegistry yourRegistry = new PrometheusMeterRegistry(PrometheusConfig.DEFAULT);
public static Scope yourScope(){
//Set up a scope, report every 10 seconds
Scope yourScope = new RootScopeBuilder()
.tags(ImmutableMap.of(
"customtag1",
"customvalue1",
"customtag2",
"customvalue2"))
.reporter(new MicrometerClientStatsReporter(yourRegistry))
.reportEvery(Duration.ofSeconds(10));
//Start Prometheus scrape endpoint at port 8077 on your local host
HttpServer scrapeEndpoint = startPrometheusScrapeEndpoint(yourRegistry, 8077);
return yourScope;
}
/**
* Starts HttpServer to expose a scrape endpoint. See
* https://micrometer.io/docs/registry/prometheus for more info.
*/
public static HttpServer startPrometheusScrapeEndpoint(
PrometheusMeterRegistry yourRegistry, int port) {
try {
HttpServer server = HttpServer.create(new InetSocketAddress(port), 0);
server.createContext(
"/metrics",
httpExchange -> {
String response = registry.scrape();
httpExchange.sendResponseHeaders(200, response.getBytes(UTF_8).length);
try (OutputStream os = httpExchange.getResponseBody()) {
os.write(response.getBytes(UTF_8));
}
});
server.start();
return server;
} catch (IOException e) {
throw new RuntimeException(e);
}
}
}
//…
// With your scrape endpoint configured, set the metrics scope in your Workflow service stub and
// use it to create a Client to start your Workers and Workflow Executions.
//…
{
//Create Workflow service stubs to connect to the Frontend Service.
WorkflowServiceStubs service = WorkflowServiceStubs.newServiceStubs(
WorkflowServiceStubsOptions.newBuilder()
.setMetricsScope(yourScope()) //set the metrics scope for the WorkflowServiceStubs
.build());
//Create a Workflow service client, which can be used to start, signal, and query Workflow Executions.
WorkflowClient yourClient = WorkflowClient.newInstance(service,
WorkflowClientOptions.newBuilder().build());
}
//…
```
To check whether your scrape endpoints are emitting metrics, run your code and go to
[http://localhost:8077/metrics](http://localhost:8077/metrics) to verify that you see the SDK metrics.
You can set up separate scrape endpoints in your Clients that you use to start your Workers and Workflow Executions.
For more examples on setting metrics endpoints in other SDKs, see the metrics samples:
- [Java SDK Samples](https://github.com/temporalio/samples-java/tree/main/core/src/main/java/io/temporal/samples/metrics)
- [Go SDK Samples](https://github.com/temporalio/samples-go/tree/main/metrics)
## Grafana data source configuration {#grafana-data-source-configuration}
**How to configure the Temporal Cloud metrics data source in Grafana.**
Depending on how you use Grafana, you can either install and run it locally, run it as a Docker container, or log in to
Grafana Cloud to set up your data sources.
If you have installed and are running Grafana locally, go to [http://localhost:3000](http://localhost:3000) and sign in.
To add the Temporal Cloud Prometheus HTTP API endpoint that we generated in the
[Temporal Cloud metrics setup](/cloud/metrics/general-setup) section, do the following:
1. Go to **Configuration > Data sources**.
1. Select **Add data source > Prometheus**.
1. Enter a name for your Temporal Cloud metrics data source, such as _Temporal Cloud metrics_.
1. In the **Connection** section, paste the URL that was generated in the Observability section on the Temporal Cloud
UI.
1. The **Authentication** section may be left as **No Authentication**.
1. In the **TLS Settings** section, select **TLS Client Authentication**:
- Leave **ServerName** blank. This is not required.
- Paste in your end-entity certificate and key.
- Note that the end-entity certificate used here must be part of the certificate chain with the root CA certificates
used in your [Temporal Cloud observability setup](/cloud/metrics/general-setup).
1. Click **Save and test** to verify that the data source is working.
If you see issues in setting this data source, verify your CA certificate chain and ensure that you are setting the
correct certificates in your Temporal Cloud observability setup and in the TLS authentication in Grafana.
### Grafana dashboards setup
To set up dashboards in Grafana, you can use the UI or configure them directly in your Grafana deployment.
:::tip
Temporal provides community-driven
[example dashboards for Temporal Cloud](https://github.com/temporalio/dashboards/tree/master/cloud) that you can
customize to meet your needs.
:::
To import a dashboard in Grafana:
1. In the left-hand navigation bar, select **Dashboards** > **Import dashboard**.
2. You can either copy and paste the JSON from the
[Temporal Cloud sample dashboards](https://github.com/temporalio/dashboards/tree/master/cloud), or import the JSON
files into Grafana.
3. Save the dashboard and review the metrics data in the graphs.
To configure dashboards with the UI:
1. Go to **Create > Dashboard** and add an empty panel.
2. On the **Panel configuration** page, in the **Query** tab, select the "Temporal Cloud metrics" data source that you
configured earlier.
3. Expand the **Metrics browser** and select the metrics you want. You can also select associated labels and values to
sort the query data. The [PromQL documentation](/cloud/metrics/reference) lists all metrics emitted from PromQL in
Temporal Cloud.
4. The graph should now display data based on your selected queries.
---
## PromQL Metrics
:::danger PromQL endpoint deprecated
The PromQL endpoint and its `temporal_cloud_v0_*` metrics were deprecated on April 2, 2026 and are no longer accepting new users.
The PromQL endpoint will be disabled for all users on **October 5, 2026**.
Migrate to the [OpenMetrics endpoint](/cloud/metrics/openmetrics).
See the [migration guide](/cloud/metrics/openmetrics/migration-guide) for a complete v0-to-v1 metric mapping.
:::
Metrics for all Namespaces in your account are available from your metrics endpoint. Keep in mind that your Temporal Cloud metrics lag real-time performance by about one minute. Temporal Cloud also only retains raw metrics for seven days.
To ensure security of your metrics, a CA certificate dedicated to observability is required.
Only clients that use certificates signed by that CA, or that chain up to the CA, can query the metrics endpoint.
For more information about CA certificates in Temporal Cloud, see [Certificate requirements](/cloud/certificates#certificate-requirements).
- [General setup](/cloud/metrics/general-setup)
- [Available metrics](/cloud/metrics/reference)
- [Prometheus & Grafana setup](/cloud/metrics/prometheus-grafana)
---
## Temporal Cloud metrics reference
:::danger PromQL endpoint deprecated
The PromQL endpoint and its `temporal_cloud_v0_*` metrics were deprecated on April 2, 2026 and are no longer accepting new users.
The PromQL endpoint will be disabled for all users on **October 5, 2026**.
Migrate to the [OpenMetrics endpoint](/cloud/metrics/openmetrics) which provides `temporal_cloud_v1_*` metrics with higher cardinality, accurate percentiles, and simplified authentication.
See the [migration guide](/cloud/metrics/openmetrics/migration-guide) for a complete v0-to-v1 metric mapping.
:::
A metric is a measurement or data point that provides insights into the performance and health of a system.
This document describes the `temporal_cloud_v0_*` metrics available from the deprecated Temporal Cloud PromQL endpoint.
For the current metrics reference, see the [OpenMetrics metrics reference](/cloud/metrics/openmetrics/metrics-reference).
This document describes:
- **[Available Temporal Cloud metrics](#available-metrics)**:
The metrics emitted by Temporal Cloud include counts of gRPC errors, requests, successful task matches to a poller, and more.
- **[Metrics labels](#metrics-labels)**:
Temporal Cloud metrics labels can filter metrics and help categorize and differentiate results.
- **[Operations](#metrics-operations)**:
An operation is a special type of label that categorizes the type of operation being performed when the metric was collected.
:::info SDK METRICS
This document discusses metrics emitted by [Temporal Cloud](/cloud).
Temporal SDKs also emit metrics, sourced from Temporal Clients and Worker processes.
You can find information about Temporal SDK metrics on its [dedicated page](/references/sdk-metrics).
Please note:
- SDK metrics start with the phrase `temporal_`.
- Temporal Cloud metrics start with `temporal_cloud_`.
:::
## Available Temporal Cloud metrics {#available-metrics}
**What metrics are emitted from Temporal Cloud?**
The following metrics are emitted for your Namespaces:
### Frontend Service metrics {#frontend}
#### temporal_cloud_v0_frontend_service_error_count
This is a count of gRPC errors returned aggregated by operation.
Labels: temporal_account, temporal_namespace, operation, temporal_service_type
#### temporal_cloud_v0_frontend_service_request_count
This is a count of gRPC requests received aggregated by operation.
Labels: temporal_account, temporal_namespace, operation, temporal_service_type
#### temporal_cloud_v0_resource_exhausted_error_count
gRPC requests received that were rate-limited by Temporal Cloud, aggregated by cause.
Labels: temporal_account, temporal_namespace, resource_exhausted_cause
#### temporal_cloud_v0_state_transition_count
Count of state transitions for each Namespace.
#### temporal_cloud_v0_total_action_count
Approximate count of Temporal Cloud Actions.
Labels: temporal_account, temporal_namespace, is_background, namespace_mode
### Poll metrics {#poll}
#### temporal_cloud_v0_poll_success_count
Tasks that are successfully matched to a poller.
Labels: temporal_account, temporal_namespace, operation, task_type, temporal_service_type
#### temporal_cloud_v0_poll_success_sync_count
Tasks that are successfully sync matched to a poller.
Labels: temporal_account, temporal_namespace, operation, task_type, temporal_service_type
#### temporal_cloud_v0_poll_timeout_count
When no tasks are available for a poller before timing out.
Labels: temporal_account, temporal_namespace, operation, task_type, temporal_service_type
### Replication lag metrics {#replication-lag}
#### temporal_cloud_v0_replication_lag_bucket
A histogram of [replication lag](/cloud/metrics/openmetrics/metrics-reference#temporal_cloud_v1_replication_lag_p99) during a specific time interval for a Namespace with high availability.
Labels: temporal_account, temporal_namespace, le
#### temporal_cloud_v0_replication_lag_count
The [replication lag](/cloud/metrics/openmetrics/metrics-reference#temporal_cloud_v1_replication_lag_p99) count during a specific time interval for a Namespace with high availability.
Labels: temporal_account, temporal_namespace
#### temporal_cloud_v0_replication_lag_sum
The sum of [replication lag](/cloud/metrics/openmetrics/metrics-reference#temporal_cloud_v1_replication_lag_p99) during a specific time interval for a Namespace with high availability.
Labels: temporal_account, temporal_namespace
### Schedule metrics {#schedule}
#### temporal_cloud_v0_schedule_action_success_count
Successful execution of a Scheduled Workflow.
Labels: temporal_account, temporal_namespace
#### temporal_cloud_v0_schedule_buffer_overruns_count
When average schedule run length is greater than average schedule interval while a `buffer_all` overlap policy is configured.
Labels: temporal_account, temporal_namespace
#### temporal_cloud_v0_schedule_missed_catchup_window_count
Skipped Scheduled executions when Workflows were delayed longer than the catchup window.
Labels: temporal_account, temporal_namespace
#### temporal_cloud_v0_schedule_rate_limited_count
Workflows that were delayed due to exceeding a rate limit.
Labels: temporal_account, temporal_namespace
### Service latency metrics {#service-latency}
#### temporal_cloud_v0_service_latency_bucket
Latency for `SignalWithStartWorkflowExecution`, `SignalWorkflowExecution`, `StartWorkflowExecution` operations.
Labels: temporal_account, temporal_namespace, le, operation, temporal_service_type
#### temporal_cloud_v0_service_latency_count
Count of latency observations for `SignalWithStartWorkflowExecution`, `SignalWorkflowExecution`, `StartWorkflowExecution` operations.
Labels: temporal_account, temporal_namespace, operation, temporal_service_type
#### temporal_cloud_v0_service_latency_sum
Sum of latency observation time for `SignalWithStartWorkflowExecution`, `SignalWorkflowExecution`, `StartWorkflowExecution` operations.
Labels: temporal_account, temporal_namespace, operation, temporal_service_type
### Workflow metrics {#workflow}
#### temporal_cloud_v0_workflow_cancel_count
Workflows canceled before completing execution.
Labels: temporal_account, temporal_namespace, operation, temporal_service_type
#### temporal_cloud_v0_workflow_continued_as_new_count
Workflow Executions that were Continued-As-New from a past execution.
Labels: temporal_account, temporal_namespace, operation, temporal_service_type
#### temporal_cloud_v0_workflow_failed_count
Workflows that failed before completion.
Labels: temporal_account, temporal_namespace, operation, temporal_service_type
#### temporal_cloud_v0_workflow_success_count
Workflows that successfully completed.
Labels: temporal_account, temporal_namespace, operation, temporal_service_type
#### temporal_cloud_v0_workflow_terminate_count
Workflows terminated before completing execution.
Labels: temporal_account, temporal_namespace, operation, temporal_service_type
#### temporal_cloud_v0_workflow_timeout_count
Workflows that timed out before completing execution.
Labels: temporal_account, temporal_namespace, operation, temporal_service_type
## Metrics labels {#metrics-labels}
**What labels can you use to filter metrics?**
Temporal Cloud metrics include key-value pairs called labels in their associated metadata.
Labels help you categorize and differentiate metrics for precise filtering, querying, and aggregation.
Use labels to filter specific attributes or compare values, such as numeric buckets in histograms.
This added context enhances the monitoring and analysis capabilities, providing deeper insights into your data.
Use the following labels to filter metrics:
| Label | Explanation |
| -------------------------- | ------------------------------------------------------------------------------------------------------------------------------------------------------------------------------------------------------------------------------------------------------------------------------------------ |
| `le` | Less than or equal to (`le`) is used in histograms to categorize observations into buckets based on their value being less than or equal to a predefined upper limit. |
| `operation` | This includes gRPC operations and general Cloud operations such as:SignalWorkflowExecutionStartBatchOperationStartWorkflowExecutionTaskQueueMgrTerminateWorkflowExecutionUpdateNamespaceUpdateSchedule See: [Metric Operations](#metrics-operations) and [Temporal Cloud Operation reference](/references/operation-list)|
| `resource_exhausted_cause` | Cause for resource exhaustion. |
| `task_type` | Activity, Workflow, or Nexus. |
| `temporal_account` | Temporal Account. |
| `temporal_namespace` | Temporal Namespace. |
| `temporal_service_type` | Frontend or Matching or History or Worker. |
| `is_background` | This label on `temporal_cloud_v0_total_action_count` indicates when actions are produced by a Temporal background job, for example: hourly Workflow Export. |
| `namespace_mode` | This label on `temporal_cloud_v0_total_action_count` indicates if actions are produced by an active vs a standby Namespace. For a regular Namespace, `namespace_mode` will always be “active”. |
The following is an example of how you can filter metrics using labels:
```text
temporal_cloud_v0_poll_success_count{__rollup__="true", operation="TaskQueueMgr", task_type="Activity", temporal_account="12345", temporal_namespace="your_namespace.12345", temporal_service_type="matching"}
```
## Operations {#metrics-operations}
**What operation labels are captured by Temporal Cloud?**
Operations are a special class of metrics label.
They describe the context during which a metric was captured.
Temporal Cloud includes the following operations labels:
- AdminDescribeMutableState
- AdminGetWorkflowExecutionRawHistory
- AdminGetWorkflowExecutionRawHistoryV2
- AdminReapplyEvents
- CountWorkflowExecutions
- CreateSchedule
- DeleteSchedule
- DeleteWorkflowExecution
- DescribeBatchOperation
- DescribeNamespace
- DescribeSchedule
- DescribeTaskQueue
- DescribeWorkflowExecution
- GetWorkerBuildIdCompatibility
- GetWorkerTaskReachability
- GetWorkflowExecutionHistory
- GetWorkflowExecutionHistoryReverse
- ListBatchOperations
- ListClosedWorkflowExecutions
- OperatorDeleteNamespace
- PatchSchedule
- PollActivityTaskQueue
- PollNexusTaskQueue
- PollWorkflowExecutionHistory
- PollWorkflowExecutionUpdate
- PollWorkflowTaskQueue
- QueryWorkflow
- RecordActivityTaskHeartbeat
- RecordActivityTaskHeartbeatById
- RegisterNamespace
- RequestCancelWorkflowExecution
- ResetStickyTaskQueue
- ResetWorkflowExecution
- RespondActivityTaskCanceled
- RespondActivityTaskCompleted
- RespondActivityTaskCompletedById
- RespondActivityTaskFailed
- RespondActivityTaskFailedById
- RespondNexusTaskCompleted
- RespondNexusTaskFailed
- RespondQueryTaskCompleted
- RespondWorkflowTaskCompleted
- RespondWorkflowTaskFailed
- SignalWithStartWorkflowExecution
- SignalWorkflowExecution
- StartBatchOperation
- StartWorkflowExecution
- StopBatchOperation
- TerminateWorkflowExecution
- UpdateNamespace
- UpdateSchedule
- UpdateWorkerBuildIdCompatibility
- UpdateWorkflowExecution
As the following table shows, certain [metrics groups](#available-metrics) support [operations](#metrics-operations) for aggregation and filtering:
| Metrics Group / Operations | All Operations | SignalWithStartWorkflowExecution / SignalWorkflowExecution / StartWorkflowExecution | TaskQueueMgr | CompletionStats |
| ----------------------------------------------- | -------------- | ----------------------------------------------------------------------------------- | ------------ | --------------- |
| **[Frontend Service Metrics](#frontend)** | X | | | |
| **[Service Latency Metrics](#service-latency)** | | X | | |
| **[Poll Metrics](#poll)** | | | X | |
| **[Workflow Metrics](#workflow)** | | | | X |
---
## Monitor SDK metrics with Prometheus and Grafana
SDK metrics are emitted by SDK Clients used to start your Workers and to start, signal, or query your Workflow Executions.
Unlike [Temporal Cloud metrics](/cloud/metrics/), which are exposed through a Prometheus HTTP API endpoint, SDK metrics require you to set up a Prometheus scrape endpoint in your application code for Prometheus to collect and aggregate.
For a full list of available SDK metrics and their descriptions, see the [SDK metrics reference](/references/sdk-metrics).
The process for setting up SDK metrics includes the following steps:
1. [Expose a metrics endpoint](#sdk-metrics-setup) in your application code where Prometheus can scrape SDK metrics.
2. [Configure Prometheus](#prometheus-configuration) to scrape your SDK metrics endpoints.
3. [Add an SDK metrics data source](#grafana-data-source-configuration) in Grafana.
4. [Set up dashboards](#grafana-dashboards-setup) to visualize SDK metrics.
Set up your connections to Temporal Cloud using an SDK of your choice and have some Workflows running on Temporal Cloud.
Ensure Prometheus and Grafana are installed.
- [Go](/develop/go/client/temporal-client#connect-to-temporal-cloud)
- [Java](/develop/java/client/temporal-client#connect-to-temporal-cloud)
- [Python](/develop/python/client/temporal-client#connect-to-temporal-cloud)
- [TypeScript](/develop/typescript/client/temporal-client#connect-to-temporal-cloud)
- [.NET](/develop/dotnet/client/temporal-client#connect-to-temporal-cloud)
## Expose a metrics endpoint {#sdk-metrics-setup}
You must configure a Prometheus scrape endpoint for Prometheus to collect and aggregate your SDK metrics.
Each language development guide has details on how to set this up.
- [Go SDK](/develop/go/platform/observability#metrics)
- [Java SDK](/develop/java/platform/observability#metrics)
- [TypeScript SDK](/develop/typescript/platform/observability#metrics)
- [Python](/develop/python/platform/observability#metrics)
- [.NET](/develop/dotnet/platform/observability#metrics)
For working examples of how to configure metrics in each SDK, see the metrics samples:
- [Go SDK Samples](https://github.com/temporalio/samples-go/tree/main/metrics)
- [Java SDK Samples](https://github.com/temporalio/samples-java/tree/main/core/src/main/java/io/temporal/samples/metrics)
- [TypeScript SDK Samples](https://github.com/temporalio/samples-typescript/tree/main/interceptors-opentelemetry)
- [Python SDK Samples](https://github.com/temporalio/samples-python/tree/main/custom_metric)
- [.NET SDK Samples](https://github.com/temporalio/samples-dotnet/tree/main/src/OpenTelemetry/DotNetMetrics)
Some examples use OpenTelemtry to instrument metrics. It is useful to use a
[Prometheus exporter with OpenTelemetry](https://github.com/open-telemetry/opentelemetry-collector-contrib/tree/main/exporter/prometheusexporter) to expose metrics for scraping.
## Configure Prometheus {#prometheus-configuration}
For Temporal SDKs, you must have Prometheus running and configured to listen on the scrape endpoints exposed in your application code.
For this example, you can run Prometheus locally or as a Docker container.
In either case, ensure that you set the listen targets to the ports where you expose your scrape endpoints.
This configuration assumes the scrape endpoint is set to port 8077 as in the [SDK metrics setup](#sdk-metrics-setup) example.
```yaml
global:
scrape_interval: 30s # Set the scrape interval to every 30 seconds. Default is every 1 minute.
#...
# Set your scrape configuration targets to the ports exposed on your endpoints in the SDK.
scrape_configs:
- job_name: 'temporalsdkmetrics'
metrics_path: /metrics
scheme: http
static_configs:
- targets:
# This is the scrape endpoint where Prometheus listens for SDK metrics.
- localhost:8077
# You can have multiple targets here, provided they are set up in your application code.
```
See the [Prometheus documentation](https://prometheus.io/docs/introduction/first_steps/) for more details on how you can run Prometheus locally or using Docker.
To check whether Prometheus is receiving metrics from your SDK target, go to [http://localhost:9090](http://localhost:9090) and navigate to **Status > Targets**.
The status of your target endpoint defined in your configuration appears here.
## Add an SDK metrics data source in Grafana {#grafana-data-source-configuration}
Depending on how you use Grafana, you can either install and run it locally, run it as a Docker container, or log in to Grafana Cloud to set up your data sources.
If you have installed and are running Grafana locally, go to [http://localhost:3000](http://localhost:3000) and sign in.
To add the SDK metrics Prometheus endpoint as a data source, do the following:
1. Go to **Configuration > Data sources**.
2. Select **Add data source > Prometheus**.
3. Enter a name for your SDK metrics data source, such as _Temporal SDK metrics_.
4. In the **HTTP** section, enter your Prometheus endpoint in the URL field.
If running Prometheus locally as described in the examples in this article, enter `http://localhost:9090`.
5. For this example, enable **Skip TLS Verify** in the **Auth** section.
6. Click **Save and test** to verify that the data source is working.
If you see issues in setting this data source, check whether the endpoints set in your SDKs are showing metrics.
If you don't see your SDK metrics at the scrape endpoints defined, check whether your Workers and Workflow Executions are running.
If you see metrics on the scrape endpoints, but Prometheus shows your targets are down, then there is an issue with connecting to the targets set in your SDKs.
Verify your Prometheus configuration and restart Prometheus.
If you're running Grafana as a container, you can set your SDK metrics Prometheus data source in your Grafana configuration.
See the example Grafana configuration described in the [Prometheus and Grafana setup for open-source Temporal Service](/self-hosted-guide/monitoring#grafana) article.
## Set up Grafana dashboards {#grafana-dashboards-setup}
To set up SDK metrics dashboards in Grafana, you can use the UI or configure them directly in your Grafana deployment.
:::tip
Temporal provides community-driven [example dashboards for Temporal SDKs](https://github.com/temporalio/dashboards/tree/master/sdk) that you can customize to meet your needs.
:::
To import a dashboard in Grafana:
1. In the navigation bar, select **Dashboards** > **Import dashboard**.
2. You can either copy and paste the JSON from the [Temporal SDK sample dashboards](https://github.com/temporalio/dashboards/tree/master/sdk), or import the JSON files into Grafana.
3. Save the dashboard and review the metrics data in the graphs.
To configure dashboards with the UI:
1. Go to **Create > Dashboard** and add an empty panel.
2. On the **Panel configuration** page, in the **Query** tab, select the "Temporal SDK metrics" data source that you configured earlier.
3. Expand the **Metrics browser** and select the metrics you want.
A list of Worker performance metrics is described in the [Developer's Guide - Worker performance](/develop/worker-performance).
All SDK-related metrics are listed in the [SDK metrics](/references/sdk-metrics) reference.
4. The graph should now display data based on your selected queries.
Note that SDK metrics will only show if you have Workflow Execution data and running Workers.
If you don't see SDK metrics, run your Worker and Workflow Executions, then monitor the dashboard.
---
## Automated migration
:::tip Support, stability, and dependency info
Automated migration is currently in [Pre-release](/evaluate/development-production-features/release-stages#pre-release).
Please contact your Temporal account executive prior to planning your migration project.
:::
## Process Overview
Automated migration is designed to provide a zero-downtime, secure means of migrating to Temporal Cloud. This guide
outlines the current process for transitioning Workflows from self-hosted Temporal Server to a namespace hosted within
Temporal Cloud.
### Namespace migration schedule
When planning a migration it is highly recommended to migrate in the order of least-critical to most-critical Namespace.
Ideally, the project will begin with Namespaces designated as "testing", where downtime is an acceptable outcome of the
testing process. From there, prioritize migrations based on order of least potential impact.

### Project phases
The migration process is separated into several phases, part of which involves coordinating with Temporal to create
necessary cloud-side resources.
Migration involves the following phases:
1. Prepare - Initial preparation involves collecting and evaluating key data points from the self-hosted clusters.
Collected data will be evaluated by Temporal to ensure eligibility for migration.
2. Setup - Once eligibility has been verified, configurations for the self-hosted clusters will be modified to support
the migration. All cloud-side components will be provisioned and the self-hosted
[S2S Proxy](https://hub.docker.com/r/temporalio/s2s-proxy/tags) will be deployed.
3. Test - Once all required components are in place, the migration process will be validated using a test Namespace.
4. Initiate - At the conclusion of a successful testing process, migration of production Namespaces will begin.
5. Finalize - After the Namespace has been transferred to Temporal Cloud and validated, the migration will be finalized.
Please review the [additional notes](#additional-notes) section prior to planning the migration.
## Phase 1: Prepare
In preparation for migrating to Temporal Cloud, the following data points must be collected and provided to Temporal via
support ticket.
- List of Temporal Cloud Accounts. If you are new to Temporal Cloud, then the most common recommendation is to create a
single Account that contains your Namespaces.
- Target Temporal Cloud provider/region per cluster. See the list of [current regions](/cloud/regions).
- Server Configuration for each cluster.
- For each Namespace:
- Namespace name and its translated cloud-side name. Since Namespaces in Temporal Cloud follow a
[specific format](/cloud/namespaces#temporal-cloud-namespace-name), existing Namespaces must be converted to the new
format.
- Namespace sizing metrics. These are used to properly size cloud-side resources for the migration.
- Custom search attributes (if any). Temporal must ensure that your custom search attributes, specifically when using
SQL-based visibility store, are compatible with Temporal Cloud.
### Capture cluster configurations
Temporal must review your self-hosted server configurations to ensure compatibility. For modern versions of Temporal
OSS, run the following command against each of your clusters:
```
temporal operator cluster describe --address --output json
```
For server versions 1.28.1 and prior, use one of the following alternate methods:
```
tctl --address admin cluster describe
```
or
```
grpcurl -v -plaintext temporal.server.api.adminservice.v1.AdminService.DescribeCluster
```
### Capture Namespace metrics
It is vital that current usage patterns for production Namespaces are well understood, as this data is used for
cloud-side resource planning. For each Namespace, collect the following metrics:
- Total number of open/closed Workflows
- Total storage used
- Current retention policy. Note that this may differ from the
[default retention policy](/cloud/limits#default-retention-period) in Temporal Cloud.
- Peak [action per second](/glossary#actions-per-second-aps) (APS). See the section
[below](#how-to-gather-self-hosted-metrics) for instructions on collecting these metrics.
- If you use custom search Attributes:
- provide _CustomSearchAttributeAliases_ of your Namespace (see command below).
- provide the VisibilityStore used (e.g. Elasticsearch or SQL)
Use the following command to capture _CustomSearchAttributeAliases_, if needed:
```
temporal operator namespace describe -n
```
### Prepare mTLS certificates
mTLS is used to secure the [S2S Proxy](#s2s-proxy-configuration) communications channel. Generate new certificates following the process outlined
[here](/cloud/certificates#issue-certificates). You will need to provide these certificates as part of your support request.
### Report collected data
Provide all collected data and mTLS certificates to Temporal via a [support ticket](/cloud/support#ticketing).
Use the following template for the collected data.
```
Temporal Cloud Account:
Cluster Name:
Target Cloud/Region:
Type of Visibility Store:
Cluster Configuration:
Namespaces:
Namespace Name:
Translated Name:
Metrics:
Peak APS:
Custom Search Attributes:
```
## Phase 2: Setup
Once the migration has been approved, the next step is to prepare both the self-hosted clusters and Temporal Cloud
resources for the migration.
:::warning
Proceed only when your request has been approved by Temporal.
:::
### Prepare Temporal Cloud Namespace
For each Namespace to be migrated, create an empty Namespace in Temporal Cloud to serve as the migration target. Since
migration cannot proceed into a Namespace that's already in use, the Namespace should remain empty (no Workflows). Apply
any required custom search attributes.
Be sure to adjust the [rate limits](/cloud/capacity-modes) of your Namespace as needed and create any custom search
attributes that are required.
If you are new to Temporal Cloud, consider your desired connectivity path to your Namespace. You may connect over the
public internet or via [private connectivity](/cloud/connectivity).
### S2S Proxy configuration
The [S2S Proxy](https://github.com/temporalio/s2s-proxy) requires a cloud-side inbound endpoint. Proceed with deployment
only after receiving the endpoint from Temporal.
The proxy provides API forwarding over a secure 2-way tunnel to Temporal Cloud. The self-hosted proxy will initiate an
outbound connection (TCP 8233) to its cloud-side counterpart and establish the 2-way tunnel. If there are firewalls
in-path, ensure that they permit this outbound connection.
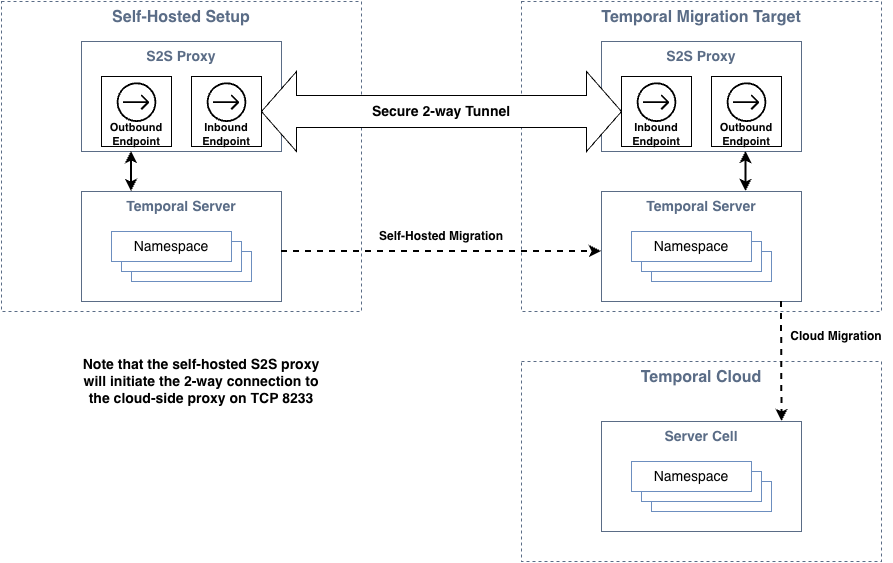
Use the following procedure to deploy the proxy:
1. Obtain the latest Docker image from the
[temporalio/s2s-proxy repository](https://hub.docker.com/r/temporalio/s2s-proxy/tags).
2. Gather the mTLS certs generated in the previous step.
3. Deploy 3 replicas of the s2s-proxy (minimum 4 CPU and 512mb memory). For Kubernetes users, use this
[helm chart example](https://github.com/temporalio/s2s-proxy/blob/main/charts/s2s-proxy/README.md) as a reference.
See the [example](https://github.com/temporalio/s2s-proxy/blob/main/charts/s2s-proxy/example.yaml) configuration file
as a reference. Note that the number of replicas must match on both sides of the connection. If your replica count differs
from 3, update Temporal with the actual number of replicas so that the same count can be configured on the cloud side.
4. Test access using the command below. It should display the information of the migration server.
```
temporal operator cluster describe --address {the-outbound-external-address-of-your-proxy}
```
Once connectivity has been verified, notify Temporal so that connectivity may be validated from the cloud-side proxy.
There are multiple metrics available on the S2S proxy (prometheus endpoint: _proxy-pod-ip_:9090/metrics). These are
helpful for monitoring the overall health of the proxy. In particular, the metric
`temporal_s2s_proxy_mux_connection_active`
will monitor connectivity to the cloud-side proxy.
### Modify cluster configuration
The [dynamic configuration](/references/dynamic-configuration) of your self-hosted cluster must be modified to
facilitate the migration.
:::warning
Coordinate closely with Temporal for this step of the process.
:::
Adjust the maximum connection keepalive time to match the setting in cloud.
```yaml
frontend.keepAliveMaxConnectionAge:
- value: '2h'
```
If you have previously enabled [Global Namespace](/global-namespace), the Failover Version Increment must be approved by
Temporal. This is **critical**, since the value may only be set once and cannot change.
If you've never enabled Global Namespace, then you may enable it and set the Initial Failover Version to a unique value
(between 1 and 100). Enable by updating the _clusterMetadata_ and the _dcRedirectionPolicy_. When complete, restart all
Temporal services (frontend, history, matching, worker), starting with the frontend.
```yaml
dcRedirectionPolicy:
policy: 'all-apis-forwarding'
clusterMetadata:
enableGlobalNamespace: true # add this
failoverVersionIncrement: CHANGEME # usually 1000000, but coordinate with Temporal. must match cloud-side migration server
masterClusterName: _NO_CHANGE_
currentClusterName: _NO_CHANGE_
clusterInformation:
_NO_CHANGE_:
enabled: true
initialFailoverVersion: CHANGEME # use unique number between 1 and 100 for each server
rpcName: _NO_CHANGE_
rpcAddress: _NO_CHANGE_
```
After all services have restarted, verify the configuration using:
```
temporal operator cluster describe
```
The following sample output is expected:
```yaml
"failoverVersionIncrement": "1000000",
"initialFailoverVersion": "the number you picked"
"isGlobalNamespaceEnabled": true
```
## Phase 3: Testing
Testing should proceed using either a newly created Namespace or else one that is considered to be non-production. In
either case, test Workflows should be utilized. It is ideal to have a mix of completed, active, and new Workflows to use
during testing.
Testing uses the following process:
1. Create or identify a non-production Namespace that can tolerate data loss in the event of issues.
2. Create target cloud-side Namespace and add the Namespace definition to the S2S Proxy configuration.
3. Run test Workflows against the Namespace.
4. Perform a complete end-to-end migration for the Namespace (see remaining phases for full process).
Testing is considered successful if all data from the self-hosted deployment is migrated to cloud.
## Phase 4: Initiate
Review the section on [transferring clients](#transfer-clients-to-cloud) before proceeding.
The sections below outline the process for initiating the migration.
### Migration start
Temporal will generate the endpoint-id and initiate the migration. During this process, the self-hosted Namespace remains active
while the cloud Namespace becomes passive. Workflows are replicated from the self-hosted Namespace to the cloud Namespace. Once the
cloud Namespace has fully synced with self-hosted Namespace, migration is ready for handover.
The following [command](https://pkg.go.dev/github.com/temporalio/tcld#readme-start-a-migration) is used to start the
migration:
```
tcld migration start --endpoint-id --source-namespace --target-namespace
```
### Monitor
During the initial sync, it is important to monitor the overall process to ensure progress is being made. While Temporal
will monitor from the cloud-side, progress may also be monitored from the self-hosted side using the
_replication_stream_stuck_ metric.
The following [command](https://pkg.go.dev/github.com/temporalio/tcld#readme-get-a-migration) may also be used to
monitor the migration progress:
```
tcld migration get --id
```
### Handover-to-cloud
Once the sync process has completed, Temporal will flip the roles of the self-hosted and cloud Namespace. At this point,
the cloud becomes active and the self-hosted Namespace becomes passive. Workflows are then replicated from the cloud to
the self-hosted server.
The following [command](https://pkg.go.dev/github.com/temporalio/tcld#readme-perform-handover-during-a-migration) is
used to trigger the handover:
```
tcld migration handover --id --to-replica-id
```
When using this command, replace `` with `cloud` when handing over to Temporal Cloud. Replace
`` with `on-prem` when handing back to the self-hosted setup.
## Phase 5: Finalize
If you have not done so already, complete the process of [transferring clients](#transfer-clients-to-cloud) to the cloud Namespace.
### Final validation
Use the following checklist prior to finalizing the migration:
- Confirm that workers can access Namespaces. Either via public internet or [private connectivity](/cloud/connectivity).
- Understand how to access metrics for your Namespace on Temporal Cloud.
- Monitor general Workflow metrics (schedule to start latency, start v.s. completion rate, sync match rate, etc).
- Learn how [capacity management](/cloud/capacity-modes) works in Temporal Cloud.
- Plan for a worker tuning session - performance change between Temporal Cloud v.s. self-hosted cluster, which could
lead to unexpected symptoms and optimizations.
- Know how to reach out to your Temporal Solutions Architect (SA) and Account Executive (AE) for assistance.
### Confirm complete
Once a Namespace has been transferred to the cloud and validated, the migration will be completed. Note that this step
is final and may not be undone. Once performed, Workflow replication from the cloud Namespace to the self-hosted server
is halted.
The following [command](https://pkg.go.dev/github.com/temporalio/tcld#readme-confirm-a-migration) is used to confirm the
migration:
```
tcld migration confirm --id
```
or to [abort](https://pkg.go.dev/github.com/temporalio/tcld#readme-abort-a-migration) and roll-back changes without
impacting your Workflows, if needed:
```
tcld migration abort --id
```
## Transfer clients to cloud
There are two options for switching Temporal clients to the cloud.
### Option 1 (recommended)
Deploy two sets of Temporal clients: one pointing to your Temporal server and one to the Cloud Namespace endpoint. This
is the recommended option since your Workflows will continue to make progress during the handover, even if your cloud
Temporal client is unable to access the cloud (due to misconfiguration, for example). The process is as follows:
1. Direct your cloud-based Temporal clients to the cloud Namespace endpoint. Initially, these clients will connect and
send Poll requests but will not receive any tasks.
2. Start migration. Your self-hosted Namespace is active while your cloud Namespace is passive (or standby). Your cloud
Temporal clients can begin receiving tasks, but all requests from cloud clients to the Cloud Namespace will
automatically forward from the cloud to your self-hosted server.
3. Hand over Namespace to the cloud. Your cloud Namespace becomes active and your self-hosted Namespace becomes passive.
All requests from your self-hosted Temporal clients will automatically forward from your server to the cloud.
4. Complete migration. Your self-hosted Temporal clients will no longer receive any tasks from your server, allowing you
to stop these clients.
### Option 2
Deploy one set of Temporal clients and switch the Namespace endpoint during migration. With this option, if your workers
are misconfigured during the switch, then it is possible that Workflows can stop making progress. It is important to
ensure that all workers maintain connectivity to cloud to avoid this scenario. The process is as follows:
1. Start migration.
2. Switch your Temporal clients to point to the cloud Namespace endpoint. Requests from your Temporal clients will
automatically forward from the cloud to your server. Alternatively, you may switch Temporal clients to the cloud
Namespace endpoint after handover.
3. Hand over Namespace to the cloud. Requests from your Temporal clients will now be served by the cloud and will not be
forwarded to your server.
4. Confirm migration completion.
## Additional notes
### Limitations
The following are known limitations.
- OSS server versions 1.22 or newer are required. Refer to the
[upgrade](/self-hosted-guide/upgrade-server#upgrade-server) procedure as needed.
- History shard counts must be a multiple of two.
- If you have multiple self-hosted servers and they are all configured with the same cluster name (by default Temporal
uses 'active' as cluster name), they cannot be connected to a single migration server simultaneously due to cluster
name collision. There are 2 available options:
1. Migrate one server at a time using a single migration server.
2. Create multiple migration servers (one for each self-hosted server) if you need to migrate all servers
simultaneously.
- If you are using multi-cluster replication in your self-hosted setup and have previously failed over Namespaces, then
this may impact your eligibility for automated migration. Specifically, whenever Global Namespace has been previously
enabled the following restrictions apply:
1. Initial Failover Version must be less than or equal to 1,000,000
2. Failover Version Increment must be a divisor of 1,000,000
- OSS supports cross-Namespace commands (e.g., parent-child, SignalExternal, CancelExternal) through the
`system.enableCrossNamespaceCommands` configuration. This configuration is disabled on Temporal Cloud. The
`system.enableCrossNamespaceCommands` configuration must be disabled, and code using cross-Namespace calls must be
updated or removed prior to migration.
### Special dynamic configuration for Version 1.22.x-1.23.x
Temporal versions 1.22.x and 1.23.x include support for stream-based replication, but it is disabled by default. Since
those releases, stream-based replication has been validated as more reliable than the poll-based replication that
remained the default in 1.22 and 1.23.
When preparing for an S2C migration on these versions, configure the following dynamic settings to enable stream-based
replication:
```yaml
history.enableReplicationStream:
- value: true
```
Enabling this configuration will require a restart of your history pods.
## How to gather self-hosted metrics
Temporal Server (version > 1.17) provides an [action](/cloud/pricing#action) metric. You may use Grafana to capture and
display this metric. Use this [sample](https://github.com/temporalio/dashboards/blob/master/server/server-general.json)
dashboard as a reference. To determine actions per second (APS) you may use the following promql queries.
`sum (rate(action{service_name="frontend"}[1m]))`
`sum (rate(action{service_name="frontend"}[1m])) by (exported_namespace)`
The first query will calculate total APS. The second will isolate the metric per Namespace.
For Datadog, the following widget will calculate actions per second:
```
{
"title": "Average Actions per Second",
"type": "query_value",
"requests": [
{
"formulas": [
{
"formula": "query1"
}
],
"queries": [
{
"name": "query1",
"data_source": "metrics",
"query": "sum:io.temporal.server.action.count{$server-name}.as_rate()",
"aggregator": "avg"
}
],
"response_format": "scalar"
}
],
"autoscale": true,
"precision": 2
}
```
## Frequently asked questions
### When should I opt for auto migration?
The answer depends on your specific situation. However, automated migration is most likely to help if any of the following apply to you:
* When safe transfer of workers is a concern - automated migration allows workers to run against both self-hosted and cloud
environments simultaneously, allowing a gradual and lower-risk transition.
* When there are a high number of long-running Workflows.
* When there is a need to migrate closed Workflows.
* When there is a need to migrate Schedules.
In contrast, automated migration may not be the best solution if your self-hosted clusters do not meet the [minimum requirements](#limitations).
### Can I split Workflows from a single source Namespace into multiple cloud-side Namespaces?
No. All Workflows will be migrated.
### Can I combine manual and auto migration?
No. Auto migration requires a "fresh" target cloud-side Namespace (one that has never had a running Workflow).
If Workflows were manually migrated to a cloud-side Namespace, then this Namespace would not be suitable as an auto-migration target.
### Why does it matter if custom search attributes are used?
Custom search attributes must be mapped to a Namespace in Temporal Cloud. They matter because configurations in a self-hosted environment
may not be directly compatible with Temporal Cloud, potentially requiring additional migration work. The exact process can also differ
depending on the type of visibility data store used.
### What Workflows are migrated by default?
All Workflows are migrated by default. For closed Workflows, you may specify a date range to be migrated. Your cloud-side Namespace must
be configured with your desired retention period prior to starting the migration.
### What can I do to speed up an automated migration?
The #1 speed optimization is to limit the time range for closed Workflows. This will reduce the amount of data required to be
migrated and in many cases will dramatically reduce overall migration time.
### Is the migration of Schedules supported?
Yes. Under the hood, Schedules are essentially Workflows.
### I have a long retention period for my Workflows. Is this compatible with Temporal Cloud?
Occasionally, self-hosted [retention periods](/temporal-service/temporal-server#retention-period) are in excess of what
is [supported](/cloud/limits#default-retention-period) in Temporal Cloud. In these cases it is recommended to utilize
[archival](/temporal-service/archival) to store closed Workflows that cannot be migrated. In general, archival is
recommended over large retention periods since the extra data can stress the persistence layer of the system.
### I am using payload encryption in my self-hosted Temporal cluster. Is this supported in cloud?
Yes. If payloads are already [encrypted](/payload-codec#encryption) in your self-hosted server via data converter, then
they will remain encrypted during and after migration.
### I would like to enable payload encryption as part of the migration. Is this supported?
The automated migration tooling cannot add payload encryption. To encrypt payloads sent to Temporal Cloud, you must encrypt
payloads in your cluster before starting the automated migration process.
---
## Migrate
Learn how to migrate your Temporal workflows with zero downtime:
- [Automated Migration](/cloud/migrate/automated) - This process enables seamless transitions from self-hosted Temporal instances to Temporal Cloud.
- [Manual Migration](/cloud/migrate/manual) - This process enables transitions from self-hosted Temporal instances to Temporal Cloud by updating clients
and workflows to utilize new resources within Temporal Cloud.
- [Migrate between regions](/cloud/migrate/migrate-within-cloud) - This process allows you to migrate a Temporal Cloud Namespace between regions or providers.
---
## Manual migration
Migrating to Temporal Cloud from a self-hosted Temporal Service will have different requirements depending on your usage.
This guide provides some guidance based on our experience helping customers of all sizes successfully migrate.
### What to expect from a migration
Depending on your Workflows' requirements, the migration process may be as simple as changing a few parameters, or may require more extensive code changes.
There are two aspects to consider when migrating: your Temporal Client connection code and your Workflow Executions.
Here's a high-level overview of what you can expect:
- **Introduce another Temporal Client to your Starter and Worker Processes:** Configure and deploy a new Temporal Client so that Temporal Cloud becomes responsible for new Workflow Executions.
- **Migrate Workflow Executions:** There are different approaches for new, running, and completed Workflow Executions.
- **New Workflow Executions:** When you no longer need to send Signals or Queries to your self-hosted Temporal Service, you can deprecate your old Client code. Until then, your self-hosted Temporal Service can receive relevant traffic, while new Workflow Executions are sent to Temporal Cloud.
- **Running Workflow Executions:** Short-running Workflows can often be drained and then started again on Temporal Cloud. Long-running Workflows that cannot be drained might require you to implement more code changes to pass the state of the currently running Workflow to Temporal Cloud.
- **Completed Workflow Executions:** Completed Workflow Execution History cannot be automatically migrated to Temporal Cloud. Refer to [Multi-Cluster Replication](#multi-cluster-replication) for more information.
### Updating Client connection code in your Workers
Whether you're self-hosting Temporal or using Temporal Cloud, you manage runtime of your code.
To migrate your Workflows to Temporal Cloud, you need to change some parameters in the Client connection code, such as updating the namespace and gRPC endpoint.
The changes needed to direct your Workflow to your Temporal Cloud
Namespace are only a few lines of code, including:
- [Add your SSL certificate and private key](/cloud/saml) associated with your Namespace.
- [Copy the Cloud-hosted endpoint](/cloud/namespaces#temporal-cloud-grpc-endpoint) from the Namespace detail Web page.
The endpoint uses this format: `..tmprl.cloud:port`.
- [Connect to Temporal Cloud](/cloud/get-started) with your Client.
- [Configure tcld, the Cloud CLI](/cloud/tcld), with the same address, Namespace, and
certificate used to create a Client through code.
### Migrating your Workflow Executions
A Temporal Service stores the complete Event History for the entire lifecycle of a
Workflow Execution.
To migrate from a self-hosted Temporal Service to Temporal Cloud, take into account the current state, Event History, and any future expectations of your Workflow Executions.
**New Workflows are automatically executed on Temporal Cloud.**
Once you've made the code changes in Step 1, and your new code is deployed, new Workflow Executions will be sent to Temporal Cloud.
Existing Workflows must receive Signals to migrate and re-execute on Cloud.
If you maintain your self-hosted instance, you will still be able to use it to access any execution history from before your migration.
You can also export JSON from your previous execution history, that you can then import into your own analytics system.
**Running Workflows can either be drained or migrated.**
If your Workflow can be completed before any compelling event which drives a move to Temporal Cloud, those Workflows can be automatically restarted on Temporal Cloud.
If your Workflows need to run continuously, you must migrate Workflows while they are running.
To accomplish this migration, cancel your current Workflow and pass the current state to a new Workflow in Temporal Cloud.
Refer to [this repository](https://github.com/temporalio/temporal-migration) for an example of migrating running Workflows in Java.
When performing a live migration, make sure your Worker capacity can support the migration load.
Both a [Signal](/sending-messages#sending-signals) and a [Query](/sending-messages#sending-queries) will be executed during the course of the migration.
Also, the Query API loads the entire history of Workflows into Workers to compute the result (if they are not already cached).
That means that your self-hosted Temporal Service Worker capacity will need to support having those executions in memory to serve those requests.
The volume of these requests might be high to execute against all the matches to a `ListFilter`.
### Considerations when resuming Workflows on a new Temporal Service or Namespace
- **Skipping Steps:** If your Workflow steps cannot guarantee idempotency, determine whether you need to skip those steps when resuming the execution in the target Namespace.
- **Elapsed Time:** If your Workflow is “resuming sleep” when in the target Namespace, determine how you will calculate the delta for the sleep invocation in the new execution.
- **Child Relationships:** If your Workflow has Child Workflow relationships (other than Detached Parent Close Policy children), determine how you can pass the state of those children into the parent to execute the child in a resumed state.
- **Heartbeat state:** If you have long running activities relying on heartbeat state, determine how you can resume these activities in the target Namespace.
- Child Workflows with the same type as their Parent types are returned in List Filters used to gather relevant executions. Unless these are Detached `ParentClosePolicy` children, this is not what you want since the Parent/Child relationship will not be carried over to the target Namespace.
- Long running activities that use heartbeat details will not receive the latest details in the target Namespace.
- Duration between Awaitables inside a Workflow definition needs to be considered for elapsed time accuracy when resuming in the target Namespace.
- When Signaling directly from one Workflow to another, make sure to handle `NotFound` executions in the target Namespace. The Workflows may resume out of order.
### Other considerations when migrating
- Have you added an mTLS certificate to your Temporal Namespace? Review our [documentation for adding a certificate to your Temporal Cloud account](/cloud/certificates) for more information.
- There are differences in how metrics are generated in self-hosted Temporal and Temporal Cloud. Review the [documentation on Temporal Cloud metrics](/cloud/metrics/) for more information.
- Consider the implications for [security and access to your Temporal Service](/cloud/security).
- Review your current load (actions per second) and speak to your Account Executive and Solutions Architect so we can set appropriate [Namespace limits](/cloud/limits).
### Multi-Cluster Replication
[Multi-Cluster Replication](/self-hosted-guide/multi-cluster-replication) is an experimental feature which asynchronously replicates Workflow Executions from active Clusters to other passive Clusters for backup and state reconstruction.
Migrating Execution History from a self-hosted Temporal Service to Temporal Cloud is not currently supported.
However, a migration tool based on Multi-Cluster Replication, which will enable this, is currently in development for Temporal Cloud.
If you have used this feature locally or you are interested in using it to migrate to Temporal Cloud, [create a support ticket](https://docs.temporal.io/cloud/support) or watch this space for more information about public availability.
---
## Migrate between regions
Temporal Cloud's [High Availability features](/cloud/high-availability) allow you to migrate a Temporal Cloud Namespace from one region or cloud provider to another with zero downtime.
## Preparing to migrate
Namespaces using Export will need to stop Export and migrate the region configuration to the new region for Export jobs to continue after migration.
See [failover scenarios](/cloud/export#failover-scenarios) for details.
[Using High Availability features affects pricing](/cloud/pricing#high-availability-features).
## Steps to migrate
1. Add a Namespace replica in the region you want to migrate to. See [regions](/cloud/regions) for a list of available regions and supported multi-region and multi-cloud configurations.
2. Wait for the replica to become active. The Cloud UI will display a time estimate, and namespace admins will receive an email when the replica is active.
3. If your workers are using API key authentication: ensure your workers (and all other client code) are updated to [use the regional endpoint of the new replica](/cloud/namespaces#access-namespaces).
4. Trigger a failover to the new region.
5. Remove the Namespace replica in the region you are migrating from.
:::note
If using [API keys](/cloud/api-keys) for worker authentication, you must open a [support ticket](/cloud/support#support-ticket) to remove the replica.
:::
:::note
All replica changes are subject to a [cooldown period](/cloud/high-availability/enable#changing) before further replica changes can be made.
:::
---
## Nexus
:::tip SUPPORT, STABILITY, and DEPENDENCY INFO
Temporal Nexus is now [Generally Available](/evaluate/development-production-features/release-stages#general-availability).
Learn why you should use Nexus in the [evaluation guide](/evaluate/nexus).
:::
Temporal Cloud builds on the [core Nexus experience](/nexus) with:
- **Global [Nexus Registry](/nexus/registry)** - Scoped to your entire Account across all Namespaces. Workers in any Namespace can host Nexus Services for others to use.
- **Built-in [access controls](/nexus/registry#configure-runtime-access-controls)** - Restrict which caller Namespaces can use a Nexus Endpoint at runtime.
- **[Audit logging](/cloud/audit-logs)** - Stream Nexus Registry actions (create, update, delete Endpoints) to your audit log integration.
- **Multi-region connectivity** - Nexus requests route across Namespaces within and across AWS and GCP using a global mTLS-secured Envoy mesh. Compatible with Namespaces that have [High Availability](/cloud/high-availability) as Endpoint targets.
- **[Terraform support](/cloud/terraform-provider#manage-temporal-cloud-nexus-endpoints-with-terraform)** - Manage Nexus Endpoints with the Temporal Cloud Terraform provider.
## Learn more
- [Evaluate Nexus](/evaluate/nexus) | [Keynote and demo](https://youtu.be/qqc2vsv1mrU?feature=shared&t=2082)
- [How Nexus works](/nexus) | [Deep dive talk](https://www.youtube.com/watch?v=izR9dQ_eIe4&t=934s)
---
## Latency and Availability - Temporal Nexus
:::tip SUPPORT, STABILITY, and DEPENDENCY INFO
Temporal Nexus is now [Generally Available](/evaluate/development-production-features/release-stages#general-availability).
Learn why you should use Nexus in the [evaluation guide](/evaluate/nexus).
:::
Nexus latency and availability in Temporal Cloud:
- **SLOs and SLAs** - Nexus operations (for example, `RespondWorkflowTaskCompleted`, `PollNexusTaskQueue`, `RespondNexusTaskCompleted`, and `RespondNexusTaskFailed`) have the same [latency SLOs](/cloud/service-availability#latency) and [availability SLAs](/cloud/sla) as other Worker requests in both caller and handler Namespaces.
- **[Nexus metrics](/nexus/metrics)** - SDK and Cloud latency metrics for monitoring Nexus performance.
- **Cross-Namespace connectivity** - Traffic routes through a global mTLS-secured Envoy mesh. Same-region Namespaces have low latency; cross-region latency varies by provider. See [secure connectivity](/nexus/security#secure-connectivity).
---
## Limits - Temporal Nexus
:::tip SUPPORT, STABILITY, and DEPENDENCY INFO
Temporal Nexus is now [Generally Available](/evaluate/development-production-features/release-stages#general-availability).
Learn why you should use Nexus in the [evaluation guide](/evaluate/nexus).
:::
Nexus limits are documented in [Temporal Cloud limits](/cloud/limits):
- [Nexus rate limits](/cloud/limits#nexus-rate-limits) - Nexus requests count toward the Namespace RPS limit.
- [Nexus Endpoint limits](/cloud/limits#nexus-endpoints-limits) - 100 Endpoints per Account (default).
- [Per-Workflow Nexus Operation limits](/cloud/limits#per-workflow-nexus-operation-limits) - 30 in-flight Operations per Workflow.
- [Nexus Operation request timeout](/cloud/limits#nexus-operation-request-timeout) - Less than 10 seconds for a handler to process a start or cancel request.
- [Nexus Operation duration limits](/cloud/limits#nexus-operation-duration-limits) - 60-day maximum ScheduleToClose duration.
- [Per-Workflow callback limits](/cloud/limits#per-workflow-callback-limits) - 2000 callbacks per Workflow. Governs how many Nexus callers can attach to a handler Workflow.
---
## Observability - Temporal Nexus
:::tip SUPPORT, STABILITY, and DEPENDENCY INFO
Temporal Nexus is now
[Generally Available](/evaluate/development-production-features/release-stages#general-availability). Learn why you
should use Nexus in the [evaluation guide](/evaluate/nexus).
:::
Nexus observability in Temporal Cloud:
- **[Nexus metrics](/nexus/metrics)** - [SDK metrics](/nexus/metrics#sdk-metrics) emitted by Workers and [Cloud metrics](/nexus/metrics#cloud-metrics) emitted by Temporal Cloud.
- **[Execution debugging](/nexus/execution-debugging)** - Bi-directional linking, pending Operations, pending callbacks, and tracing across Namespaces.
- **[Audit logging](/cloud/audit-logs)** - `CreateNexusEndpoint`, `UpdateNexusEndpoint`, and `DeleteNexusEndpoint` actions streamed to your audit log integration.
---
## Pricing for Temporal Nexus
:::tip SUPPORT, STABILITY, and DEPENDENCY INFO
Temporal Nexus is now [Generally Available](/evaluate/development-production-features/release-stages#general-availability).
Learn why you should use Nexus in the [evaluation guide](/evaluate/nexus).
:::
Nexus pricing:
- **One Action to start or cancel a Nexus Operation** in the caller Namespace.
Underlying primitives (Workflows, Activities, Signals) and their retries created by the handler result in normal Actions.
- **No Action for handling or retrying the Nexus Operation itself**.
However, billable actions initiated by the handler (such as Activities) are charged if they fail and retry.
See [Pricing](/cloud/pricing) for details.
---
## Notifications
## Get notified about Temporal Cloud status {#cloud-status}
In the event of an incident, Temporal updates the [Temporal Cloud status page](https://status.temporal.io/) with important updates.
Users can subscribe to updates in their preferred mode (e.g. email, Slack, SMS, etc.) by visiting this page.
## Get notified about administrative events {#admin-notifications}
Temporal Cloud sends emails to notify users of important administrative events.
| Reason for email | Who receives email |
|------------------ | -------------------|
| Certificate Expiring in 15 days | Global Administrator, Namespace Administrator, Account Owner |
| Certificate Expiring in 10 days | Global Administrator, Namespace Administrator, Account Owner |
| Certificate Expiring in 5 days | Global Administrator, Namespace Administrator, Account Owner |
| API Key Expiring in 30 days | Global Administrator, Account Owner, individual user (if API Key has an owner) |
| API Key Expiring in 20 days | Global Administrator, Account Owner, individual user (if API Key has an owner) |
| API Key Expiring in 10 days | Global Administrator, Account Owner, individual user (if API Key has an owner) |
| Sign up credit expiring in 30 days | Account Owner, Finance Administrator |
| Sign up credit expiring in 14 days | Account Owner, Finance Administrator |
| Sign up credit expiring in 7 days | Account Owner, Finance Administrator |
| Sign up credit expiring in 1 days | Account Owner, Finance Administrator |
| Sign up credit is 50% consumed | Account Owner, Finance Administrator |
| Sign up credit is 90% consumed | Account Owner, Finance Administrator |
| Account plan type changed | Global Administrator, Account Owner, Finance Administrator |
| Namespace Failover Completed/Failed | Global Administrator, Namespace Administrator, Account Owner |
To ensure that you receive email notifications, configure your junk-email filters to permit email from
`noreply@temporal.io`.
To provide feedback on notifications or request changes, [create a support ticket](/cloud/support#support-ticket).
---
## Cloud Ops API
:::tip Support, stability, and dependency info
The Temporal Cloud Operations API is in [Public Preview](/evaluate/development-production-features/release-stages#public-preview).
:::
The Temporal Cloud Operations API, or the Cloud Ops API, is an open source, public [HTTP API](https://saas-api.tmprl.cloud/docs/httpapi.html#description/introduction) and [gRPC API](https://github.com/temporalio/cloud-api/tree/main) for programmatically managing Temporal Cloud control plane resources, including [Namespaces](/cloud/namespaces), [Users](/cloud/users), [Service Accounts](/cloud/service-accounts), [API keys](/cloud/api-keys), and others. The Temporal Cloud [Terraform Provider](/cloud/terraform-provider), [tcld CLI](/cloud/tcld), and Web UI all use the Cloud Ops API.
## Develop applications with the Cloud Ops API
You can use the HTTP API or the gRPC API depending on how you need to integrate with your platform. The URL to access both the HTTP and gRPC Cloud Ops API is `saas-api.tmprl.cloud`.
### Prerequisites
These prerequisites are required for using either HTTP or gRPC.
- [Temporal Cloud user account](/cloud/get-started)
- [API Key](/cloud/tcld/apikey#create) for authentication
### Use cases
Some common reasons you might use the API are to:
- Provision Namespaces per environment or tenant via pipelines.
- Bootstrap new projects by creating users, assigning roles, and creating Namespaces via custom scripts.
- Rotate service account keys on a schedule with a job.
- Audit and report access across orgs with scheduled HTTP requests.
### Using HTTP
[The HTTP API](https://saas-api.tmprl.cloud/docs/httpapi.html#description/introduction) supports the same operations as the [gRPC API](#using-grpc), but it's usable via standard HTTP methods and authentication. This may be a more convenient option if you are writing automation scripts for CI/CD or you can't use gRPC due to network policies, proxies, tooling gaps, or language/runtime constraints. Since it's standard HTTP, it's language agnostic giving you the ability to run cloud operations consistently.
:::note
This *does not* allow interaction with individual Workflows or Activities via HTTP.
:::
### Using gRPC
*For Go developers:*
- Use the [Go SDK](https://github.com/temporalio/cloud-sdk-go) for the simplest setup experience
*For other programming languages:*
- Basic familiarity with gRPC and Protocol Buffers (protobuf)
- [Protocol Buffers](https://github.com/protocolbuffers/protobuf/releases)
- [gRPC](https://grpc.io/docs/languages/) in your preferred programming language
You can use the provided proto files to generate client libraries in your desired programming language, and then use that client to access the gRPC API. You can also find the [full gRPC docs on Buf](https://buf.build/temporalio/cloud-api/docs/main:temporal.api.cloud.cloudservice.v1#temporal.api.cloud.cloudservice.v1.CloudService).
#### Using the Go SDK
If you're developing in Go, we recommend using the [Go SDK](https://github.com/temporalio/cloud-sdk-go) which provides pre-compiled Go bindings and a more idiomatic interface. The Go SDK handles all the protobuf compilation and provides ready-to-use Go types and client interfaces. You can also use the [Go samples](https://github.com/temporalio/cloud-samples-go) to help you get started with the Cloud Ops API using the Go SDK.
To start using the Go SDK with the Cloud Ops API, follow these steps:
1. Install the Go SDK:
```go
go get github.com/temporalio/cloud-sdk-go
```
2. Import and use the SDK:
```go
"github.com/temporalio/cloud-sdk-go/client"
)
```
3. The Go SDK provides pre-built client interfaces that handle authentication and connection setup. Refer to the [Go samples](https://github.com/temporalio/cloud-samples-go) for detailed usage examples.
The Go SDK eliminates the need to work directly with generated protobuf files and provides a more idiomatic Go experience.
#### Compile the API and use the generated code (For other languages)
For programming languages other than Go, download the gRPC protobufs from the [Cloud Ops API repository](https://github.com/temporalio/cloud-api/tree/main/temporal/api/cloud) and compile them manually.
Use [gRPC](https://grpc.io/docs/) to compile and generate code in your preferred [programming language](https://grpc.io/docs/#official-support). The steps below use Python as an example and require [Python's gRPC tools](https://grpc.io/docs/languages/python/quickstart/#grpc-tools) to be installed, but the approach can be adapted for other supported programming languages.
1. Clone the Temporal Cloud API repository:
```command
git clone https://github.com/temporalio/cloud-api.git
cd cloud-api
```
2. Copy Protobuf files:
- Navigate to the `temporal` directory.
- Copy the protobuf files to your project directory.
3. Compile the Protobuf files:
```python
python -m grpc_tools.protoc -I./ --python_out=./ --grpc_python_out=./ *.proto
```
- `-I` specifies the directory of the `.proto` files.
- `--python_out=` sets the output directory for generated Python classes.
- `--grpc_python_out=` sets the output directory for generated gRPC service classes.
- `*.proto` processes all `.proto` files.
After compiling the Protobuf files, you will have generated code files in your project directory.
These files enable interaction with the Temporal Cloud API in your chosen programming language.
4. Import the Generated Files:
- Locate the Python files (.py) generated in your project directory.
- Import these files into your Python application where you intend to interact with the Temporal Cloud API.
2. Use the API:
- Use the classes and methods defined in the imported files to communicate with the Temporal Cloud services.
- Ensure to handle any required authentication or configuration as needed for Temporal Cloud.
This approach can be adapted for other programming languages by following their respective import and usage conventions for the generated code files.
## Usage guidelines
When interacting with the Temporal Cloud Ops API, follow these guidelines:
- API version header:
- Always include the `temporal-cloud-api-version` header in your requests, specifying the API version identifier.
- The current API version can be found [here](https://github.com/temporalio/cloud-api/blob/main/VERSION#L1C1-L1C14).
- Connection URL:
- Connect to the Temporal Cloud using the gRPC URL: `saas-api.tmprl.cloud:443`.
- Engagement steps:
- Generate API key:
- Obtain an [API Key for authentication](/cloud/api-keys#manage-api-keys). Note that many operations may require Admin privileges.
- Set up client:
- Establish a secure connection to the Temporal Cloud. Refer to the example [Client setup in Go](https://github.com/temporalio/cloud-samples-go/blob/main/client/temporal/client.go) for guidance.
- Execute operations:
- For operation specifics, refer to the `cloudservice/v1/request_response.proto` for gRPC messages and `cloudservice/v1/service.proto` for gRPC services.
These steps provide a structured approach to using the Temporal Cloud Ops API effectively, ensuring proper authentication and connection setup.
## Rate limits
The Temporal Cloud Operations API implements rate limiting to ensure system stability and fair usage across all users. Rate limits are applied based on identity type, with different limits for users and service accounts.
### Account-level rate limit
**Total rate limit: 160 requests per second (RPS)**
This limit applies to all requests made to the Temporal Cloud control plane by any client (tcld, UI, Cloud Ops API) or identity type (user, service account) within your account. The total account throughput cannot exceed the limit regardless of the number of users or service accounts making requests.
### Per-identity rate limits
**User rate limit: 40 RPS per user**
This limit applies to all requests made by each user through any client (tcld, UI, Cloud Ops API), regardless of the authentication method used (SSO or API keys).
**Service account rate limit: 80 RPS per service account**
This limit applies to all requests made by each service account through any client (tcld, Cloud Ops API).
**Asynchronous Operations: 10 concurrent operations at a time**
This limits the number of concurrent asynchronous operations that can be in-flight at any given time.
### Important considerations
- Rate limits are enforced across all Temporal Cloud control plane operations
- Multiple clients used by the same identity (user or service account) share the same rate limit
- Authentication method (SSO, API keys) does not affect rate limiting
- These limits help ensure system stability and prevent any single account or identity from overwhelming the service
### Request limit increases
If your use case requires higher rate limits, you can request an increase by [submitting a support ticket](/cloud/support#support-ticket). When requesting a limit increase, please provide:
- Your current usage patterns and requirements
- The specific limits you need increased
- A description of your use case and why higher limits are necessary
### Provide feedback
Your input is valuable!
You can provide feedback through the following channels:
- Submit request or feedback through a [support ticket](/cloud/support#support-ticket)
- Open an issue in the [GitHub Repo](https://github.com/temporalio/cloud-api)
---
## Awsregions
### Asia Pacific - Tokyo (`ap-northeast-1`)
- **Cloud API Code**: `aws-ap-northeast-1`
- **Regional Endpoint**: `aws-ap-northeast-1.region.tmprl.cloud`
- **PrivateLink Endpoint Service**: `com.amazonaws.vpce.ap-northeast-1.vpce-svc-08f34c33f9fb8a48a`
- **Same Region Replication**: Not Available
- **Multi-Region Replication**:
- `aws-ap-northeast-2`
- `aws-ap-south-1`
- `aws-ap-south-2`
- `aws-ap-southeast-1`
- `aws-ap-southeast-2`
- **Multi-Cloud Replication**:
- `gcp-asia-south1`
### Asia Pacific - Seoul (`ap-northeast-2`)
- **Cloud API Code**: `aws-ap-northeast-2`
- **Regional Endpoint**: `aws-ap-northeast-2.region.tmprl.cloud`
- **PrivateLink Endpoint Service**: `com.amazonaws.vpce.ap-northeast-2.vpce-svc-08c4d5445a5aad308`
- **Same Region Replication**: Not Available
- **Multi-Region Replication**:
- `aws-ap-northeast-1`
- `aws-ap-south-1`
- `aws-ap-south-2`
- `aws-ap-southeast-1`
- `aws-ap-southeast-2`
- **Multi-Cloud Replication**:
- `gcp-asia-south1`
### Asia Pacific - Mumbai (`ap-south-1`)
- **Cloud API Code**: `aws-ap-south-1`
- **Regional Endpoint**: `aws-ap-south-1.region.tmprl.cloud`
- **PrivateLink Endpoint Service**: `com.amazonaws.vpce.ap-south-1.vpce-svc-0ad4f8ed56db15662`
- **Same Region Replication**: Not Available
- **Multi-Region Replication**:
- `aws-ap-northeast-1`
- `aws-ap-northeast-2`
- `aws-ap-south-2`
- `aws-ap-southeast-1`
- `aws-ap-southeast-2`
- **Multi-Cloud Replication**:
- `gcp-asia-south1`
### Asia Pacific - Hyderabad (`ap-south-2`)
- **Cloud API Code**: `aws-ap-south-2`
- **Regional Endpoint**: `aws-ap-south-2.region.tmprl.cloud`
- **PrivateLink Endpoint Service**: `com.amazonaws.vpce.ap-south-2.vpce-svc-08bcf602b646c69c1`
- **Same Region Replication**: Not Available
- **Multi-Region Replication**:
- `aws-ap-northeast-1`
- `aws-ap-northeast-2`
- `aws-ap-south-1`
- `aws-ap-southeast-1`
- `aws-ap-southeast-2`
- **Multi-Cloud Replication**:
- `gcp-asia-south1`
### Asia Pacific - Singapore (`ap-southeast-1`)
- **Cloud API Code**: `aws-ap-southeast-1`
- **Regional Endpoint**: `aws-ap-southeast-1.region.tmprl.cloud`
- **PrivateLink Endpoint Service**: `com.amazonaws.vpce.ap-southeast-1.vpce-svc-05c24096fa89b0ccd`
- **Same Region Replication**: Not Available
- **Multi-Region Replication**:
- `aws-ap-northeast-1`
- `aws-ap-northeast-2`
- `aws-ap-south-1`
- `aws-ap-south-2`
- `aws-ap-southeast-2`
- **Multi-Cloud Replication**:
- `gcp-asia-south1`
### Asia Pacific - Sydney (`ap-southeast-2`)
- **Cloud API Code**: `aws-ap-southeast-2`
- **Regional Endpoint**: `aws-ap-southeast-2.region.tmprl.cloud`
- **PrivateLink Endpoint Service**: `com.amazonaws.vpce.ap-southeast-2.vpce-svc-0634f9628e3c15b08`
- **Same Region Replication**: Not Available
- **Multi-Region Replication**:
- `aws-ap-northeast-1`
- `aws-ap-northeast-2`
- `aws-ap-south-1`
- `aws-ap-south-2`
- `aws-ap-southeast-1`
- **Multi-Cloud Replication**:
- `gcp-asia-south1`
### Europe - Frankfurt (`eu-central-1`)
- **Cloud API Code**: `aws-eu-central-1`
- **Regional Endpoint**: `aws-eu-central-1.region.tmprl.cloud`
- **PrivateLink Endpoint Service**: `com.amazonaws.vpce.eu-central-1.vpce-svc-073a419b36663a0f3`
- **Same Region Replication**: Not Available
- **Multi-Region Replication**:
- `aws-eu-west-1`
- `aws-eu-west-2`
- **Multi-Cloud Replication**:
- `gcp-europe-west3`
### Europe - Ireland (`eu-west-1`)
- **Cloud API Code**: `aws-eu-west-1`
- **Regional Endpoint**: `aws-eu-west-1.region.tmprl.cloud`
- **PrivateLink Endpoint Service**: `com.amazonaws.vpce.eu-west-1.vpce-svc-04388e89f3479b739`
- **Same Region Replication**: Not Available
- **Multi-Region Replication**:
- `aws-eu-central-1`
- `aws-eu-west-2`
- **Multi-Cloud Replication**:
- `gcp-europe-west3`
### Europe - London (`eu-west-2`)
- **Cloud API Code**: `aws-eu-west-2`
- **Regional Endpoint**: `aws-eu-west-2.region.tmprl.cloud`
- **PrivateLink Endpoint Service**: `com.amazonaws.vpce.eu-west-2.vpce-svc-0ac7f9f07e7fb5695`
- **Same Region Replication**: Not Available
- **Multi-Region Replication**:
- `aws-eu-central-1`
- `aws-eu-west-1`
- **Multi-Cloud Replication**:
- `gcp-europe-west3`
### North America - Central Canada (`ca-central-1`)
- **Cloud API Code**: `aws-ca-central-1`
- **PrivateLink Endpoint Service**: `com.amazonaws.vpce.ca-central-1.vpce-svc-080a781925d0b1d9d`
- **Regional Endpoint**: `aws-ca-central-1.region.tmprl.cloud`
- **Same Region Replication**: Not Available
- **Multi-Region Replication**:
- `aws-us-east-1`
- `aws-us-east-2`
- `aws-us-west-2`
- **Multi-Cloud Replication**:
- `gcp-us-central1`
- `gcp-us-west1`
- `gcp-us-east4`
### North America - Northern Virginia (`us-east-1`)
- **Cloud API Code**: `aws-us-east-1`
- **Regional Endpoint**: `aws-us-east-1.region.tmprl.cloud`
- **PrivateLink Endpoint Service**: `com.amazonaws.vpce.us-east-1.vpce-svc-0822256b6575ea37f`
- **Same Region Replication**: Available
- **Multi-Region Replication**:
- `aws-ca-central-1`
- `aws-us-east-2`
- `aws-us-west-2`
- **Multi-Cloud Replication**:
- `gcp-us-central1`
- `gcp-us-west1`
- `gcp-us-east4`
### North America - Ohio (`us-east-2`)
- **Cloud API Code**: `aws-us-east-2`
- **Regional Endpoint**: `aws-us-east-2.region.tmprl.cloud`
- **PrivateLink Endpoint Service**: `com.amazonaws.vpce.us-east-2.vpce-svc-01b8dccfc6660d9d4`
- **Same Region Replication**: Not Available
- **Multi-Region Replication**:
- `aws-ca-central-1`
- `aws-us-east-1`
- `aws-us-west-2`
- **Multi-Cloud Replication**:
- `gcp-us-central1`
- `gcp-us-west1`
- `gcp-us-east4`
### North America - Oregon (`us-west-2`)
- **Cloud API Code**: `aws-us-west-2`
- **Regional Endpoint**: `aws-us-west-2.region.tmprl.cloud`
- **PrivateLink Endpoint Service**: `com.amazonaws.vpce.us-west-2.vpce-svc-0f44b3d7302816b94`
- **Same Region Replication**: Available
- **Multi-Region Replication**:
- `aws-ca-central-1`
- `aws-us-east-1`
- `aws-us-east-2`
- **Multi-Cloud Replication**:
- `gcp-us-central1`
- `gcp-us-west1`
- `gcp-us-east4`
### South America - São Paulo (`sa-east-1`)
- **Cloud API Code**: `aws-sa-east-1`
- **Regional Endpoint**: `aws-sa-east-1.region.tmprl.cloud`
- **PrivateLink Endpoint Service**: `com.amazonaws.vpce.sa-east-1.vpce-svc-0ca67a102f3ce525a`
- **Same Region Replication**: Not Available
- **Multi-Region Replication**:
- None
- **Multi-Cloud Replication**:
- None
---
## RPO and RTO
When a cloud outage disrupts a Namespace, Temporal Cloud takes measures to maintain the Namespace's availability and data durability. The time it takes to recover from the outage is called the "recovery time." The amount of data (event histories) lost is called the "recovery point." A durable system should have a low recovery time and recovery point.
To help users plan for keeping critical Workflows available during a cloud outage, Temporal Cloud publishes goals for the recovery time and recovery point for each kind of outage. These goals are called the Recovery Time Objective (RTO) and Recovery Point Objective (RPO). These objectives are complementary to Temporal Cloud's [Service Level Agreement (SLA)](/cloud/sla).
To achieve the lowest RPO and RTO, Temporal Cloud offers [High Availability](/cloud/high-availability) features that keep Workflows operational with minimal downtime. When High Availability is enabled on a Namespace, the user chooses a region to place a "replica" that will take over in the event of a failure. The location of the replica determines the type of replication used and the type of outages that can be handled. Multi-region Replication is when the active and replica are in different regions on the same cloud (e.g., AWS us-east-1 and AWS us-west-2). Multi-cloud Replication is when the active and replica are in different clouds (e.g., AWS and GCP). Same-region Replication is when the active and replica are in the same region. Temporal always places the active and replica in different [cells](/cloud/overview#cell-based-infrastructure).
As Workflows progress in the active region, history events are asynchronously replicated to the replica.
Because replication is asynchronous, High Availability does not impact the latency or throughput of Workflow Executions in the active region.
If an outage hits the active region or cell, Temporal Cloud will fail over to the replica so that existing Workflow Executions will continue to run and new Workflow Executions can be started.
The Recovery Point Objective and Recovery Time Objective for Temporal Cloud depend on the type of outage and which [High Availability](/cloud/high-availability) feature your Namespace has enabled. Temporal Cloud can only set an RPO and RTO for cases where it has the ability to mitigate the outage. Therefore, the below RPOs and RTOs apply to Namespaces that have the corresponding type of replication and have enabled Temporal-initiated failovers, which comes enabled by default.
1. **Availability zone outage**:
1. _Applicable Namespaces:_ All Namespaces
2. _Goals:_ Zero RPO and near-zero RTO
3. _More details:_ Historically, these have been the most common type of outage in the cloud. Temporal Cloud replicates every Namespace across three availability zones. The failure of a single availability zone is handled automatically by Temporal Cloud behind the scenes, with no potential for data loss, and little-to-no observable downtime to the end user.
2. **Cell outage**:
1. _Applicable Namespaces:_ Namespaces with Same-region Replication, Multi-region Replication, or Multi-cloud Replication
2. _Goals:_ 1-minute RPO and 20-minute RTO
3. _More details:_ Temporal Cloud runs on a [cell architecture](/cloud/sla). Each cell contains the software and services necessary to host a Namespace. While unlikely, it's possible for a cell to experience a disruption due to uncaught software bugs or sub-component failures (e.g., an outage in the underlying database).
3. **Regional outage**:
1. _Applicable Namespaces:_ Namespaces with Multi-region Replication or Multi-cloud Replication
2. _Goals:_ 1-minute RPO and 20-minute RTO
3. _More details:_ On [rare occasions](https://temporal.io/blog/how-devs-kept-running-during-the-aws-us-east-1-oct-20-2025), an entire region within a cloud provider will be degraded. Since Namespaces depend on the cloud provider's infrastructure, Temporal Cloud is not immune to these outages.
4. **Cloud-wide outage**:
1. _Applicable Namespaces:_ Namespaces with Multi-cloud Replication
2. _Goals:_ 1-minute RPO and 20-minute RTO
3. _More details:_ An entire cloud provider has an outage across most or all regions. Since cloud providers strive to keep cloud regions de-coupled, these are the rarest outages of all. Still, they [have happened](https://status.cloud.google.com/incidents/ow5i3PPK96RduMcb1SsW) in the past.
Notes:
- The above goals are only applicable to Namespaces that have enabled Temporal-initiated failovers, which comes enabled by default. Temporal-initiated failovers are initiated by Temporal's tooling and/or on-call engineers without user action. Users can always initiate a failover on their Namespace, even when Temporal-initiated failovers are enabled. In an outage, a user-initiated failover will not cancel out or accidentally reverse a Temporal-initiated failover.
:::note
Temporal highly recommends keeping Temporal-initiated failovers enabled. When Temporal-initiated failovers are _disabled,_ Temporal Cloud cannot set an RPO and RTO for that Namespace, because it cannot control when or if the user will trigger a failover.
:::
- The above goals are for unplanned cloud outages. They do not apply to user-initiated failovers during healthy periods (e.g., for DR drills). Read about [triggering a failover](/cloud/high-availability/failovers) to see how a Namespace failover should perform during healthy periods.
- As soon as a cloud outage resolves, Temporal's on-call engineers will work to restore service to Namespaces that were not protected by High Availability. A cloud outage can leave lingering effects in Temporal's systems and applications, even after the cloud provider restores the underlying service. Because of this, affected Namespaces may not be immediately available when the underlying service is restored. An affected Namespace's outage may last longer than the cloud provider's outage.
- All Namespaces are backed up every 4 hours. If an outage causes data loss on a Namespace that was not protected by High Availability, then Temporal will use the backup to restore as much data as feasible.
## Minimizing the Recovery Point
Temporal has put extensive work into tools and processes that minimize the recovery point and achieve its RPO for Temporal-initiated failovers, including:
- Best-in-class [data replication technology](https://youtu.be/mULBvv83dYM?si=RDeWb3gVsEtgGM4z&t=334) that keeps the replica up to date with the active.
- Monitoring, alerting, and internal SLOs on the replication lag for every Temporal Cloud Namespace.
However, user actions on a Namespace can affect the recovery point. For example, suddenly spiking into much higher throughput than a Namespace has seen before could create a period of replication lag where the replica falls behind the active.
Temporal provides a [replication lag](/cloud/metrics/openmetrics/metrics-reference#temporal_cloud_v1_replication_lag_p99) metric for each Namespace. This metric approximates the recovery point the Namespace would achieve in a worst case failure at that given moment.
:::note
Temporal recommends monitoring the replication lag and alerting should it rise too high, e.g., above 1 minute.
:::
## Minimizing the Recovery Time
Temporal has put extensive work into tools and processes that minimize the recovery time and achieve its RTO for Temporal-initiated failovers, including:
- History events are replicated _asynchronously_. This ensures that the Namespace can still run workflows in the active region even if there are networking blips or outages with the replica region.
- Outages are detected automatically. We have extensive internal alerting to detect disruptions to Namespaces, and are ever improving this system.
- Battle-tested Temporal Workflows that execute failovers of all Temporal Cloud Namespaces in a given region quickly.
- Regular drills where we fail over our internal Namespaces to test our tooling.
- Expert engineers on-call 24/7 monitoring Temporal Cloud Namespaces and ready to assist should an outage occur.
To achieve the lowest possible recovery times, Temporal recommends that you:
- Keep Temporal-initiated failovers enabled on your Namespace (the default)
- Invest in a process to detect outages and trigger a manual failover.
Users can trigger manual failovers on their Namespaces even if Temporal-initiated failovers are enabled. There are several benefits to combining a manual failover process with Temporal-initiated failovers:
- You can detect outages that Temporal doesn't. In the cloud, regional outages don't affect all services equally. It's possible that Temporal--and the services it depends on--are unaffected by the outage, even while your Workers or other cloud infrastructure are disrupted. If you [monitor services in your critical path](https://sre.google/sre-book/monitoring-distributed-systems/) and alert on unusual error rates, you may catch outages before Temporal Cloud does.
- You can sequence your failovers in a particular order. Your cloud infrastructure probably contains more pieces than just your Temporal Namespace: Temporal Workers, compute pools, data stores, and other cloud services. If you manually fail over, you can choose the order in which these pieces switch to the replica region. You can then test that ordering with failover drills and ensure it executes smoothly without data consistency issues or bottlenecks.
- You can proactively fail over more aggressively than Temporal. While the 20-minute RTO should be sufficient for most use cases, some may strive to hit an even lower RTO. For workloads like high frequency trading, auctions, or popular sporting events, an outage at the wrong time could cause tremendous lost revenue per minute. You can adopt a posture that fails over more eagerly than Temporal does. For example, you could trigger a manual failover at the first sign of a possible disruption, before knowing whether there's a true regional outage.
- Even if you have robust tooling to detect an outage and trigger a failover, leaving Temporal-initiated failovers enabled provides a "safety net" in case your automation misses an outage. It also gives Temporal leeway to preemptively fail over your Namespace if we detect that it may be disrupted soon, e.g., by a rolling failure that has impacted other Namespaces but not yours, yet.
## Understanding Temporal's RTO vs. SLA
Temporal has both a Recovery Time Objective (RTO) and a Service Level Agreement (SLA). They serve complementary purposes and apply in different situations.
| Aspect | RTO | SLA |
|-----------------------------------|-------------------------------------------------------------------------------------------------------------------------------------------------------------------------------------------------------------------------------------------------------------------------|--------------------------------------------------------------------------------------------------------------------------------------------------------------------------------------------------------------------------------------------------------------------------------------------------------------------------------------------------------------------------------------------------------------------------------------------------------------------------------|
| What is it? | An objective, or high-priority goal, for the total time that an outage disrupts a Namespace. | A contractual agreement that sets an upper bound on the service error rate, with financial repercussions. |
| How is it measured? | The achieved recovery time is measured in terms of minutes per outage. | The achieved service error rate is measured in terms of error rate per month. |
| How is the calculation performed? | The achieved recovery time in a given outage is the total time between when a disruption to a Namespace began and when the Namespace was restored to full functionality, either after a failover to a healthy region or after the outage has been mitigated. | Temporal measures the percentage of requests to Temporal Cloud that fail, and applies a [formula](/cloud/sla) to get the final percentage for the month. |
| Do partial degradations count? | Most outages contain periods of __partial degradation__ where some percentage of Namespace operations fail while the rest complete as normal. When they disrupt a Namespace, periods of partial degradation count in the calculation of the recovery time. | Partial degradations only partially count for the service error rate calculation. A 5-minute window with a 10% error rate would count less than a 5-minute window with a 100% error rate. |
| What is excluded? | For partial degradations, what counts as a disruption to a Namespace is subject to Temporal's expert judgment, but a good rule of thumb is a service error rate >=10%. | We exclude outages that are out of Temporal's control to mitigate, e.g., a failure of the underlying cloud provider infrastructure that affects a Namespace without High Availability and Temporal-initiated failovers enabled. If a Namespace has the relevant High Availability feature and has Temporal-initiated failovers enabled, then Temporal can act to mitigate the outage and it does usually count against the SLA. Full exclusions on the [SLA page](/cloud/sla). |
The following examples illustrate the RTO and SLA calculations for different types of in a regional outage. These hypothetical Namespaces are based on actual Temporal Cloud performance in a [real-world outage](https://temporal.io/blog/how-devs-kept-running-during-the-aws-us-east-1-oct-20-2025).
Suppose that region `middle-earth-1` experienced a cascading failure starting at 10:00:00 UTC, causing various instances and machines to fail over time. Temporal's automatic failover triggered for all Namespaces and completed at 10:15:00 UTC.
- Namespace 0 was in the region but its cell was not affected by the outage. The only downtime it had was for a few seconds during the failover operation. It experienced a near-zero Recovery Time, and its service error rate was negligible. Graceful failover was successful, and this Namespace achieved a recovery point of 0.
- Namespace 1_A was in the region and its cell experienced a partial degradation that caused 10% of requests to fail in the first 5 minutes, 25% in the second five minutes, and 50% in the third five minutes. Since it was significantly impacted from 10:00:00 to 10:15:00, its Recovery Time was 15 minutes. If it had no other service errors that month, then its service error rate for the month would be: ( (1 - 10%) + (1 - 25%) + (1 - 50%) + 8925 * 100% ) / 8928 = 99.990%. (Note: there are 8928 5-minute periods in a 31-day month.) Graceful failover was successful, and this Namespace achieved a recovery point of 0.
- Namespace 1_B was in the same cell as Namespace 2_A, so it also experienced a partial degradation that caused 10% of requests to fail. However, its owner detected the outage via their own tooling and decided to manually fail over at 10:05:00. This Namespace achieved a recovery time of 5 minutes and a service error rate of ( 1 * (1 - 10%) + 8927 * 100% ) / 8928 = 99.998%. Graceful failover was successful, and this Namespace achieved a recovery point of 0.
- Namespace 2_A was in the region and its cell was fully network partitioned at the start of the outage, causing 100% of requests to fail. Since it was significantly impacted from 10:00:00 to 10:15:00, its Recovery Time was 15 minutes. If it had no other service errors that month, then its service error rate for the month would be: ( 3 * (1 - 100%) + 8928 * 100% ) / 8640 5-minute periods per month = 99.97%. Because the Namespace was network partitioned, graceful failover did not succeed, and forced failover was used. The recovery point achieved was equal to the replication lag at the time of the network partition, which was a few seconds.
- Namespace 2_B was in the region and was fully network partitioned, causing 100% of requests to fail. However, its owner detected the outage via their own tooling and decided to manually fail over at 10:05:00. This Namespace achieved a recovery time of 5 minutes and a service error rate of ( 1 5-minute periods * (1 - 100%) + 8639 5-minute periods * 100% ) / 8640 5-minute periods per month = 99.99%. Because the Namespace was network partitioned, graceful failover did not succeed, and forced failover was used. The recovery point achieved was equal to the replication lag at the time of the network partition, which was a few seconds.
All of the above Namespaces were in the affected region and beat the 1-minute RPO. But they achieved varying recovery times and service error rates.
- Notice how Namespace 1_A and Namespace 2_A were both automatically failed over with **the same recovery time but different service error rates**. Notice how Namespace 2_B and Namespace 1_A happen to have the **same service error rate but different recovery times**. This illustrates how RTO and SLA can differ, even in the same outage. Both are valuable tools for Temporal Cloud users to measure the availability of their Namespaces.
- Notice how the Namespaces that were manually failed over (Namespace 1_B and Namespace 2_B) achieved lower recovery times than the Namespaces that were automatically failed over (Namespace 1_A and Namespace 2_A). This illustrates how **proactive, aggressive manual failover can achieve a better recovery time than automatic failover**.
---
## SAML authentication
Integrating with your organization's identity provider (IdP) with Temporal Cloud through Security Assertion Markup
Language (SAML) 2.0 allows you to authenticate users of your Temporal Cloud account using your organization's IdP. This
allows you to enforce your corporate identity policies, such as multi-factor authentication (MFA), password complexity,
and reduces the risk of credential theft.
SAML is included in the Business, Enterprise, and Mission Critical plans. For more details, refer to
[Temporal Cloud pricing](/cloud/pricing#base_plans).
## Integrate SAML with your Temporal Cloud account
1. Locate your [Temporal Cloud Account Id](/cloud/namespaces#temporal-cloud-account-id). Your Account Id can be viewed
and copied from the Temporal Cloud user profile dropdown menu in the top right corner. Alternatively, find your
[Namespace Id](/cloud/namespaces#temporal-cloud-namespace-id). The Account Id is the five or six characters following
the period (.), such as `f45a2`. You will need the Account Id to construct your callback URL and your entity
identifier.
1. Configure SAML with your IdP by following one of these sets of instructions:
- [Microsoft Entra ID](#configure-saml-with-azure-ad)
- [Okta](#configure-saml-with-okta)
1. [Share your connection information with us and test your connection.](#finish-saml-configuration)
## How to configure SAML with Microsoft Entra ID {#configure-saml-with-azure-ad}
If you want to use the general Microsoft login mechanism, you don't need to set up SAML with Entra ID. Just select
**Continue with Microsoft** on the Temporal Cloud sign-in page.
To use Entra ID as your SAML IdP, create a Microsoft Entra ID Enterprise application.
1. Sign in to the [Microsoft Entra ID](https://portal.azure.com/).
1. On the home page, under **Manage Microsoft Entra ID**, select **View**.
1. On the **Overview** page near the top, select **Add > Enterprise application**.
1. On the **Browse Microsoft Entra ID Gallery** page near the top, select **Create your own application**.
1. In the **Create your own application** pane, provide a name for your application (such as `temporal-cloud`) and
select **Integrate any other application you don't find in the gallery**.
1. Select **Save**.
1. In the **Getting Started** section, select **2. Set up single sign on**.
1. On the **Single sign-on** page, select **SAML**.
1. In the **Basic SAML Configuration** section of the **SAML-based Sign-on** page, select **Edit**.
1. In **Identifier (Entity ID)**, enter the following entity identifier, including your Account Id where indicated:
```bash
urn:auth0:prod-tmprl:ACCOUNT_ID-saml
```
A correctly formed entity identifier looks like this:
```bash
urn:auth0:prod-tmprl:f45a2-saml
```
1. In **Reply URL (Assertion Consumer Service URL)**, enter the following callback URL, including your Account Id where
indicated:
```bash
https://login.tmprl.cloud/login/callback?connection=ACCOUNT_ID-saml
```
A correctly formed callback URL looks like this:
```bash
https://login.tmprl.cloud/login/callback?connection=f45a2-saml
```
1. In **Sign on URL**, enter the following login url, including your Account Id where indicated:
```bash
https://cloud.temporal.io/login/saml?connection=ACCOUNT_ID-saml
```
A correctly formed login URL looks like this:
```bash
https://cloud.temporal.io/login/saml?connection=f45a2-saml
```
1. You can leave the other fields blank. Near the top of the pane, select **Save**.
1. In the **Attributes & Claims** section, select **Edit**. Configure the following settings. Under **Required claim**:
- Set **Unique User Identifier (NameID)** to `user.userprincipalname`
- Set the **NameID format** to `emailAddress`
These are the default settings for Microsoft Entra ID. Then under **Additional claims**, ensure **Email** and
**Name** are present.
1. Collect information that you need to send to us:
- In the **SAML Certificates** section of the **SAML-based Sign-on** page, select the download link for **Certificate
(Base64)**.
- In the **Set up _APPLICATION_NAME_** section of the **SAML-based Sign-on** page, copy the value of **Login URL**.
To finish setting up Microsoft Entra ID as your SAML IdP, see [Finish SAML configuration](#finish-saml-configuration).
## How to configure SAML with Okta {#configure-saml-with-okta}
To use Okta as your SAML IdP, configure a new Okta application integration.
1. Sign in to the [Okta Admin Console](https://www.okta.com/login/).
1. In the left navigation pane, select **Applications > Applications**.
1. On the **Applications** page, select **Create App Integration**.
1. In the **Create a new app integration** dialog, select **SAML 2.0** and then select **Next**.
1. On the **Create SAML Integration** page in the **General Settings** section, provide a name for your application
(such as `temporal-cloud`) and then select **Next**.
1. In the **Configure SAML** section in **Single sign on URL**, enter the following callback URL, including your Account
Id where indicated:
```bash
https://login.tmprl.cloud/login/callback?connection=ACCOUNT_ID-saml
```
A correctly formed callback URL looks like this:
```bash
https://login.tmprl.cloud/login/callback?connection=f45a2-saml
```
1. In **Audience URI (SP Entity ID)**, enter the following entity identifier, including your Account Id where indicated:
```bash
urn:auth0:prod-tmprl:ACCOUNT_ID-saml
```
A correctly formed entity identifier looks like this:
```bash
urn:auth0:prod-tmprl:f45a2-saml
```
1. We require the user's full email address when connecting to Temporal.
- In **Name ID format**, select `EmailAddress`.
- In **Attribute Statements**, set **email** and **name**.
1. Select **Next**.
1. In the **Feedback** section, select **Finish**.
1. On the **Applications** page, select the name of the application integration you just created.
1. On the application integration page, select the **Sign On** tab.
1. Under **SAML Setup**, select **View SAML setup instructions**.
1. Collect information that you need to send to us:
- Copy the IdP settings.
- Download the active certificate.
To finish setting up Okta as your SAML IdP, see the next section,
[Finish SAML configuration](#finish-saml-configuration).
## How to finish your SAML configuration {#finish-saml-configuration}
After you configure SAML with your IdP, we can finish the configuration on our side.
[Create a support ticket](/cloud/support#support-ticket) that includes the following information:
- The sign-in URL from your application
- The X.509 SAML sign-in certificate in PEM format
- One or more IdP domains to map to the SAML connection
Generally, the provided IdP domain is the same as the domain for your email address. You can provide multiple IdP
domains.
When you receive confirmation from us that we have finished configuration, log in to Temporal Cloud. This time, though,
enter your email address and click **Continue**. You will be directed to the authentication page of your IdP.
---
## SCIM user management
[SCIM](https://scim.cloud/) lets you integrate your identity provider (IdP) with Temporal Cloud to automate user provisioning and access. Once SCIM is configured, changes in your IdP are automatically reflected in Temporal Cloud, including:
- User creation / onboarding
- User deletion / offboarding
- User membership in groups
You can map SCIM groups to Temporal Cloud [roles and permissions](/cloud/manage-access/roles-and-permissions), so users automatically get the Temporal Cloud access they need based on the groups they belong to.
:::info
SCIM is a paid feature. See the [pricing page](/cloud/pricing) for details.
:::
## Supported IdP Vendors
Supported upstream IdP vendors include:
* [Okta](#configure-scim-with-okta)
* Microsoft Entra ID (Azure AD)
* Google Workspace
* OneLogin
* CyberArk
* JumpCloud
* PingFederate
* Any SCIM 2.0-compliant provider
## Preparing for SCIM
Before starting your work with SCIM, you'll need to complete this checklist:
1. Configure [SAML](/cloud/saml) SSO.
1. Identify your organization's **IdP administrator**, who is responsible for configuring and managing your SCIM integration.
Specify their contact details when you reach out to support in the next stage of this process.
After completing these steps, you're ready to submit your [support ticket](/cloud/support#support-ticket) to enable SCIM.
:::tip Adding and removing users
When SCIM is enabled for user management, you can still add and remove users outside of SCIM using the Temporal Cloud interface, until you disable user lifecycle management.
You can always change a user's or group's Account Role from the Temporal Cloud interface.
:::
## Onboarding with SCIM and Okta {#configure-scim-with-okta}
1. Temporal Support enables the SCIM integration on your account.
Enabling integration automatically emails a configuration link to your Okta administrator.
This authorizes them to set up the integration.
1. Your Okta administrator opens the supplied link.
The link leads to step-by-step instructions for configuring the integration.
1. Once configured in Okta, Temporal Cloud will begin to receive SCIM messages and automatically onboard and offboard the users and groups configured in Okta.
Some points to note:
- User and group change events are applied within 10 minutes of them being made in Okta.
- User lifecycle management with SCIM also allows user roles to be derived from group membership.
- Once a group has been synced in Temporal Cloud, you can use `tcld` to assign roles to the group.
For instructions, see the [User Group Management](https://github.com/temporalio/tcld?tab=readme-ov-file#user-group-management) page.
---
## Monitor Temporal Cloud
Temporal Cloud metrics help monitor production deployments.
This documentation covers best practices for monitoring Temporal Cloud.
## Monitor availability issues
When you see a sudden drop in Worker resource utilization, verify whether Temporal Cloud's API is showing increased latency and error rates.
### Reference Metrics
- [temporal\_cloud\_v1\_service\_latency\_p99](/cloud/metrics/openmetrics/metrics-reference#temporal_cloud_v1_service_latency_p99)
This metric measures latency for `SignalWithStartWorkflowExecution`, `SignalWorkflowExecution`, `StartWorkflowExecution` operations.
These operations are mission critical and never [throttled](/cloud/service-availability#throughput).
This metric is a good indicator of your lowest possible latency for the 99th percentile of requests.
### Workflow execution latency
To monitor end-to-end Workflow execution time (not just the service API latency above), use the workflow schedule-to-close latency metrics:
- [temporal\_cloud\_v1\_workflow\_schedule\_to\_close\_latency\_p50](/cloud/metrics/openmetrics/metrics-reference#temporal_cloud_v1_workflow_schedule_to_close_latency_p50)
- [temporal\_cloud\_v1\_workflow\_schedule\_to\_close\_latency\_p95](/cloud/metrics/openmetrics/metrics-reference#temporal_cloud_v1_workflow_schedule_to_close_latency_p95)
- [temporal\_cloud\_v1\_workflow\_schedule\_to\_close\_latency\_p99](/cloud/metrics/openmetrics/metrics-reference#temporal_cloud_v1_workflow_schedule_to_close_latency_p99)
These measure the time from when a Workflow is scheduled until it closes, including all Activity execution time. A sudden increase may indicate Worker capacity issues, downstream service degradation, or retry storms.
## Monitor Temporal Service errors
Check for Temporal Service gRPC API errors.
Note that Service API errors are not equivalent to guarantees mentioned in the [Temporal Cloud SLA](/cloud/sla).
### Reference Metrics
- [temporal\_cloud\_v1\_service\_error\_count](/cloud/metrics/openmetrics/metrics-reference#temporal_cloud_v1_service_error_count)
- [temporal\_cloud\_v1\_service\_request\_count](/cloud/metrics/openmetrics/metrics-reference#temporal_cloud_v1_service_request_count)
### Prometheus Query for this Metric
Measure your daily average success rate over 10-minute windows.
OpenMetrics v1 metrics are pre-computed rates. Use `sum()` to aggregate across dimensions rather than `increase()` or `rate()`.
```
avg_over_time((
(
(
sum(temporal_cloud_v1_service_request_count{temporal_namespace=~"$namespace", operation=~"StartWorkflowExecution|SignalWorkflowExecution|SignalWithStartWorkflowExecution|RequestCancelWorkflowExecution|TerminateWorkflowExecution"})
-
sum(temporal_cloud_v1_service_error_count{temporal_namespace=~"$namespace", operation=~"StartWorkflowExecution|SignalWorkflowExecution|SignalWithStartWorkflowExecution|RequestCancelWorkflowExecution|TerminateWorkflowExecution"})
)
/
sum(temporal_cloud_v1_service_request_count{temporal_namespace=~"$namespace", operation=~"StartWorkflowExecution|SignalWorkflowExecution|SignalWithStartWorkflowExecution|RequestCancelWorkflowExecution|TerminateWorkflowExecution"})
)
or vector(1)
)[1d:1m])
```
## Detecting Activity and Workflow Failures
The metrics `temporal_cloud_v1_activity_fail_count` and `temporal_cloud_v1_workflow_failed_count` together provide failure detection for Temporal applications. These metrics work in tandem to give you both granular component-level visibility and high-level workflow health insights.
### Activity failure cascade
If not using infinite retry policies, Activity failures can lead to Workflow failures:
```
Activity Failure --> Retry Logic --> More Activity Failures --> Workflow Decision --> Potential Workflow Failure
```
Activity failures are often recoverable and expected. Workflow failures represent terminal states requiring immediate attention.
A spike in activity failures may precede workflow failures.
Generally Temporal recommends that Workflows should be designed to always succeed. If an Activity fails more than its retry policy allows, we suggest having the Workflow handle Activity failure and take action to notify a human to take corrective action or be aware of the error.
### Ratio-based monitoring
#### Failure conversion rate
Monitor the ratio of workflow failures to activity failures:
```
workflow_failure_rate = temporal_cloud_v1_workflow_failed_count / temporal_cloud_v1_activity_fail_count
```
What to watch for:
- High ratio (greater than 0.1): Poor error handling - activities failing are causing workflow failures
- Low ratio (less than 0.01): Good resilience - activities fail but workflows recover
- Sudden spikes: May indicate systematic issues
#### Activity success rate
```
activity_success_rate = temporal_cloud_v1_activity_success_count / (temporal_cloud_v1_activity_success_count + temporal_cloud_v1_activity_fail_count)
```
Target: >95% for most applications. Lower success rate can be a sign of system troubles.
See also:
- [Crafting an Error Handling Strategy](https://learn.temporal.io/courses/errstrat/)
- [Temporal Failures reference](/references/failures)
- [Detecting Workflow failures](/encyclopedia/detecting-workflow-failures)
## Monitor replication lag for Namespaces with High Availability features
Replication lag refers to the transmission delay of Workflow updates and history events from the primary Namespace to the replica.
Always check the [metric replication lag](/cloud/metrics/openmetrics/metrics-reference#temporal_cloud_v1_replication_lag_p99) before initiating a failover.
A forced failover when there is a large replication lag has a higher likelihood of rolling back Workflow progress.
**Who owns the replication lag?**
Temporal owns replication lag.
**What guarantees are available?**
There is no SLA for replication lag.
Temporal recommends that customers do not trigger failovers except for testing or emergency situations.
High Availability feature's four-9 guarantee SLA means Temporal will handle failovers and ensure high availability.
Temporal also monitors replication lag.
Customers who decide to trigger failovers should look at this metric before moving forward.
**If the lag is high, what should you do?**
We don't expect users to failover.
Please contact Temporal support if you feel you have a pressing need.
**Where can you read more?**
See [operations and metrics](/cloud/high-availability) for Namespaces with High Availability features.
### Reference Metrics
- [temporal\_cloud\_v1\_replication\_lag\_p99](/cloud/metrics/openmetrics/metrics-reference#temporal_cloud_v1_replication_lag_p99)
- [temporal\_cloud\_v1\_replication\_lag\_p95](/cloud/metrics/openmetrics/metrics-reference#temporal_cloud_v1_replication_lag_p95)
- [temporal\_cloud\_v1\_replication\_lag\_p50](/cloud/metrics/openmetrics/metrics-reference#temporal_cloud_v1_replication_lag_p50)
## Detecting Resource Exhaustion
The Cloud metric `temporal_cloud_v1_resource_exhausted_error_count` is the primary indicator for Cloud-side throttling, signaling system limits
are exceeded and `ResourceExhausted` gRPC errors are occurring. This generally does not break workflow processing due to how resources are prioritized.
Persistent non-zero values of this metric are unexpected.
## Monitoring Trends Against Limits {#rps-aps-rate-limits}
The set of [limit metrics](/cloud/metrics/openmetrics/metrics-reference#limit-metrics) provide a time series of values for limits. Use these
metrics with their corresponding count metrics to monitor general trends against limits and set alerts when limits are exceeded. Use the corresponding throttle metrics
to determine the severity of any active rate limiting.
| Limit Metric | Count Metric | Throttle Metric |
| ------------ | ------------ | --------------- |
| `temporal_cloud_v1_action_limit` | `temporal_cloud_v1_total_action_count` | `temporal_cloud_v1_total_action_throttled_count` |
| `temporal_cloud_v1_service_request_limit` | `temporal_cloud_v1_service_request_count` | `temporal_cloud_v1_service_request_throttled_count` |
| `temporal_cloud_v1_operations_limit` | `temporal_cloud_v1_operations_count` | `temporal_cloud_v1_operations_throttled_count` |
### On-demand envelope limits
For Namespaces using provisioned capacity, the following metrics show what your limits would be under on-demand mode.
Compare these against your current provisioned limits to evaluate capacity mode choices:
| On-Demand Envelope Metric | Equivalent Limit Metric |
| ------------------------- | ----------------------- |
| `temporal_cloud_v1_action_on_demand_envelope_limit` | `temporal_cloud_v1_action_limit` |
| `temporal_cloud_v1_operations_on_demand_envelope_limit` | `temporal_cloud_v1_operations_limit` |
| `temporal_cloud_v1_service_request_on_demand_envelope_limit` | `temporal_cloud_v1_service_request_limit` |
For Namespaces already in on-demand mode, these metrics track the same values as their equivalent limit metrics.
The [Grafana dashboard example](https://github.com/grafana/jsonnet-libs/blob/master/temporal-mixin/dashboards/temporal-overview.json) includes a Usage & Quotas section
that creates demo charts for these limits and count metrics respectively.
The limit metrics, throttle metrics, and count metrics are already directly comparable as per second rates. Keep in mind that each `count` metric is represented as a per second rate averaged
over each minute. For example, to get the total count of Actions, you must multiply this metric by 60.
When setting alerts against limits, consider if your workload is spiky or sensitive to throttling (e.g. does latency matter?). If your workload is sensitive, consider alerting
for `temporal_cloud_v1_total_action_count` at a 50% threshold of the `temporal_cloud_v1_action_limit`. If your workload is not sensitive, consider an alert at 90% of this threshold
or directly when throttling is detected as a value greater than zero for `temporal_cloud_v1_total_action_throttled_count`. This logic can also be used to automatically scale [Temporal
Resource Units](/cloud/capacity-modes#provisioned-capacity) up or down as needed. Some workloads choose to exceed limits and accept throttling because they are not latency sensitive.
---
## tcld account command reference
The `tcld account` commands manage accounts in Temporal Cloud.
Alias: `a`
- [tcld account audit-log](#audit-log)
- [tcld account get](#get)
- [tcld account list-regions](#list-regions)
- [tcld account metrics](#metrics)
## audit-log
The `tcld account audit-log` command manage Audit Logs in Temporal Cloud.
Alias: `al`
- [tcld account audit-log kinesis](#kinesis)
- [tcld account audit-log pubsub](#pubsub)
### kinesis
The `tcld account audit-log kinesis` command manages Kinesis audit log sinks.
Alias: `k`
- [tcld account audit-log kinesis create](#create)
- [tcld account audit-log kinesis delete](#delete)
- [tcld account audit-log kinesis get](#account-audit-log-kinesis-get)
- [tcld account audit-log kinesis list](#list)
- [tcld account audit-log kinesis update](#update)
- [tcld account audit-log kinesis validate](#validate)
#### create
The `tcld account audit-log kinesis` command creates a Kinesis audit log sink.
Alias: `c`
##### --destination-uri
The destination URI of the audit log sink.
Alias: `du`
##### --region
The region to use for the request.
Alias: `re`
##### --role-name
The role name to use to write to the sink.
Alias: `rn`
##### --sink-name
Provide a name for the sink.
#### delete
The `tcld account audit-log kinesis delete` command deletes an audit log sink.
Alias: `d`
##### --resource-version
The resource-version (etag) to update from, if not set the cli will use the latest (optional).
Alias: `v`
##### --sink-name
Provide a name for the sink.
#### get {#account-audit-log-kinesis-get}
The `tcld account audit-log kinesis get` command gets an audit log sink.
Alias: `g`
##### --sink-name
Provide a name for the sink.
#### list
The `tcld account audit-log kinesis list` command lists audit log sinks on the account.
Alias: `l`
##### --page-size
The page size for list operations.
##### --page-token
The page token for list operations.
#### update
The `tcld account audit-log kinesis update` command updates an audit log sink.
Alias: `u`
##### --destination-uri
The destination URI of the audit log sink.
Alias: `du`
##### --enabled
Whether the sink is enabled.
##### --region
The region to use for the request.
Alias: `re`
##### --resource-version
The resource-version (etag) to update from, if not set the cli will use the latest (optional).
Alias: `v`
##### --role-name
The role name to use to write to the sink.
Alias: `rn`
##### --sink-name
Provide a name for the sink.
#### validate
The `tcld account audit-log kinesis validate` command verifies Temporal Cloud can write to a Kinesis sink.
Alias: `v`
##### --destination-uri
The destination URI of the audit log sink.
Alias: `du`
##### --region
The region to use for the request.
Alias: `re`
##### --role-name
The role name to use to write to the sink.
Alias: `rn`
##### --sink-name
Provide a name for the sink.
### pubsub
The `tcld account audit-log pubsub` command manages Pub/Sub audit log sinks.
Alias: `ps`
- [tcld account audit-log pubsub create](#create)
- [tcld account audit-log pubsub delete](#delete)
- [tcld account audit-log pubsub get](#account-audit-log-pubsub-get)
- [tcld account audit-log pubsub list](#list)
- [tcld account audit-log pubsub update](#update)
- [tcld account audit-log pubsub validate](#validate)
#### create
The `tcld account audit-log pubsub` command creates a Pub/Sub audit log sink.
Alias: `c`
##### --service-account-email
The service account email to impersonate to write to the sink.
Alias: `sae`
##### --sink-name
Provide a name for the sink.
##### --topic-name
The topic name to write to the sink.
Alias: `tn`
#### delete
The `tcld account audit-log pubsub delete` command deletes an audit log sink.
Alias: `d`
##### --resource-version
The resource-version (etag) to update from, if not set the cli will use the latest (optional).
Alias: `v`
##### --sink-name
Provide a name for the sink.
#### get {#account-audit-log-pubsub-get}
The `tcld account audit-log pubsub get` command gets an audit log sink.
Alias: `g`
##### --sink-name
Provide a name for the sink.
#### list
The `tcld account audit-log pubsub list` command lists audit log sinks on the account.
Alias: `l`
##### --page-size
The page size for list operations.
##### --page-token
The page token for list operations.
#### update
The `tcld account audit-log pubsub update` command updates an audit log sink.
Alias: `u`
##### --enabled
Whether the sink is enabled.
##### --resource-version
The resource-version (etag) to update from, if not set the cli will use the latest (optional).
Alias: `v`
##### --service-account-email
The service account email to impersonate to write to the sink.
Alias: `sae`
##### --sink-name
Provide a name for the sink.
##### --topic-name
The topic name to write to the sink.
Alias: `tn`
#### validate
The `tcld account audit-log pubsub validate` command verifies Temporal Cloud can write to a Pub/Sub sink.
Alias: `v`
##### --service-account-email
The service account email to impersonate to write to the sink.
Alias: `sae`
##### --sink-name
Provide a name for the sink.
##### --topic-name
The topic name to write to the sink.
Alias: `tn`
## get
The `tcld account get` command gets information about the Temporal Cloud account you are logged into.
Alias: `g`
`tcld account get`
The command has no modifiers.
## list-regions
The `tcld account list-regions` lists all regions where the account can provision namespaces.
Alias: `l`
## metrics
The `tcld account metrics` commands configure the metrics endpoint for the Temporal Cloud account that is currently logged in.
Alias: `m`
- [tcld account metrics enable](#enable)
- [tcld account metrics disable](#disable)
- [tcld account metrics accepted-client-ca](#accepted-client-ca)
### accepted-client-ca
The `tcld account metrics accepted-client-ca` commands manage the end-entity certificates for the metrics endpoint of the Temporal Cloud account that is currently logged in.
:::info
The end-entity certificates for the metrics endpoint must chain up to the CA certificate used for the account. For more information, see [Certificate requirements](/cloud/certificates#certificate-requirements).
:::
Alias: `ca`
- [tcld account metrics accepted-client-ca add](#add)
- [tcld account metrics accepted-client-ca list](#list)
- [tcld account metrics accepted-client-ca set](#set)
- [tcld account metrics accepted-client-ca remove](#remove)
#### add
The `tcld account metrics accepted-client-ca add` command adds end-entity certificates to the metrics endpoint of a Temporal Cloud account.
:::info
The end-entity certificates for the metrics endpoint must chain up to the CA certificate used for the account. For more information, see [Certificate requirements](/cloud/certificates#certificate-requirements).
:::
`tcld account metrics accepted-client-ca add --ca-certificate `
Alias: `a`
The following modifiers control the behavior of the command.
##### --request-id
Specify a request identifier to use for the asynchronous operation. If not specified, the server assigns a request identifier.
Alias: `-r`
**Example**
```bash
tcld account metrics accepted-client-ca add --request-id --ca-certificate
```
##### --resource-version
Specify a resource version (ETag) to update from. If not specified, the latest version is used.
Alias: `-v`
**Example**
```bash
tcld account metrics accepted-client-ca add --resource-version --ca-certificate
```
##### --ca-certificate
_Required modifier unless `--ca-certificate-file` is specified_
Specify a base64-encoded string of a CA certificate PEM file.
If both `--ca-certificate` and `--ca-certificate-file` are specified, only `--ca-certificate` is used.
Alias: `-c`
**Example**
```bash
tcld account metrics accepted-client-ca add --ca-certificate
```
##### --ca-certificate-file
_Required modifier unless `--ca-certificate` is specified_
Specify a path to a CA certificate PEM file.
If both `--ca-certificate` and `--ca-certificate-file` are specified, only `--ca-certificate` is used.
Alias: `-f`
**Example**
```bash
tcld account metrics accepted-client-ca add --ca-certificate-file
```
#### list
The `tcld account metrics accepted-client-ca list` command lists the end-entity certificates that are currently configured for the metrics endpoint of a Temporal Cloud account.
`tcld account metrics accepted-client-ca list`
Alias: `l`
The command has no modifiers.
#### remove
The `tcld account metrics accepted-client-ca remove` command removes end-entity certificates from the metrics endpoint of a Temporal Cloud account.
`tcld account metrics accepted-client-ca remove --ca-certificate `
Alias: `r`
The following modifiers control the behavior of the command.
##### --request-id
Specify a request identifier to use for the asynchronous operation. If not specified, the server assigns a request identifier.
Alias: `-r`
**Example**
```bash
tcld account metrics accepted-client-ca remove --request-id --ca-certificate
```
##### --resource-version
Specify a resource version (ETag) to update from. If not specified, the latest version is used.
Alias: `-v`
**Example**
```bash
tcld account metrics accepted-client-ca remove --resource-version --ca-certificate
```
##### --ca-certificate
_Required modifier unless `--ca-certificate-fingerprint` or `--ca-certificate-file` is specified_
Specify a base64-encoded string of a CA certificate PEM file.
If `--ca-certificate-fingerprint` is also specified, both `--ca-certificate` and `--ca-certificate-file` are ignored.
If `--ca-certificate-file` is also specified but `--ca-certificate-fingerprint` is not, only `--ca-certificate` is used.
Alias: `-c`
**Example**
```bash
tcld account metrics accepted-client-ca remove --ca-certificate
```
##### --ca-certificate-file
_Required modifier unless `--ca-certificate-fingerprint` or `--ca-certificate` is specified_
Specify a path to a CA certificate PEM file.
If `--ca-certificate-fingerprint` is also specified, both `--ca-certificate-file` and `--ca-certificate` are ignored.
If `--ca-certificate` is also specified but `--ca-certificate-fingerprint` is not, only `--ca-certificate` is used.
Alias: `-f`
**Example**
```bash
tcld account metrics accepted-client-ca remove --ca-certificate-file
```
##### --ca-certificate-fingerprint
_Required modifier unless `--ca-certificate` or `--ca-certificate-file` is specified_
Specify the fingerprint of a CA certificate.
If `--ca-certificate`, `--ca-certificate-file`, or both are also specified, they are ignored.
Alias: `--fp`
**Example**
```bash
tcld account metrics accepted-client-ca remove --ca-certificate-fingerprint
```
#### set
The `tcld account metrics accepted-client-ca set` command sets the end-entity certificates for the metrics endpoint of a Temporal Cloud account.
:::info
The end-entity certificates for the metrics endpoint must chain up to the CA certificate used for the account. For more information, see [Certificate requirements](/cloud/certificates#certificate-requirements).
:::
`tcld account metrics accepted-client-ca set --ca-certificate `
Alias: `s`
The following modifiers control the behavior of the command.
##### --request-id
Specify a request identifier to use for the asynchronous operation. If not specified, the server assigns a request identifier.
Alias: `-r`
**Example**
```bash
tcld account metrics accepted-client-ca set --request-id --ca-certificate
```
##### --resource-version
Specify a resource version (ETag) to update from. If not specified, the latest version is used.
Alias: `-v`
**Example**
```bash
tcld account metrics accepted-client-ca set --resource-version --ca-certificate
```
##### --ca-certificate
_Required modifier unless `--ca-certificate-file` is specified_
Specify a base64-encoded string of a CA certificate PEM file.
If both `--ca-certificate` and `--ca-certificate-file` are specified, only `--ca-certificate` is used.
Alias: `-c`
**Example**
```bash
tcld account metrics accepted-client-ca set --ca-certificate
```
##### --ca-certificate-file
_Required modifier unless `--ca-certificate` is specified_
Specify a path to a CA certificate PEM file.
If both `--ca-certificate` and `--ca-certificate-file` are specified, only `--ca-certificate` is used.
Alias: `-f`
**Example**
```bash
tcld account metrics accepted-client-ca set --ca-certificate-file
```
### enable
The `tcld account metrics enable` command enables the metrics endpoint for the Temporal Cloud account that is currently logged in.
:::info
The end-entity for the metrics endpoint _must_ be configured before the endpoint can be enabled. See the [tcld account metrics accepted-client-ca](#accepted-client-ca) commands.
:::
`tcld account metrics enable`
The command has no modifiers.
### disable
The `tcld account metrics disable` command disables the metrics endpoint for the Temporal Cloud account that is currently logged in.
`tcld account metrics disable`
The command has no modifiers.
---
## tcld apikey command reference
The `tcld apikey` commands manage API Keys in Temporal Cloud.
Alias: `ak`
- [tcld apikey create](#create)
- [tcld apikey get](#get)
- [tcld apikey list](#list)
- [tcld apikey delete](#delete)
- [tcld apikey disable](#disable)
- [tcld apikey enable](#enable)
## create
The `tcld apikey create` command creates an API Key in Temporal Cloud.
`tcld apikey create --name --description --duration --expiry --request-id `
The following options control the behavior of the command.
#### --name
_Required modifier_
Specify the display name of the API Key.
Alias: `-n`
**Example**
```bash
tcld apikey create --name
```
#### --description
Specify a description for the API Key.
Alias: `-desc`
**Example**
```bash
tcld apikey create --name --description "Your API Key"
```
#### --duration
Specify the duration from now when the API Key will expire.
This will be ignored if the expiry flag is set.
Example format: `24h` (default: 0s).
Alias: `-d`
**Example**
```bash
tcld apikey create --name --duration 24h
```
#### --expiry
Specify the absolute timestamp (RFC3339) when the API Key will expire.
Example: `2023-11-28T09:23:24-08:00`.
Alias: `-e`
**Example**
```bash
tcld apikey create --name --expiry '2023-11-28T09:23:24-08:00'
```
#### --request-id
Specify a request-id for the asynchronous operation.
If not set, the server will assign one.
Alias: `-r`
**Example**
```bash
tcld apikey create --name --request-id
```
## get
The `tcld apikey get` command retrieves the details of a specified API Key in Temporal Cloud.
`tcld apikey get --id `
The following option controls the behavior of the command.
#### --id
_Required modifier_
Specify the ID of the API Key to retrieve.
Alias: `-i`
**Example**
```bash
tcld apikey get --id
```
## list
The `tcld apikey list` command lists all API Keys in Temporal Cloud.
`tcld apikey list`
This command does not require any specific options.
Alias: `l`
**Example**
```bash
tcld apikey list
```
## delete
The `tcld apikey delete` command deletes an API Key in Temporal Cloud.
`tcld apikey delete --id [--resource-version ] [--request-id ]`
The following options control the behavior of the command.
#### --id
_Required modifier_
Specify the ID of the API Key to delete.
Alias: `-i`
**Example**
```bash
tcld apikey delete --id
```
#### --resource-version
Specify the resource-version (etag) to update from.
If not set, the CLI will use the latest.
Alias: `-v`
**Example**
```bash
tcld apikey delete --id --resource-version
```
#### --request-id
Specify a request-id for the asynchronous operation.
If not set, the server will assign one.
Alias: `-r`
**Example**
```bash
tcld apikey delete --id --request-id
```
## disable
The `tcld apikey disable` command disables an API Key in Temporal Cloud.
`tcld apikey disable --id [--resource-version ] [--request-id ]`
The following options control the behavior of the command.
#### --id
_Required modifier_
Specify the ID of the API Key to disable.
Alias: `-i`
**Example**
```bash
tcld apikey disable --id
```
#### --resource-version
Specify the resource-version (etag) to update from. If not set, the CLI will use the latest.
Alias: `-v`
**Example**
```bash
tcld apikey disable --id --resource-version
```
#### --request-id
Specify a request-id for the asynchronous operation. If not set, the server will assign one.
Alias: `-r`
**Example**
```bash
tcld apikey disable --id --request-id
```
## enable
The `tcld apikey enable` command enables a disabled API Key in Temporal Cloud.
`tcld apikey enable --id [--resource-version ] [--request-id ]`
The following options control the behavior of the command.
#### --id
_Required modifier_
Specify the ID of the API Key to enable.
Alias: `-i`
**Example**
```bash
tcld apikey enable --id
```
#### --resource-version
Specify the resource-version (etag) to update from.
If not set, the CLI will use the latest.
Alias: `-v`
**Example**
```bash
tcld apikey enable --id --resource-version
```
#### --request-id
Specify a request-id for the asynchronous operation.
If not set, the server will assign one.
Alias: `-r`
**Example**
```bash
tcld apikey enable --id --request-id
```
---
## tcld connectivity-rule command reference
The `tcld connectivity-rule` commands manage [connectivity rules](/cloud/connectivity#connectivity-rules) in Temporal Cloud.
Alias: `cr`
- [tcld connectivity-rule create](#create)
- [tcld connectivity-rule delete](#delete)
- [tcld connectivity-rule get](#get)
- [tcld connectivity-rule list](#list)
## create
The `tcld connectivity-rule create` command creates a connectivity rule.
Alias: `c`
#### --connection-id
The connection ID of the private connection.
Alias: `ci`
#### --connectivity-type
The type of connectivity, currently only support 'private' and 'public'.
Alias: `ct`
#### --gcp-project-id
The GCP project ID of the connection, required if the cloud provider is 'gcp'.
Alias: `gpi`
#### --region
The region of the connection.
Alias: `r`
## delete
The `tcld connectivity-rule delete` command deletes a connectivity rule.
Alias: `d`
#### --connectivity-rule-id
The connectivity rule ID.
Alias: `id`
## get
The `tcld connectivity-rule get` command gets a connectivity rule.
Alias: `g`
#### --connectivity-rule-id
The connectivity rule ID.
Alias: `id`
## list
The `tcld connectivity-rule list` command lists connectivity rules.
Alias: `l`
#### --namespace
The namespace hosted on temporal cloud.
Alias: `n`
---
## tcld feature command reference
The `tcld feature` commands manage features in Temporal Cloud.
Alias: `f`
- [tcld feature get](#get)
- [tcld feature toggle](#toggle)
## get
The `tcld feature get` command gets information about the Temporal Cloud features you've enabled.
Alias: `g`
`tcld feature get`
The command has no modifiers.
**Example**
`tcld feature get`
The following is an example output:
```json
[
{
"Name": "enable-apikey",
"Value": true
}
]
```
## toggle
The `tcld feature toggle-*` command turns on or off the `*` feature in Temporal Cloud.
:::note
The `*` symbol represents the name of the feature.
Replace `*` with the name of the available feature to toggle.
:::
Alias: `tak`
`tcld feature toggle-*`
The command has no modifiers.
**Example**
`tcld feature toggle-apikey`
The following is an example output:
```json
Feature flag enable-apikey is now true
```
:::note
The feature `apikey` is an example.
Update the feature name to toggle a different feature.
:::
---
## tcld generate-certificates command reference
The `tcld generate-certificates` commands generate certificate authority (CA) and end-entity TLS certificates for Temporal Cloud.
Alias: `gen`
- [tcld generate-certificates certificate-authority-certificate](#certificate-authority-certificate)
- [tcld generate-certificates end-entity-certificate](#end-entity-certificate)
## tcld generate-certificates certificate-authority-certificate {#certificate-authority-certificate}
The `tcld generate-certificates certificate-authority-certificate` command generates certificate authority (CA) certificates for Temporal Cloud.
`tcld generate-certificates certificate-authority-certificate `
Alias: `ca`
The following modifiers control the behavior of the command.
#### --organization
Specify an organization name for certificate generation.
Alias: `--org`
**Example**
```bash
tcld generate-certificates certificate-authority-certificate --organization
```
#### --validity-period
Specify the duration for which the certificate is valid.
Format values as d/h (for example, `30d10h` for a certificate lasting 30 days and 10 hours).
Alias: `-d`
**Example**
```bash
tcld generate-certificates certificate-authority-certificate --validity-period
```
#### --ca-certificate-file
Specify a path to a `.pem` file where the generated X.509 certificate file will be stored.
Alias: `--ca-cert`
**Example**
```bash
tcld generate-certificates certificate-authority-certificate --ca-certificate-file
```
#### --ca-key-file
Specify a path to a `.key` file where the certificate's private key will be stored.
Alias: `--ca-key`
**Example**
```bash
tcld generate-certificates certificate-authority-certificate --ca-key-file
```
#### --rsa-algorithm
When enabled, a 4096-bit RSA key pair is generated for the certificate instead of an ECDSA P-384 key pair.
Because an ECDSA P-384 key pair is the recommended default, this option is disabled.
Alias: `--rsa`
**Example**
```bash
tcld generate-certificates certificate-authority-certificate --rsa-algorithm
```
## tcld generate-certificates end-entity-certificate {#end-entity-certificate}
The `tcld generate-certificates end-entity-certificate` command generates end-entity (leaf) certificates for Temporal Cloud.
`tcld generate-certificates end-entity-certificate `
Alias: `leaf`
The following modifiers control the behavior of the command.
#### --organization
Specify an organization name for certificate generation.
Alias: `--org`
**Example**
```bash
tcld generate-certificates end-entity-certificate --organization
```
#### --organization-unit
Optional: Specify the name of the organization unit.
**Example**
```bash
tcld generate-certificates end-entity-certificate --organization-unit
```
#### --validity-period
Specify the duration for which the certificate is valid.
Format values as d/h (for example, `30d10h` for a certificate lasting 30 days and 10 hours).
Alias: `-d`
**Example**
```bash
tcld generate-certificates end-entity-certificate --validity-period
```
#### --ca-certificate-file
Specify the path of the X.509 CA certificate in a `.pem` file for the certificate authority.
Alias: `--ca-cert`
**Example**
```bash
tcld generate-certificates end-entity-certificate --ca-certificate-file
```
#### --ca-key-file
Specify the path of the private key in a `.key` file for the certificate authority.
Alias: `--ca-key`
**Example**
```bash
tcld generate-certificates end-entity-certificate --ca-key-file
```
#### --certificate-file
Specify a path to a `.pem` file where the generated X.509 leaf certificate file will be stored.
Alias: `--cert`
**Example**
```bash
tcld generate-certificates end-entity-certificate --certificate-file
```
#### --key-file
Specify a path to a `.key` file where the leaf certificate's private key will be stored.
Alias: `--key`
**Example**
```bash
tcld generate-certificates end-entity-certificate --key-file
```
---
## tcld command reference
The Temporal Cloud CLI (tcld) is a command-line tool that you can use to interact with Temporal Cloud.
- [How to install tcld](#install-tcld)
### tcld commands
- [tcld account](/cloud/tcld/account)
- [tcld apikey](/cloud/tcld/apikey)
- [tcld connectivity-rule](/cloud/tcld/connectivity-rule)
- [tcld feature](/cloud/tcld/feature)
- [tcld generate-certificates](/cloud/tcld/generate-certificates)
- [tcld login](/cloud/tcld/login)
- [tcld logout](/cloud/tcld/logout/)
- [tcld namespace](/cloud/tcld/namespace)
- [tcld nexus](/cloud/tcld/nexus)
- [tcld request](/cloud/tcld/request)
- [tcld user](/cloud/tcld/user)
- [tcld version](/cloud/tcld/version/)
### Global modifiers
#### --auto_confirm
Automatically confirm all prompts.
You can specify the value for this modifier by setting the AUTO_CONFIRM environment variable.
The default value is `false`.
## How to install tcld {#install-tcld}
You can install [tcld](/cloud/tcld) in two ways.
### Install tcld by using Homebrew
```bash
brew install temporalio/brew/tcld
```
### Build tcld from source
1. Verify that you have Go 1.18 or later installed.
```bash
go version
```
If Go 1.18 or later is not installed, follow the [Download and install](https://go.dev/doc/install) instructions on the Go website.
1. Clone the tcld repository and run make.
```bash
git clone https://github.com/temporalio/tcld.git
cd tcld
make
```
1. Copy the tcld executable to any directory that appears in the PATH environment variable, such as `/usr/local/bin`.
```bash
cp tcld /usr/local/bin/tcld
```
1. Verify that tcld is installed.
```bash
tcld version
```
---
## tcld login command reference
The `tcld login` command logs in a user to Temporal Cloud.
Follow instructions in the browser to log in to your Temporal account.
Alias: `l`
`tcld login`
The command has no modifiers.
---
## tcld logout command reference
The `tcld logout` command logs a user out of Temporal Cloud.
Alias: `lo`
`tcld logout`
The following modifier controls the behavior of the command.
#### --disable-pop-up
Disables a browser pop-up if set to `true`. The default value is `false`.
---
## tcld namespace command reference
The `tcld namespace` commands enable [Namespace](/namespaces) operations in Temporal Cloud.
Alias: `n`
:::info Namespace ID Format
The `--namespace` flag accepts a **Namespace ID** in the format `.` (e.g., `your-namespace.a1b2c`). This is the full identifier shown in Temporal Cloud, not just the [Namespace Name](/cloud/namespaces#temporal-cloud-namespace-name). You can find your account suffix in the Temporal Cloud UI.
:::
- [tcld namespace add-region](#add-region)
- [tcld namespace create](#create)
- [tcld namespace delete](#delete)
- [tcld namespace failover](#failover)
- [tcld namespace get](#get)
- [tcld namespace list](#list)
- [tcld namespace export](#export)
- [tcld namespace accepted-client-ca](#accepted-client-ca)
- [tcld namespace certificate-filters](#certificate-filters)
- [tcld namespace search-attributes](#search-attributes)
- [tcld namespace retention](#retention)
- [tcld namespace update-codec-server](#update-codec-server)
- [tcld namespace update-high-availability](#update-high-availability)
- [tcld namespace tags](#tags)
- [tcld namespace set-connectivity-rules](#set-connectivity-rules)
## add-region
Use `tcld namespace add-region` to add a region to an existing Temporal Cloud [Namespace](/namespaces), upgrading it to support [High Availability](/cloud/high-availability).
See [Regions](/cloud/regions) for available regions and their supported replication options.
The following modifiers control the behavior of the command.
#### --request-id
The request identifier to use for the asynchronous operation. If not set, the server assigns an identifier.
Alias: `-r`
#### --namespace
**Required.** Specify a Namespace hosted on Temporal Cloud. If not specified, the value of the environment variable `$TEMPORAL_CLOUD_NAMESPACE` is used.
Alias: `-n`
#### --region
**Required.** The region to add to the existing Namespace. See [Regions](/cloud/regions) for a list of supported regions.
:::tip Choosing Replica Regions
See [Regions](/cloud/regions) for available regions and their supported replication options. See [High Availability](/cloud/high-availability) to learn how replication and failover work.
:::
Alias: `--re`
**Example**
```bash
tcld namespace add-region \
--namespace \
--region
```
Specify the region name (for example, `us-east-1`) of the region where you want to create the replica as an argument to the `--region` flag.
See [High Availability](/cloud/high-availability) for details on same-region, multi-region, and multi-cloud replication options.
Temporal Cloud sends an email alert once your Namespace is ready for use.
#### --cloud-provider
The cloud provider of the region. One of [`aws`, `gcp`].
Default: `aws`
## create
The `tcld namespace create` command creates a Temporal [Namespace](/namespaces) in Temporal Cloud.
Alias: `c`
The following modifiers control the behavior of the command.
#### --namespace
**Required.** The name for the new Namespace. This becomes part of the Namespace ID (`.`).
Alias: `-n`
#### --region
**Required.** The cloud provider region to create the Namespace in. Supply one `--region` for a standard Namespace, or two for a Namespace with [High Availability](/cloud/high-availability).
See [Regions](/cloud/regions) for available regions and their supported replication options.
Alias: `--re`
#### --auth-method
The authentication method for the Namespace. One of [`mtls`, `api_key`].
- `mtls` (default): Requires `--ca-certificate` or `--ca-certificate-file`
- `api_key`: No other modifiers
**Example**
```bash
tcld namespace create \
--namespace test-namespace.a1b2c \
--region us-east-1 \
--auth-method api_key
```
#### --ca-certificate
A base64-encoded [CA certificate](/cloud/certificates). If both `--ca-certificate` and `--ca-certificate-file` are specified, only `--ca-certificate` is used.
Alias: `-c`
#### --ca-certificate-file
A path to a [CA certificate](/cloud/certificates) PEM file. If both options are specified, only `--ca-certificate` is used.
Alias: `--cf`
#### --certificate-filter-file
Path to a JSON file that defines the [certificate filters](/cloud/certificates#manage-certificate-filters) to be applied to the Namespace.
Sample JSON: `{ "filters": [ { "commonName": "test1" } ] }`
If both `--certificate-filter-file` and `--certificate-filter-input` are specified, the command returns an error.
Alias: `--cff`
#### --certificate-filter-input
A JSON string that defines the [certificate filters](/cloud/certificates#manage-certificate-filters) to be applied to the Namespace.
Sample JSON: `{ "filters": [ { "commonName": "test1" } ] }`
If both `--certificate-filter-input` and `--certificate-filter-file` are specified, the command returns an error.
Alias: `--cfi`
#### --cloud-provider
The cloud provider of the region. One of [`aws`, `gcp`].
Default: `aws`
Alias: `--cp`
#### --connectivity-rule-ids
A list of [connectivity rule](/cloud/connectivity#connectivity-rules) IDs to apply to the Namespace. Can be specified more than once.
Alias: `--ids`
**Example**
```bash
tcld namespace create \
--namespace test-namespace.a1b2c \
--region us-east-1 \
--auth-method api_key \
--connectivity-rule-ids \
--connectivity-rule-ids
```
#### --enable-delete-protection
Enable [delete protection](/cloud/namespaces#delete-protection) on the Namespace.
Default: `false`
Alias: `--edp`
#### --endpoint
The [codec server](/production-deployment/data-encryption) endpoint to decode payloads for all users interacting with this Namespace. Must be HTTPS.
Alias: `-e`
#### --include-credentials
Include cross-origin credentials when calling the [codec server](/production-deployment/data-encryption).
Default: `false`
Alias: `--ic`
#### --pass-access-token
Pass the user access token to the [codec server](/production-deployment/data-encryption) endpoint.
Default: `false`
Alias: `--pat`
#### --request-id
The request identifier to use for the asynchronous operation. If not set, the server assigns an identifier.
Alias: `-r`
#### --retention-days
The [retention period](/temporal-service/temporal-server#retention-period) in days for closed Workflow Executions.
Default: `30`
Alias: `--rd`
#### --search-attribute
A custom [Search Attribute](/search-attribute) in the form '_name_=_type_'. Can be specified more than once.
Valid values for _type_: `Bool` | `Datetime` | `Double` | `Int` | `Keyword` | `Text`
Alias: `--sa`
**Example**
```bash
tcld namespace create \
--namespace test-namespace.a1b2c \
--region us-east-1 \
--auth-method api_key \
--search-attribute "customer_id=Int" \
--search-attribute "customer_name=Text"
```
#### --tag
A [tag](/cloud/namespaces#tag-a-namespace) in the form "_key_=_value_". Can be specified more than once.
See [Tag structure and limits](/cloud/namespaces#tag-structure-and-limits).
Alias: `--t`
**Example**
```bash
tcld namespace create \
--namespace test-namespace.a1b2c \
--region us-east-1 \
--auth-method api_key \
--tag "key=value" \
--tag "key2=value2"
```
#### --user-namespace-permission
A [Namespace-level permission](/cloud/manage-access/roles-and-permissions#namespace-level-permissions) for a user in the form '_email_=_permission_'. Can be specified more than once.
Valid values for _permission_: `Admin` | `Write` | `Read`
Alias: `-p`
**Example**
```bash
tcld namespace create \
--namespace test-namespace.a1b2c \
--region us-east-1 \
--auth-method api_key \
--user-namespace-permission "user@example.com=Admin" \
--user-namespace-permission "user2@example.com=Write"
```
## delete
The `tcld namespace delete` command deletes the specified [Namespace](/namespaces) in Temporal Cloud.
Alias: `d`
`tcld namespace delete`
The following modifiers control the behavior of the command.
#### --namespace
**Required.** Specify the Namespace hosted on Temporal Cloud to be deleted.
Alias: `-n`
#### --request-id
The request identifier to use for the asynchronous operation. If not set, the server assigns an identifier.
Alias: `-r`
#### --resource-version
A resource version (ETag) to update from. If not set, the CLI uses the latest.
Alias: `-v`
**Example**
```bash
tcld namespace delete \
--namespace
```
## delete-region
Use `tcld namespace delete-region` to remove a for an existing Temporal Cloud
[Namespace](/namespaces). Removing a replica disables [High Availability features](/cloud/high-availability) and results
in a mandatory 7-day waiting period before you can re-enable High Availability features in the same location. Refer to
[Enable High Availability](/cloud/high-availability/enable) for more information.
The following modifiers control the behavior of the command.
#### --request-id
The request identifier to use for the asynchronous operation. If not set, the server assigns an identifier.
Alias: `-r`
#### --namespace
**Required.** Specify a Namespace hosted on Temporal Cloud. If not specified, the value of the environment variable `$TEMPORAL_CLOUD_NAMESPACE` is used.
Alias: `-n`
#### --region
**Required.** The region to remove from the Namespace. Specify the region name, for example `us-east-1`. Upon removal, Temporal stops replication and the Namespace becomes a Standard Namespace. You cannot re-add a region or add a new region for seven days after removing a Namespace region.
Alias: `--re`
**Example**
```bash
tcld namespace delete-region \
--namespace \
--region
```
When using API key authentication, add your API credentials before pressing Enter:
```bash
tcld --api-key \
delete-region \
--namespace \
--region
```
#### --cloud-provider
The cloud provider of the region to failover to. One of [aws, gcp].
Default: aws (default: "aws")
## failover
Failover a Temporal Namespace with [High Availability features](/cloud/high-availability). A failover switches a
Namespace region from a primary Namespace to its replica.
**Example**
```bash
tcld namespace failover \
--namespace \
--region
```
When using API key authentication, add your API credentials before pressing Enter:
```bash
tcld --api-key \
namespace failover \
--namespace \
--region
```
#### --request-id
Specify a request identifier to use for the asynchronous operation. If not specified, the server assigns a request
identifier.
Alias: `-r`
#### --namespace
**Required.** Specify a Namespace hosted on Temporal Cloud. If not specified, the value of the environment variable `$TEMPORAL_CLOUD_NAMESPACE` is used.
Alias: `-n`
#### --region
**Required.** The region to fail over _to_. Specify the region name, for example `us-east-1`.
See [Regions](/cloud/regions) for a list of supported regions.
Alias: `--re`
**Example**
```bash
tcld namespace failover \
--namespace \
--region
```
#### --ca-certificate
_Required modifier unless `--ca-certificate-file` is specified_.
A base64-encoded CA certificate.
If both `--ca-certificate` and `--ca-certificate-file` are specified, only `--ca-certificate` is used.
Alias: `-c`
#### --cloud-provider
The cloud provider of the region to failover to. One of [aws, gcp].
Default: aws (default: "aws")
## get
The `tcld namespace get` command gets information about the specified [Namespace](/namespaces) in Temporal Cloud.
Alias: `g`
`tcld namespace get`
The following modifier controls the behavior of the command.
#### --namespace
Specify a Namespace hosted on Temporal Cloud. If not specified, the value of the environment variable
$TEMPORAL_CLOUD_NAMESPACE is used.
Alias: `-n`
**Example**
```bash
tcld namespace get \
--namespace
```
## list
The `tcld namespace list` command lists all [Namespaces](/namespaces) in Temporal Cloud.
Alias: `l`
`tcld namespace list`
The command has no modifiers.
## export
The `tcld namespace export s3` commands manage Workflow History Exports.
Valid options: `s3`
Alias: `es`
- [tcld namespace export s3 create](#create)
- [tcld namespace export s3 get](#get)
- [tcld namespace export s3 delete](#delete)
- [tcld namespace export s3 list](#list)
- [tcld namespace export s3 update](#update)
- [tcld namespace export s3 validate](#validate)
### create
The `tcld namespace export s3 create` command allows users to create an export sink for the Namespace of a Temporal
Cloud account.
**Example**
```bash
tcld namespace export s3 create \
--namespace \
--sink-name \
--s3-bucket-name \
--role-arn
```
The following modifiers control the behavior of the command.
#### --namespace
Specify a Namespace hosted on Temporal Cloud. If not specified, the value of the environment variable
$TEMPORAL_CLOUD_NAMESPACE is used.
Alias: `-n`
#### --sink-name
Provide a name for the export sink.
_Required modifier_
#### --role-arn
Provide role arn for the IAM Role.
_Required modifier_
#### --s3-bucket-name
Provide the name of an AWS S3 bucket that Temporal will send closed workflow histories to.
_Required modifier_
#### --request-id
Specify a request identifier to use for the asynchronous operation. If not specified, the server assigns a request
identifier.
Alias: `-r`
#### --kms-arn
Provide the ARN of the KMS key to use for encryption. Note: If the KMS ARN needs to be added or updated, users should
create the IAM Role with KMS or modify the created IAM Role accordingly. Providing it as part of the input won't help.
### get
The `tcld namespace export s3 get` command allows users to retrieve details about an existing export sink from the
Namespace of a Temporal Cloud account.
**Example**
```bash
tcld namespace export s3 get \
--namespace \
--sink-name
```
The following modifiers control the behavior of the command.
#### --namespace
Specify a Namespace hosted on Temporal Cloud. If not specified, the value of the environment variable
$TEMPORAL_CLOUD_NAMESPACE is used.
Alias: `-n`
#### --sink-name
Provide the name of the export sink you wish to retrieve details for.
_Required modifier_
### delete
The `tcld namespace export s3 delete` command allows users to delete an existing export sink from the Namespace of a
Temporal Cloud account.
**Example**
```bash
tcld namespace export s3 delete \
--namespace \
--sink-name
```
The following modifiers control the behavior of the command.
#### --namespace
Specify a Namespace hosted on Temporal Cloud. If not specified, the value of the environment variable
$TEMPORAL_CLOUD_NAMESPACE is used.
Alias: `-n`
#### --sink-name
Provide the name of the export sink you wish to delete.
_Required modifier_
#### --resource-version
Specify a resource version (ETag) to delete from. If not specified, the CLI will use the latest version.
Alias: `-v`
#### --request-id
Specify a request identifier to use for the asynchronous operation. If not specified, the server assigns a request
identifier.
Alias: `-r`
### list
The `tcld namespace export s3 list` command allows users to list all existing export sinks within the Namespace of a
Temporal Cloud account.
**Example**
```bash
tcld namespace export s3 list \
--namespace
```
The following modifiers control the behavior of the command.
#### --namespace
Specify a Namespace hosted on Temporal Cloud. If not specified, the value of the environment variable
$TEMPORAL_CLOUD_NAMESPACE is used.
Alias: `-n`
#### --page-size
Determine the number of results to return per page for list operations. If not specified, the default value is 100.
#### --page-token
Provide the page token to continue listing results from where the previous list operation left off.
### update
The `tcld namespace export s3 update` command allows users to modify the details of an existing export sink within the
Namespace of a Temporal Cloud account.
**Example**
```bash
tcld namespace export s3 update \
--namespace \
--sink-name \
--enabled true
```
The following modifiers control the behavior of the command.
#### --namespace
Specify a Namespace hosted on Temporal Cloud. If not specified, the value of the environment variable
$TEMPORAL_CLOUD_NAMESPACE is used.
Alias: `-n`
#### --sink-name
Provide the name of the export sink you wish to update.
_Required modifier_
#### --enabled
Specify whether the export is enabled or not.
#### --role-arn
Update the role ARN for the IAM Role.
#### --s3-bucket-name
Update the name of the AWS S3 bucket that Temporal will send closed workflow histories to.
#### --resource-version
Specify a resource version (ETag) to update from. If not specified, the CLI will use the latest version.
Alias: `-v`
#### --kms-arn
Update the ARN of the KMS key used for encryption. Note: If the KMS ARN needs to be added or updated, users should
create the IAM Role with KMS or modify the created IAM Role accordingly. Providing it as part of the input won't help.
#### --request-id
Specify a request identifier to use for the asynchronous operation. If not specified, the server assigns a request
identifier.
Alias: `-r`
### validate
The `tcld namespace export s3 validate` command allows users to validate an export sink from the Namespace of a Temporal
Cloud account.
**Example**
```bash
tcld namespace export s3 validate \
--namespace