Temporal Client - Typescript SDK
The Temporal Client, provided by the Temporal SDK, allows you to communicate with the Temporal Service. It acts as the bridge for communication between your applications and the Temporal Service.
The following page shows how to:
- Connect to a local development Temporal Service
- Connect to Temporal Cloud
- Start a Workflow Execution
Connect to development Temporal Service
How to connect to the local Temporal CLI development Temporal Service using the Typescript SDK
A Temporal Client facilitates communication with the Temporal Service, allowing you to perform a variety of actions, such as:
- Starting Workflow Executions.
- Sending Signals to Workflow Executions.
- Sending Queries to Workflow Executions.
- Getting the results of a Workflow Execution.
- Providing an Activity Task Token.
A Temporal Client cannot be initialized and used inside a Workflow. However, it is acceptable and common to use a Temporal Client inside an Activity to communicate with a Temporal Service.
Running a Temporal Service locally, like through the Temporal CLI, requires minimal connection configurations. Many of the SDKs automatically use the default local address and port (127.0.0.1:7233) that Temporalite and Docker Compose use.
import { Client } from '@temporalio/client';

async function run() {
  const client = new Client();

  // . . .

  await client.connection.close();
}

run().catch((err) => {
  console.error(err);
  process.exit(1);
});
To connect to the Temporal Service, you create a Connection. You then use this Connection when setting up the Client. You can pass the Connection instance when creating the Client.
If you omit the Connection and just create a new Client(), it will connect to localhost:7233.
Connect to Temporal Cloud
How to connect to Temporal Cloud using an API key
To use an API key with the Temporal TypeScript SDK, you will need to provide additional connection options:
- Your API Key value
- Your Namespace and Account id combination, which follows the format
<namespace_id>.<account_id>. - The endpoint may vary. The most common endpoint used is the gRPC regional endpoint, which follows the format:
<region>.<cloud_provider>.api.temporal.io:7233. - For Namespaces with High Availability features with API key authentication enabled, use the gRPC Namespace endpoint:
<namespace>.<account>.tmprl.cloud:7233. This allows automated failover without needing to switch endpoints.
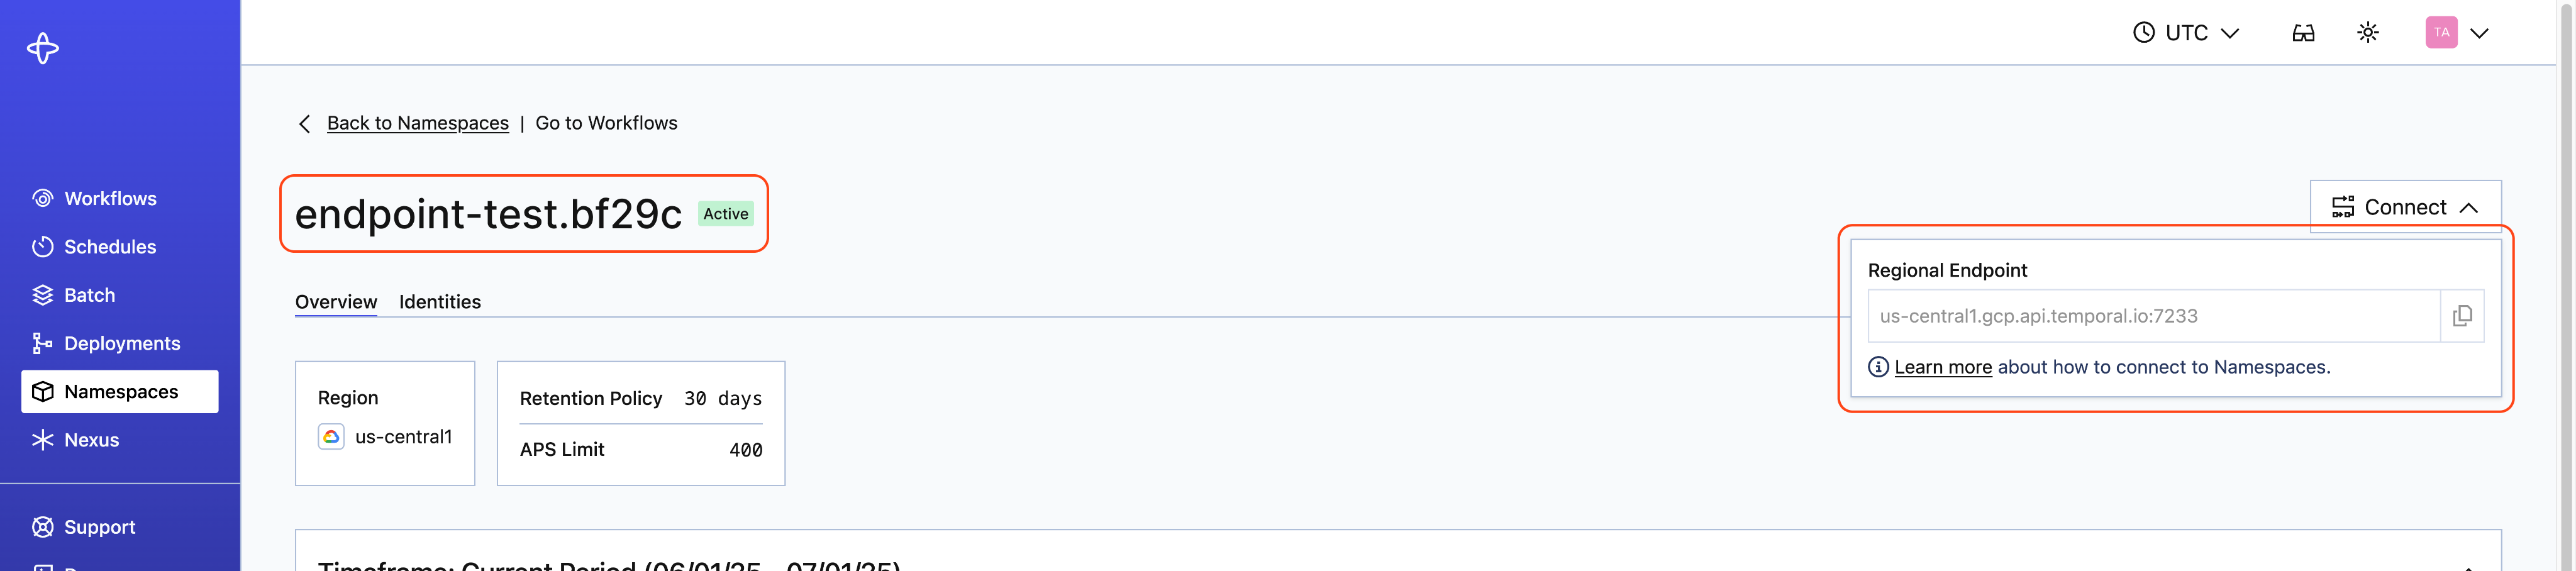
You can find the Namespace and Account ID, as well as the endpoint, on the Namespaces tab:
Now, when instantiating a Temporal connection in your Temporal TypeScript SDK code, provide the API key with the following connect code:
const connection = await Connection.connect({
    address: <endpoint>,
    tls: true,
    apiKey: <APIKey>,
});
const client = new Client({
    connection,
    namespace: <namespace_id>.<account_id>,
});
To create an initial Worker NativeConnection (for use with Worker):
const connection = await NativeConnection.connect({
    address: <endpoint>,
    tls: true,
    apiKey: <APIKey>,
});
const worker = await Worker.create({
    connection,
    namespace: <namespace_id>.<account_id>,
    // ...
});
To update the API key on an existing Connection or NativeConnection, use setApiKey:
connection.setApiKey(<APIKey>);
How to connect to Temporal Cloud using mTLS
When you connect to Temporal Cloud with mTLS, you need to provide additional connection and client options that include the following:
- The Temporal Cloud Namespace Id.
- The Namespace's gRPC endpoint. An endpoint listing is available at the Temporal Cloud Website on each Namespace detail page. The endpoint contains the Namespace Id and port.
- mTLS CA certificate.
- mTLS private key.
For more information about managing and generating client certificates for Temporal Cloud, see How to manage certificates in Temporal Cloud.
For more information about configuring TLS to secure inter- and intra-network communication for a Temporal Service, see Temporal Customization Samples.
Create a Connection with a connectionOptions object that has your Cloud namespace and client certificate.
import { Client, Connection } from '@temporalio/client';
import fs from 'fs-extra';

const { NODE_ENV = 'development' } = process.env;
const isDeployed = ['production', 'staging'].includes(NODE_ENV);

async function run() {
  const cert = await fs.readFile('./path-to/your.pem');
  const key = await fs.readFile('./path-to/your.key');

  let connectionOptions = {};
  if (isDeployed) {
    connectionOptions = {
      address: 'your-namespace.tmprl.cloud:7233',
      tls: {
        clientCertPair: {
          crt: cert,
          key,
        },
      },
    };

    const connection = await Connection.connect(connectionOptions);

    const client = new Client({
      connection,
      namespace: 'your-namespace',
    });

    // . . .

    await client.connection.close();
  }
}

run().catch((err) => {
  console.error(err);
  process.exit(1);
});
Start Workflow Execution
How to start a Workflow Execution using the Typescript SDK
Workflow Execution semantics rely on several parameters—that is, to start a Workflow Execution you must supply a Task Queue that will be used for the Tasks (one that a Worker is polling), the Workflow Type, language-specific contextual data, and Workflow Function parameters.
In the examples below, all Workflow Executions are started using a Temporal Client. To spawn Workflow Executions from within another Workflow Execution, use either the Child Workflow or External Workflow APIs.
See the Customize Workflow Type section to see how to customize the name of the Workflow Type.
A request to spawn a Workflow Execution causes the Temporal Service to create the first Event (WorkflowExecutionStarted) in the Workflow Execution Event History. The Temporal Service then creates the first Workflow Task, resulting in the first WorkflowTaskScheduled Event.
When you have a Client, you can schedule the start of a Workflow with client.workflow.start(), specifying workflowId, taskQueue, and args and returning a Workflow handle immediately after the Server acknowledges the receipt.
const handle = await client.workflow.start(example, {
  workflowId: 'your-workflow-id',
  taskQueue: 'your-task-queue',
  args: ['argument01', 'argument02', 'argument03'], // this is typechecked against workflowFn's args
});
const handle = client.getHandle(workflowId);
const result = await handle.result();
Calling client.workflow.start() and client.workflow.execute() send a command to Temporal Server to schedule a new Workflow Execution on the specified Task Queue. It does not actually start until a Worker that has a matching Workflow Type, polling that Task Queue, picks it up.
You can test this by executing a Client command without a matching Worker. Temporal Server records the command in Event History, but does not make progress with the Workflow Execution until a Worker starts polling with a matching Task Queue and Workflow Definition.
Workflow Execution run in a separate V8 isolate context in order to provide a deterministic runtime.
Set a Workflow's Task Queue
In most SDKs, the only Workflow Option that must be set is the name of the Task Queue.
For any code to execute, a Worker Process must be running that contains a Worker Entity that is polling the same Task Queue name.
A Task Queue is a dynamic queue in Temporal polled by one or more Workers.
Workers bundle Workflow code and node modules using Webpack v5 and execute them inside V8 isolates. Activities are directly required and run by Workers in the Node.js environment.
Workers are flexible. You can host any or all of your Workflows and Activities on a Worker, and you can host multiple Workers on a single machine.
The Worker need three main things:
taskQueue: The Task Queue to poll. This is the only required argument.activities: Optional. Imported and supplied directly to the Worker.- Workflow bundle. Choose one of the following options:
- Specify
workflowsPathpointing to yourworkflows.tsfile to pass to Webpack; for example,require.resolve('./workflows'). Workflows are bundled with their dependencies. - If you prefer to handle the bundling yourself, pass a prebuilt bundle to
workflowBundle.
- Specify
import { Worker } from '@temporalio/worker';
import * as activities from './activities';

async function run() {
  // Step 1: Register Workflows and Activities with the Worker and connect to
  // the Temporal server.
  const worker = await Worker.create({
    workflowsPath: require.resolve('./workflows'),
    activities,
    taskQueue: 'hello-world',
  });
  // Worker connects to localhost by default and uses console.error for logging.
  // Customize the Worker by passing more options to create():
  // https://typescript.temporal.io/api/classes/worker.Worker
  // If you need to configure server connection parameters, see docs:
  // /typescript/security#encryption-in-transit-with-mtls

  // Step 2: Start accepting tasks on the `tutorial` queue
  await worker.run();
}

run().catch((err) => {
  console.error(err);
  process.exit(1);
});
taskQueue is the only required option; however, use workflowsPath and activities to register Workflows and Activities with the Worker.
When scheduling a Workflow, you must specify taskQueue.
import { Client, Connection } from '@temporalio/client';
// This is the code that is used to start a Workflow.
const connection = await Connection.create();
const client = new Client({ connection });
const result = await client.workflow.execute(yourWorkflow, {
  // required
  taskQueue: 'your-task-queue',
  // required
  workflowId: 'your-workflow-id',
});
When creating a Worker, you must pass the taskQueue option to the Worker.create() function.
const worker = await Worker.create({
  // imported elsewhere
  activities,
  taskQueue: 'your-task-queue',
});
Optionally, in Workflow code, when calling an Activity, you can specify the Task Queue by passing the taskQueue option to proxyActivities(), startChild(), or executeChild().
If you do not specify taskQueue, the TypeScript SDK places Activity and Child Workflow Tasks in the same Task Queue as the Workflow Task Queue.
Set a Workflow Id
Although it is not required, we recommend providing your own Workflow Idthat maps to a business process or business entity identifier, such as an order identifier or customer identifier.
Connect to a Client with client.workflow.start() and any arguments. Then specify your taskQueue and set your workflowId to a meaningful business identifier.
const handle = await client.workflow.start(example, {
  workflowId: 'yourWorkflowId',
  taskQueue: 'yourTaskQueue',
  args: ['your', 'arg', 'uments'],
});
This starts a new Client with the given Workflow Id, Task Queue name, and an argument.
Get the results of a Workflow Execution
If the call to start a Workflow Execution is successful, you will gain access to the Workflow Execution's Run Id.
The Workflow Id, Run Id, and Namespace may be used to uniquely identify a Workflow Execution in the system and get its result.
It's possible to both block progress on the result (synchronous execution) or get the result at some other point in time (asynchronous execution).
In the Temporal Platform, it's also acceptable to use Queries as the preferred method for accessing the state and results of Workflow Executions.
To return the results of a Workflow Execution:
return 'Completed ' + wf.workflowInfo().workflowId + ', Total Charged: '
  + totalCharged;
totalCharged is just a function declared in your code. For a full example, see subscription-workflow-project-template-typescript/src/workflows.ts.
A Workflow function may return a result. If it doesn’t (in which case the return type is Promise<void>), the result will be undefined.
If you started a Workflow with client.workflow.start(), you can choose to wait for the result anytime with handle.result().
const handle = client.getHandle(workflowId);
const result = await handle.result();
Using a Workflow Handle isn't necessary with client.workflow.execute().
Workflows that prematurely end will throw a WorkflowFailedError if you call result().
If you call result() on a Workflow that prematurely ended for some reason, it throws a WorkflowFailedError error that reflects the reason. For that reason, it is recommended to catch that error.
const handle = client.getHandle(workflowId);
try {
  const result = await handle.result();
} catch (err) {
  if (err instanceof WorkflowFailedError) {
    throw new Error('Temporal workflow failed: ' + workflowId, {
      cause: err,
    });
  } else {
    throw new Error('error from Temporal workflow ' + workflowId, {
      cause: err,
    });
  }
}